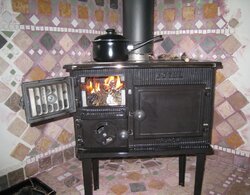
I've just obtained a Jøtul NR.404 Cookstove that I'm about to completely rebuild. I've never rebuild a stove before so I thought I'd start a thread here to gather any advise I might need.
When I took delivery of the stove it was clear many of the plates were mating quite poorly, plates were not meeting closely here and there as it would seem gaps had just been cemented without ever being pulled together, at first I was worried the plates might be warped, but having dismantled the stove I can see they're not.
What I am planning on doing is this.
Dismantle the entire stove.
Clean rust of every surface I find it.
Paint each exposed metal surface with stove paint (the exterior is enamelled so won't need this)
Reconstruct the stove sealing every joint with furnace cement.
Is this the right plan, or am I missing owt?
The fire bricks are cracked, should I replace these? If so they are curved bricks, is it going to matter if I can't source identical bricks? Could I use mouldable fire bricks moulded to the same shape? I notice that there is no fire brick at the back of the firebox, is this simply missing or correct for this stove, the flames are drawn out the front right of the firebox, so maybe it's not a very hot area.
The flue spigot is damaged, in that the eyes through which the bolts pass have sheared off, will it be okay to weld new eyes on to this, or would the welds fail under the heat load? If it can't be welded, does anyone know if the spigot on the 404 is the same as the one on say the 602, the part numbers are the same apart from two numbers added at the end, which I think refer to the colour of the enamel only, so a new spigot can be sourced.
The US manual for the 404 refers to a flue adapter, which changed the diameter from the 125mm of the spigot to the 6" of the stack pipe. US manuals for the 602 also refer to this adapter whereas European manuals for the 602 make no mention of an adapter and so I assume it is safe to use 5" pipe and skip the need for an adapter, any opinions on this? European manuals for the 404 are unavailable. It is a rare beast apparently.
Lastly does anyone know about the doors on these things, there seems no room for fire rope, but I assume they had some kind of gasket at some point, does anyone know what kind of gasket they used, or any suggestions to ensure a good seal when the door is closed?
Thank you for your help.