Non-Kent-related discussion of the Shelton study is continuing in this thread:
https://www.hearth.com/econtent/index.php/forums/viewthread/67756/
https://www.hearth.com/econtent/index.php/forums/viewthread/67756/
")
Truly. One wonders how they got away with it.madrone said:The double-circulating flow drawing is amusing. Magical.
It depends how you define "burn time". Some like to use a certain value of stovetop temperature. That really measures heat storage, not burn time. The two that make sense to me are a) the length of the flaming period of the burn cycle, or b) how long the stove can maintain sufficient live coals for a 'warm startup'. I prefer the latter. And clearly the Kents are exceptional at that. But most EPA stoves can be easily modded to do very well. It's all about air control.I'm assuming your burn times are shorter than those of us with EPA II stoves are used to.
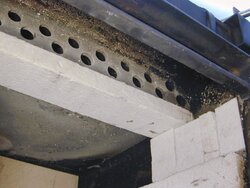
What I'm getting from this experiment is that most stoves are using multiple rows of secondary air as a way to meet emissions with reduced air intake? i.e. cleanest possible longer burns?
How do those first 20-30 minutes compare with the Quad? I'm guessing they're both dirtier on start up?
Some stoves are going in that direction. But the Kent doesn't fall in that category. The ceramic tiles aren't great heat storage.In light of the trend in Euro stoves, is it inevitable that we’ll be reinventing the masonry heater?
Smoke emissions from the chimney were definitely improved for the first, say, 3/4 of the flame cycle, and for a good chunk of it were totally opaque, as good as the best EPA stoves I’ve seen.
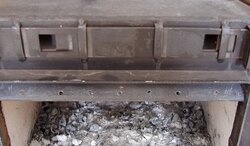
or can you suck out with a vacuum at the front where the holes are?