
Starting My Chimney Rebuild (pics)
- Thread starter Todd
- Start date
-
Active since 1995, Hearth.com is THE place on the internet for free information and advice about wood stoves, pellet stoves and other energy saving equipment.
We strive to provide opinions, articles, discussions and history related to Hearth Products and in a more general sense, energy issues.
We promote the EFFICIENT, RESPONSIBLE, CLEAN and SAFE use of all fuels, whether renewable or fossil.
You are using an out of date browser. It may not display this or other websites correctly.
You should upgrade or use an alternative browser.
You should upgrade or use an alternative browser.
- Status
- Not open for further replies.
woodchip
Minister of Fire
Todd said:Punched a hole in the bottom of the chimney to help remove the tile, he said it is easier than using the small cleanout inside and making a mess in the house.
Good idea, our flue is swept via a soot door on the outside of the chimney stack, sweeping is now a pleasure......... well, almost a pleasure ;-)
Looking really good so far, Todd...the way it should be done. Based on some extensive brickwork I've paid a mason to do in the past 4 years or so (various projects from small to large), I'd say it looks to me like you got yourself a talented mason there, who's doing it right. If I ever need to get another brick laid, I'm going right back to the guy I hired (4 times) in the past. A really good mason is an artist. I've tried to lay a few bricks before...built a little backyard fountain once. Ended up with more mortar on me than the bricks.  Rick
Rick
RickYeah, the mason seems to know his stuff. Wish I had the patients to do something like this. The new bricks on top won't be identical but they are close, hope it looks ok.
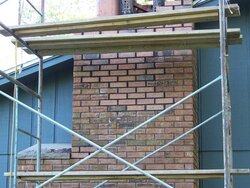
I'm a stone mason by trade, but do a lot of rebuilds just like this - it's the bread and butter of my business in some ways. This looks like a very well executed job. It's nice to see someone restoring a masonry chimney instead of tearing it down - properly built and protected they'll last for many years and they look great. Nice job!
Ha, I figure by the time I'm dead I might break even. :lol: Hanging around here too much makes the addiction worse.
Seriously, I'm chalking this one up as Fossil stated, home value, It had to be done someday.
Seriously, I'm chalking this one up as Fossil stated, home value, It had to be done someday.
leeave96
Minister of Fire
Todd,
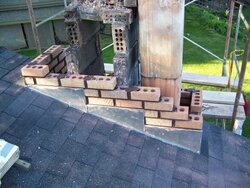
I see the square/rectangular clay tiles going up on one side of the chimney and a hollow brick frame beside it. Can you describe what that frame is? Is there only one flue coming out of that chimney? Are you venting your two stoves from the same chimney - but in the end there will be two flues coming out of it?
I like the idea of having a mason doing the chimney or at least in my case, a chimney sweep busting out the tiles in my old chimney and installing the new liner. I don't know how it works for others, but for me, there are some things that I just need to PAY to have someone else do.
Looking good!
Bill
leeave96 said:Todd,
I see the square/rectangular clay tiles going up on one side of the chimney and a hollow brick frame beside it. Can you describe what that frame is? Is there only one flue coming out of that chimney? Are you venting your two stoves from the same chimney - but in the end there will be two flues coming out of it?
I like the idea of having a mason doing the chimney or at least in my case, a chimney sweep busting out the tiles in my old chimney and installing the new liner. I don't know how it works for others, but for me, there are some things that I just need to PAY to have someone else do.
Looking good!
Bill
The hollow brick frame in the middle is the dummy flue or separating wall between the two flues. The flue you see on the right in the last picture is for the old fireplace on the main floor that I had modified for my first Keystone. The left side had the 6x10 tiles removed and will have the supaflue poured and goes down to the basement Keystone.
fossil said:Oh, well, c'mon...this project has a whole lot more to do with preserving the value of the home than it does with saving money burning wood. Rick
For sure. But me and Todd love picking on each other. Well, I love picking on Todd anyway because he is a great guy with a sense of humor. And never satisfied with his stove setup, kinda like me.
I am letting this place go to hell in a hand basket. Around fifty grand worth of stuff that needs to be done in my estimation. It started because we were going to be moving next year for the last twenty five years. I am slowly parting with it in pieces but the day you finally realize that you ain't ever gonna be selling it and they will carry you out the front door feet first you start delaying some of that stuff. Kinda thinking that the happy nieces all excited about the inheritance will have an "Oh chit!" moment when they go to sell it. :lol:
"But he said Better Homes and Gardens" wanted to do a feature on it!"
SnapCracklePop
Feeling the Heat
fossil said:A really good mason is an artist. I've tried to lay a few bricks before...built a little backyard fountain once. Ended up with more mortar on me than the bricks.
Then there's the backyard BBQ grill/fireplace built by yers truly while keeping cool by downing Coors Lights... The higher the courses went, the more Coors consumed, the more crooked the bricks were.
But, hey, that sucker worked. I incorporated an electric rotisserie unit into it. My mouth waters as I speak for the chickens and roasts I used to do on that thang.
Nancy
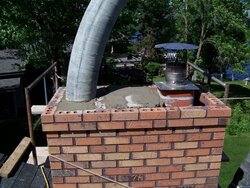
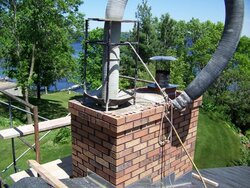
This morning they put down a 10" form and filled in the gaps with a mix of supaflue, concrete mix and left over brick pieces. Tomorrow they pull the 10" and pour the 6" supaflue. Then the following day it should be finished off with the new crown.
Attachments
fbelec
Minister of Fire
he did a nice job todd. can't wait to see how he does his crown. is that a rubber balloon to make the flue?
cmonSTART
Minister of Fire
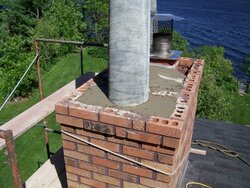
Took out the 10" and poured the 6" today. Also formed up the pipe in the crock and blocked off the cleanout. They will have to pull off that plate and clean up the crock and cleanout by hand tomorrow, it will be interesting to see what I have behind that plate.
Attachments
shawneyboy
Minister of Fire
- Status
- Not open for further replies.
Similar threads
- Replies
- 35
- Views
- 2K
- Replies
- 6
- Views
- 2K
- Replies
- 8
- Views
- 929
- Replies
- 3
- Views
- 885