new w/a few questions

  • Active since 1995, Hearth.com is THE place on the internet for free information and advice about wood stoves, pellet stoves and other energy saving equipment.

    We strive to provide opinions, articles, discussions and history related to Hearth Products and in a more general sense, energy issues.

    We promote the EFFICIENT, RESPONSIBLE, CLEAN and SAFE use of all fuels, whether renewable or fossil.
Status
Not open for further replies.

Tigg

Member
Dec 11, 2010
31
Mid, NC
Hi everyone,

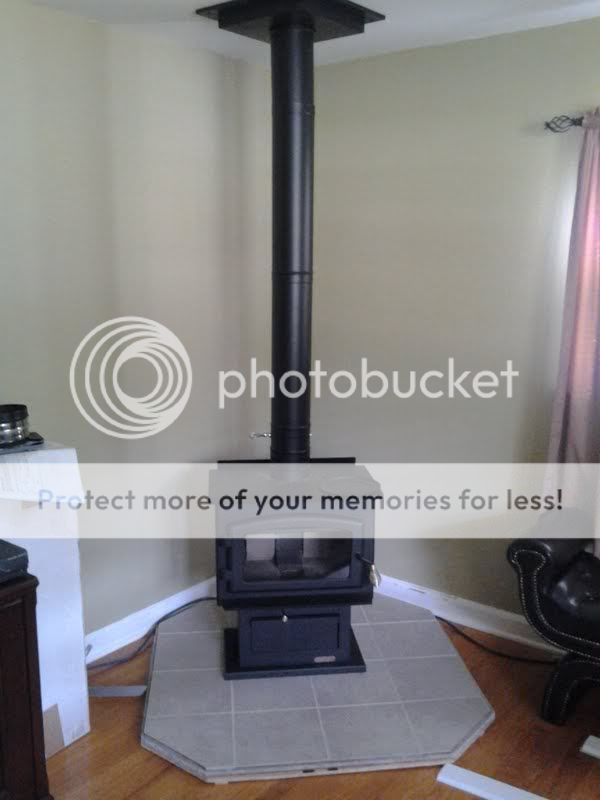
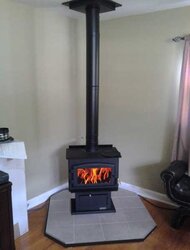
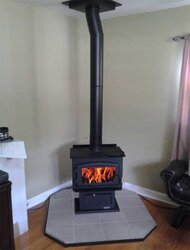
I have a question in regards to your hearth pads. In the installation guide as well as the advise of the city/town I am going 8" away from the sides and back and 18" off the front. I'm wondering what you guys have done with your pads when you kiddy corner them and cant get the exact measurements as provided by the maufacturer? I ask because I had to move the heater over 3.5" more (instead of the required 24") off of one wall because of a joist in my ceiling, so now I'm not squared up in the corner. This is messing with my plans for my hearth pad.
Have any of you guys/gals had this experience? If so what did you do to resolve this? Use the side further away to store some wood?
Sorry if I start to blab, I'm sure you can tell I'm a complete noobie. I'm kind of a perfectionist and this installation seems to be kicking my butt at the moment.

Thanks for any info, advise or critisism.
Its much appreciated.

Oh, the heater that is going to be installed is just a Drolet Savannah. Got a decent deal and for a first timer thought it was a good choice.
Thanks again %-P
 
When I bought my Keystone, the drawings Woodstock provided were good approximations, but not exact and I wanted the hearth to be as small as possible so as not to intrude on the room. The Keystone's clearances are 8 inches on the non-door sides and I think 16 inches at the door. So what I did was get the stove in hand and then took all kinds of measurements. I laid out the hearth on a CAD program. I then designed the hearth so the legs would fall centered on tiles.

Good luck,
Bill
 
The best bet may be to get a somewhat oversized hearth pad. It will afford more flexibility in stove placement and will provide extra protection and ash catching. We have a corner installation. I got an oversized pad to increase clearances for the Castine. This proved a good decision and made upgrading to the T6 an easier decision. As for the joist offset, we had to use a pair of 45s to get things lined up for the T6. It works pretty well.
 
Something that didn't occur to me until, actually, I'd taken a picture of my stove and hearth and posted it on the forum. Looked at it and thought, jeeze, I could have rounded off those corners and made the footprint a lot smaller. Chalked it up to too soon old, too late smart, but someone else might benefit from that--so throwing it out there.

One more thing: be patient with the process. You never know when serendipity will strike. I ended up having to completely relocate my stove on installation day, with about 20 minutes' notice to figure out a different spot--and after I did, and the stovepipe went in, I HATED it. It took me months to get around to building the hearth (which also had to be reconfigured), and when I did, and got the stove installed, I thought I was going to really dislike that location.

I love the location. It works out much better for us than the first place I picked out would have.

Frustrated as you may be with the forced change, I encourage you to roll with it, give it time, and see what happens. One day you might be sitting there looking at that 3-1/2" space, and realize it's the perfect place to build a marble hearth, or a rock wall. You may find that you now have a spot big enough for wood storage, as you said, or an ash bucket, hearth tools, or . . . ? Also, I think you'll really appreciate the efficiency that you'll get with that straight-shot-up stovepipe, and the ease of cleaning.

We get so heavily invested in how we think things are supposed to work out that when we try to make them work in the real world we think that it's wrong if we have to change the plan. Adaptation to a site and to the realities of an individual building and the ideosyncrasies of materials are what give a home character and richness, in part. Remember that the plan was made to serve in the real world--not the other way around. Things that look really strange and off and annoying at first can often turn into a situation that you look back on and think, "How lucky was that?" Give it time.

And congratulations on the new stove and installation. You're going to love this wood heat.
 
The stove would look a hell of a lot better if you had it evenly installed in the corner and used a set of 45 degree elbows as close to the ceiling as possible.
 
I agree with the last post, I would install it evenly in corner and use 45s to get around the joist problem. A straight pipe is better but overall the stove would look better if installed equal distance from both walls. Make sure you have the full required distance with the hearth on the sides and front. If you don't have a CAD program to lay out, a simple piece of graph paper and a ruler will work. You could also just cut a piece of cardboard the size of the stove and lay out right there in place on the floor.
 
Wood Heat Stoves said:
I agree with the last post, I would install it evenly in corner and use 45s to get around the joist problem. A straight pipe is better but overall the stove would look better if installed equal distance from both walls. Make sure you have the full required distance with the hearth on the sides and front. If you don't have a CAD program to lay out, a simple piece of graph paper and a ruler will work. You could also just cut a piece of cardboard the size of the stove and lay out right there in place on the floor.

+1. It does look best centered. And a cardboard template will allow you to play around with placement without moving a big stove.
 
any of you guys have a window by your stove in corner? how about window blinds i would do 45 but am worried about window coverings getting caught on fire.
 
The clearance to combustibles would include the window coverings. Maintain the specified distances and you will be fine.

pen
 
greythorn3 said:
any of you guys have a window by your stove in corner? how about window blinds i would do 45 but am worried about window coverings getting caught on fire.

I'll tell you if you put your shirt on!

We do stove installed by windows all the time. If there are blinds/curtains, we just measure the clearance to them and leave an extra inch or two for "flop". If there are no blinds/curtains, we'll take the clearance required and add 6" in case the customer decides to add them later. (we also take photos)
 
greythorn3 said:
any of you guys have a window by your stove in corner? how about window blinds i would do 45 but am worried about window coverings getting caught on fire.

I do . . . but it's a non issue. Blinds are always left up and it only has a topper for a curtain . . . plus as others have mentioned I made sure I met the clearances.
 
Thanks for all the info guys, I appreciate it very much.
While I agree it would look best centered, I really dont think it would look bad offset. I mean it is only 3" and the space that will be offset will be used for wood storage. Plus, having a straight flue is more appealing to the eye than one with 45s.
I still have a little time to figure out exactly what I'm going to do. I do like the idea of an oversized hearth though.
Thanks again fellas.
 
Can't store much wood in 3"...
 
Hah, been a while. And, a long project. Thankfully we had a warm winter, hah.

Yeah youre right, cant store much wood in a 3" space. But, I'll be making a wood storage case specifically for that area. Again, more appealing to the eye than open space.
 
I agree with the last post, I would install it evenly in corner and use 45s to get around the joist problem. A straight pipe is better but overall the stove would look better if installed equal distance from both walls. Make sure you have the full required distance with the hearth on the sides and front. If you don't have a CAD program to lay out, a simple piece of graph paper and a ruler will work. You could also just cut a piece of cardboard the size of the stove and lay out right there in place on the floor.
I agree too. But I wouldn't compromise my corner install even with centering and 45ing the chimney connector. I cut the joist and rafter out and ran my flue straight up. I know that takes a bit of engineering but I have no regrets.....it is centered in the corner and my flue and chimney pipe are a straight shot.....I don't like bends.:mad:
 
Well, this is the best picture I have so far. I need to finish the pad and screw the flue together but otherwise, this is how it sits. I will get a better shot of it further back so you can see its full setting in the room.

heater.jpg
 
Looks great to me!
 
If it has to be scooted to the side 3.5", why not just scoot forward 3.5" as well, and end up centered again?
 
I would go with the straight shot for easier cleaning of the pipe.
 
That's not an extreme offset. He could brush that pipe no prob. Soot eater would work too.
 
Ok, that isn't bad at all. I'd personally leave it as it is, with the straight pipe run, as I think the straight pipe looks better than the centered stove with the 45s. Geez, that is nothing. You'll grow so accustomed to it, you won't notice it in short time.
 
Thanks for the kind words fellas, I appreciate it.
Its going to stay, like said, its not that bad and wont notice it in short time.

Thanks again
 
Its official, I'm a burner, hah.
Sparked up the stove yesterday morning and have had it running ever since.
Man what an accomplishment. Honestly, I have been very nervous about this, that is the reason I have been putting it off for so long.
I cant believe how well it works. Our heat ussually kicks in at 68 and our temps float around from 68 to roughly 72/73. It was 81 last night, hah.
Granted I didnt sleep very well, loaded it up at roughly 2:30 and it was still burning at 6. I am amazed at how the heat is traveling throughout my whole house. Its great.
Now, I need to get onto that wood pile.
 
Status
Not open for further replies.