I Built My gasification boiler; Finally Done

  • Active since 1995, Hearth.com is THE place on the internet for free information and advice about wood stoves, pellet stoves and other energy saving equipment.

    We strive to provide opinions, articles, discussions and history related to Hearth Products and in a more general sense, energy issues.

    We promote the EFFICIENT, RESPONSIBLE, CLEAN and SAFE use of all fuels, whether renewable or fossil.
Status
Not open for further replies.

ozzie88

Member
May 13, 2011
199
maine
Took me 3 months,started with the top tank of a new yorker oil boiler with tubes,got some 1/4 and 5/16 plate steel and started welding.Made 1 1/2 inch. water jacket all around,lined with fire brick,made it with 3 stage flame path with Alumina board,3 air inlets for chambers all adujustable,Made a top heat exchanger to heat out side air before blowing into stove[more efficent] got couple propane tanks for storage used one for DHW and the boiler tank had a DHW coile in it also so I have alot of hot water now, cut a hole used 3/4 base board heat strips for heat exchanger[found in the dump] for water about 20 feet in tank welded top back on, all presserad tested at 100 lb. air. all 1 1/4 inch. pipe, I have out of pocket $800 in this, I look all over, dumpsters,old buildings,and traded for most of steel,only bought what I had too.Used 7018 and 6013 for most welding. Used my homemade wood splitter with a long pipe to lift into my front door,works good. I did alot of reserch on size and how to make the different flam path chambers and what materal to use. My house is not to big,2000 feet with basement heated, I decided to use outside air and heat it with flue gas just before it goes out chimmey so i put heat back in the boiler and dont burn any inside air. I welded 1 1/2 inch. pipe into the sides with caps so I can see into the different chambers and even made a slide to move the one panel when I start it cold for a while till gets going then I close it to start the burn. I have it all controled with a honeywell control and some temp. switches for over heat,and to keep the tanks even in temp. And also a electric 4inch vent switch to open and shut off the air when blower runs,with a ajustment on the blower to control air flow whitch also turns the one pump on when fire is on. Comes on at 140 off at 180, the over heat come on at 200 and off at 180 and the even out switch come on at 150 and off at 180, so far all works good.

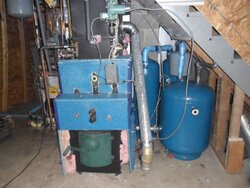
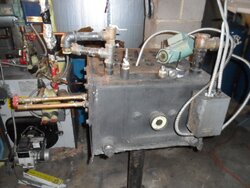
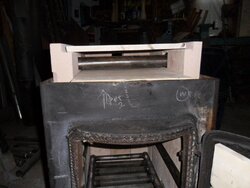
The first photo is the unit done the tanks are not insulted yet and you can see the backup oile boiler in the back. The second is the top tank with tubes I welded to the bottom boiler I made.
 

Attachments

  • SAM_0488.jpg
    SAM_0488.jpg
    118.6 KB · Views: 1,283
  • SAM_0482.jpg
    SAM_0482.jpg
    116.8 KB · Views: 1,274
Pretty slick. I especially like the idea of starting with a salvaged fire-tube heat exchanger, seems like that must have simplified things a lot.

--ewd
 
Nice job Ozzie88. More pictures please! Brian
 
Thanks for coments! I just ran it I started with well water [in maine cold] it was 43* it took 25 minutes 20 get secondary fire and wow! the second chamber got red hot was a blueish purpel coler, then took 2.7 hours to heat 160 gal. to 180* the only adustment I made was I did not have enough air to the very bottom chamber. The chimmey flue temp. just before it went into the masonary one is 300 to 380*. I thought I had a bunch of leaks when first started but they dried up after got hot,,was just condisation,wow was scary? I think all in all it will work ok.
Anybody have any questions i will try to answer best I can/ It may not be as pretty as ones you buy but I think it going to work very good I hope. And there was no smoke at all out chimmey.

The first photo is top tank again with bottom tank i made you can see the secondary chamber air inlet pipe, the second is log splitter with propane tank going into house.
 

Attachments

  • SAM_0483.jpg
    SAM_0483.jpg
    90.9 KB · Views: 1,049
  • SAM_0481.jpg
    SAM_0481.jpg
    216.7 KB · Views: 1,194
nice ! sounds like it's going to work great for you.
 
Thanks for comment,, Woodmaster,says your from NW ohio? I grew up in toledo,did alot hunting around swanton & sherwood
 
Hey Ozzie88, any chance you have some picture of the interior primary and secondary burn chambers? Where abouts in Maine are you? Brian
 
Hi, I live just north of Lincoln, The fire box bottom is 14 wide 19 long 18 tall,I have 2.5inch. by 14 wide opening from bottom chamber to upper then 4inch. hight in second chamber 16 long. I put a 2.5inch. baffel[choker] 1/3third way in second chamber to cause tubulence in air. I inject air in very bottom and top of first chamber then right in back of second,you can see the flam come from the 3 holes I put in it. all these I made ajustable to adjust air inlet. second chamber turns red hot.

The first photo is second chamber before I welded 6 more inch. on sides and pipe is just there to line up brick[would melt] I used Cordienit for baffels[can cut with masenary blade] next photo is bottom chamber.
I will take photo of fire next time I light it,maybe tonight?
 

Attachments

  • SAM_0451.jpg
    SAM_0451.jpg
    85.2 KB · Views: 888
  • SAM_0490.jpg
    SAM_0490.jpg
    116.8 KB · Views: 873
Photo of welding side water jacket on and one of the very top heat exchanger I added right before goes into chimmey to get last bit of heat out of gases.
 

Attachments

  • SAM_0459.jpg
    SAM_0459.jpg
    107.8 KB · Views: 841
  • SAM_0463.jpg
    SAM_0463.jpg
    95.2 KB · Views: 865
ozzie88 said:
Thanks for comment,, Woodmaster,says your from NW ohio? I grew up in toledo,did alot hunting around swanton & sherwood

I just live a few miles north of sherwood. White tail heaven around here. One of these years I hope to get a record Deer but everybody wishes for that.
 
Just an update for you guys. Aftr 4 trials with the air intake and different size nozzels I made I think I got it? I have gassificaTION AFTER 20 MINUTES from starting from a cold boiler, I can adust the bottom air the top of bottom chamber and the secondarys. It can change the flame from yellow to orange to purpel to blue,and it is HOT.
Can this be running to hot?? I dont know if there is a question of to hot but I have a 3/8 steel rod to open draft for starting cold fire onle and it is white hot and all the 2 1/2 inch fire brick are glowing red hot, is this going to be ok????
 
Wow! Congratulations. Great looking fabrication.

I am sure you already know this, but here is a temperature vs color chart for metal:
http://911research.wtc7.net/cache/wtc/analysis/fires/metcolor.htm
White hot steel is not going to perform well over the long haul.

Your obvious talent with the stinger leads me to believe you are familiar with steel to a greater extent than most of us, but here is a phase diagram for the changes in carbon steel at various high temperatures:
http://www.substech.com/dokuwiki/doku.php?id=iron-carbon_phase_diagram
This lets you know what is happening to your steel at various temperatures. Kind of a guide to heat treating. Some stress relief from start-up high temperatures is good, however, long periods of overly high temperature may lead to corrosion or failure of some parts.

Mic the parts you are worried about, run it for a season and mic them again. That may give you an idea how long things are going to last.
 
Status
Not open for further replies.