
Need some help guys, I am no good at this insulation deal and need to get some advice on insulating my attic. I can't just blow insulation up in my attic due to the wood floors and to take up the wood floors and redo the insulation would be one heck of a job with the hvac system up there, in this type of attic do people just put insulation between the rafters and call it a day? I was looking at insulation the rafters then putting that aluminum bubblewrap type of heat blocker behind the insulation, what do you guys think would be best?
Attic Insulation help
- Thread starter mellow
- Start date
-
Active since 1995, Hearth.com is THE place on the internet for free information and advice about wood stoves, pellet stoves and other energy saving equipment.
We strive to provide opinions, articles, discussions and history related to Hearth Products and in a more general sense, energy issues.
We promote the EFFICIENT, RESPONSIBLE, CLEAN and SAFE use of all fuels, whether renewable or fossil.
You are using an out of date browser. It may not display this or other websites correctly.
You should upgrade or use an alternative browser.
You should upgrade or use an alternative browser.
- Status
- Not open for further replies.
PJF1313
Member
I'm going to keep an eye on this thread. I'm in a similar situation on the main part of the house.
btuser
Minister of Fire
My first thought was spray foam. Due to the depth of your rafters you're going to have a hard time getting to R50+ with fiberglass batts. If the cost of the spray foam is too much you could perhaps get a contractor to blow HD cellulouse (it stays in place) in between the rafters and then cover with either the bubble wrap or ridgid foam board, but that gets expensive. Once you hit a certain R value there is a thermal break so you won't need to worry about venting the roof and/or remaining an air gap between the insulation and the decking. Its not the heat that causes the shingles to curl but the differential in temp from the inside vs outside. Without sprayfoam, this would be difficult. You can get the self-install kits but its cheaper to hire someone unless its a very small area.
How big is your attic space?
How big is your attic space?
shawneyboy
Minister of Fire
I think the key here is what kind of ventalation is in the attic space. The reason most times the rafters are NOT insulated but the floor is is to one keep the envelope as small as possible so that the heating and cooling space is smaller and two to ensure that the attic space has proper venting. If you have soffit and ridge vents, yes I see the window, in general, you do NOT want to insulate the rafters, you want to insulate the floor. I personally, always insulate the attic floor space, unless of course it is used as a living space.
Shawn
Shawn
btuser
Minister of Fire
If you can't do the floor then to insulate the rafters is the only choice. Can be done but its 2x the money.
midwestcoast
Minister of Fire
IMO the choice Btwn insulating the floor or roof (and gable-end walls) would depend on use of the space vs cost. Is it likely you'd want to make living space up there in future? Another plus for roof insul'n here would be bringing the HVAC inside the conditioned space. IF you do the roof I agree with btuser look at spray foam to get the R you need. Just running fiberglass batts Btwn the rafters looks easy n cheap, but will cost you forever in heat loss.
Retrofit insulating and airsealing the rafters is tricky to do right (if you screw it up, you rot your roof out with condensation). Not something you just want to try in a BS way. Doing it right will be more expensive than the floor, and only worth it if you would like some more conditioned space (depends on needs and ceiling height).
There's a difference between impossible to insulate the floor and a PITA to insulate the floor. I have a HVAC blower in my attic, and some hard ducting, but it is a small percentage of the floor area. Looks to me like you can move your stuff to one half of the floor, pull up the boards on one side, airseal and insulate that side, replace boards and then repeat for the other side. I will be doing the same thing this fall after it cools off up there.
How many inches deep are your joists (attic floor) and your rafters (attic ceiling)?? If you do the floor, get the FG batts that are one size thicker (nominal) than your space and compress them a little. The performance **per inch** does go up on compression, and the cost increase for the thicker batts is often tiny or zero. You don't really need R-50 in Maryland, 6-8" of slightly compressed batts, carefully installed under your floor is R-20-R-25, which will give excellent bang for your buck if it is currently non- or minimally insulated. I estimated simple payback for my similar sitch was 1.5 years. Going from R-25 to R-50 will save you more money, but the payback (in a mild climate) is several years for cheap FG, or very long if you did super-expensive r-50 foam!.
Researching the whole 'convection in FG batts = cellulose is better', I decided it is basically BS. The study is old, and only saw convection in very low density **loose-fill** FG (the stuff that has big channels between the separate puffs of insulation) and then only at temps that are irrelevant for the mid-atlantic region (us). Between using batts and compressing them slightly there will be NO loss of R-value in your app.
The alum bubble wrap is also a waste of time cost-benefit wise, unless you live in an AC dominated climate.
All this said, and I am broken record on this--you need to see how much venting there is between your conditioned space and your attic. In an older house, there could be a ton of framing and pipe chases that vent conditioned air into you attic. When you go under the floor you can find them all and seal them. This can easily save you as much the insulation itself. This was not appreciated in the 1970s energy crisis, so there is are a bunch of retro-insulated attics out there that look really well insulated at first glance, but are huge heat leaks because of (hidden/buried) air leaks. I know cuz I bought one, and it took me a while to figure out where all my heat was going.
midwestcoast
Minister of Fire
Oh and the bubble foil is way expensive for the real R value you get. It needs an airspace to work as a true radiant barrier.
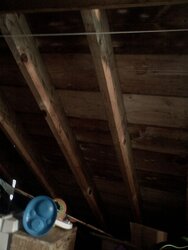
The house was built in 1950, it has the original insulation under the wood floors from what I can tell. It has soffit vents and a ridge vent already. I have gone through and found most of the air leaks to try and save some of the heat from getting up there but in the winter the upstairs is cooler and in the summer it is hotter than the downstairs. The attic itself is pretty cold during the winter, I have a window up there that I just replaced with a newer one to try and cut down some of the drafts. The door that leads to the attic I put in extra insulation around it and found the drafts coming from it.
The house size is 29 x 22, I didn't get a chance to take a tape measure up in the attic yet.
Since the attic is only walkable in the center I haven't given any thought about turning it into a living space, just storage for now.
I guess it is looking like I will be pulling up those wood floors and replacing the insulation, I looked at the spray foam and just DIY kits would cost a fair amount to do my attic.
This sounds like it will be a sept-oct type job.
So with your air handler, did you just leave that spot alone and pull the boards up around it?
mellow said:The house was built in 1950, it has the original insulation under the wood floors from what I can tell. It has soffit vents and a ridge vent already. I have gone through and found most of the air leaks to try and save some of the heat from getting up there but in the winter the upstairs is cooler and in the summer it is hotter than the downstairs. The attic itself is pretty cold during the winter, I have a window up there that I just replaced with a newer one to try and cut down some of the drafts. The door that leads to the attic I put in extra insulation around it and found the drafts coming from it.
The house size is 29 x 22, I didn't get a chance to take a tape measure up in the attic yet.
Since the attic is only walkable in the center I haven't given any thought about turning it into a living space, just storage for now.
I guess it is looking like I will be pulling up those wood floors and replacing the insulation, I looked at the spray foam and just DIY kits would cost a fair amount to do my attic.
This sounds like it will be a sept-oct type job.
So with your air handler, did you just leave that spot alone and pull the boards up around it?
I did the same to my neighbors house and he had central air and a floor!!
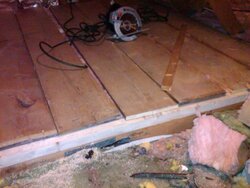
So I pulled up the all the floor boards and added 2x2s to the 2x4s to make 2x6s. Pulled out all the old insualtion. Rolled down the foil which also makes a good vapor barrier! Then I added in the R19 6" Fiberglass insulation and screwed the floor boards back instead of nailing them!
As far as the air handler goes, it was high enough off the floor to get the 2x2s added to the 2x4s and put in the foil and insulation. Then the drip pan just fit nicely on top of the newly raised floor!
See pic on first completed floor section below: ( I did 3 floor sections at a time)
Attachments
mellow said:Did you use a 3 inch screw to go through the 2x2 into the 2x4?
Hi mellow
No, I just used a nail gun to nail down the 2x2s because I will never need to pull them up.
But for the floor boards I had 1" boards so I used 1.5" screws. Since it is inside I used wall board screws but you can also used galvanized deck screws.
It was a fun job. Now if my neighbor needs to get to any wiring or light fixtures in his rooms below, he can unscrew the boards and work on them!
--------------------------------------------------------------------
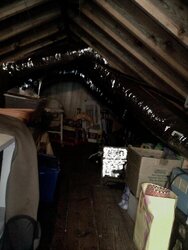
Never only put insulation in the rafters, it will rot out the roof!
The rafter vents and foil I put between the rafters keep the attic and roof cool too.
See pic below.
The left side of the roof has the newly raised floor with foil and insulation plus the foil and rafter vents in the roof.
The right side was not done at this time. Pretty COOL !! LOL
As you can see the heat is escaping and melting the snow on the right side because all it has is the OLD R7 fiberglass in the floor!!
That is money thru the ROOF !! LOL
Attachments
Looks like a nice job Don. I did a similar thing in my house. I however can't agree on the vapor barrier. Why do you want to stop moisture? Are you stopping it from outside to in or inside to out?Don2222 said:mellow said:The house was built in 1950, it has the original insulation under the wood floors from what I can tell. It has soffit vents and a ridge vent already. I have gone through and found most of the air leaks to try and save some of the heat from getting up there but in the winter the upstairs is cooler and in the summer it is hotter than the downstairs. The attic itself is pretty cold during the winter, I have a window up there that I just replaced with a newer one to try and cut down some of the drafts. The door that leads to the attic I put in extra insulation around it and found the drafts coming from it.
The house size is 29 x 22, I didn't get a chance to take a tape measure up in the attic yet.
Since the attic is only walkable in the center I haven't given any thought about turning it into a living space, just storage for now.
I guess it is looking like I will be pulling up those wood floors and replacing the insulation, I looked at the spray foam and just DIY kits would cost a fair amount to do my attic.
This sounds like it will be a sept-oct type job.
So with your air handler, did you just leave that spot alone and pull the boards up around it?
I did the same to my neighbors house and he had central air and a floor!!
So I pulled up the all the floor boards and added 2x2s to the 2x4s to make 2x6s. Pulled out all the old insualtion. Rolled down the foil which also makes a good vapor barrier! Then I added in the R19 6" Fiberglass insulation and screwed the floor boards back instead of nailing them!
As far as the air handler goes, it was high enough off the floor to get the 2x2s added to the 2x4s and put in the foil and insulation. Then the drip pan just fit nicely on top of the newly raised floor!
See pic on first completed floor section below: ( I did 3 floor sections at a time)
mellow said:The house was built in 1950, it has the original insulation under the wood floors from what I can tell. It has soffit vents and a ridge vent already. I have gone through and found most of the air leaks to try and save some of the heat from getting up there but in the winter the upstairs is cooler and in the summer it is hotter than the downstairs. The attic itself is pretty cold during the winter, I have a window up there that I just replaced with a newer one to try and cut down some of the drafts. The door that leads to the attic I put in extra insulation around it and found the drafts coming from it.
The house size is 29 x 22, I didn't get a chance to take a tape measure up in the attic yet.
Since the attic is only walkable in the center I haven't given any thought about turning it into a living space, just storage for now.
I guess it is looking like I will be pulling up those wood floors and replacing the insulation, I looked at the spray foam and just DIY kits would cost a fair amount to do my attic.
This sounds like it will be a sept-oct type job.
So with your air handler, did you just leave that spot alone and pull the boards up around it?
I think Don gave a better answer already--
I haven't done my insulation yet. I have two attic sections ~750 sq ft each, one of them has 4x4' plywood sheets nailed down over ~200 sq ft or so, and my handler is pinning down a couple of those--I'll prob just leave it alone.
Looks like my 1963 house got loose-fill FG, now collapsed to about 1-2" deep, and someone laid 6" FG batts crosswise over the joist tops (prob in 80s). IOW, it looks like its insulated but its a mess. They did not pull up the plywood to upgrade underneath--just 1-2" of loos fill. I figure I have 200 sq ft at R-4, and maybe 1300 sq ft at R-15 to R-20.
I finished my airsealing in the spring, and will tackle this in the fall, starting with the decked section.
gzecc said:Looks like a nice job Don. I did a similar thing in my house. I however can't agree on the vapor barrier. Why do you want to stop moisture? Are you stopping it from outside to in or inside to out?Don2222 said:mellow said:The house was built in 1950, it has the original insulation under the wood floors from what I can tell. It has soffit vents and a ridge vent already. I have gone through and found most of the air leaks to try and save some of the heat from getting up there but in the winter the upstairs is cooler and in the summer it is hotter than the downstairs. The attic itself is pretty cold during the winter, I have a window up there that I just replaced with a newer one to try and cut down some of the drafts. The door that leads to the attic I put in extra insulation around it and found the drafts coming from it.
The house size is 29 x 22, I didn't get a chance to take a tape measure up in the attic yet.
Since the attic is only walkable in the center I haven't given any thought about turning it into a living space, just storage for now.
I guess it is looking like I will be pulling up those wood floors and replacing the insulation, I looked at the spray foam and just DIY kits would cost a fair amount to do my attic.
This sounds like it will be a sept-oct type job.
So with your air handler, did you just leave that spot alone and pull the boards up around it?
I did the same to my neighbors house and he had central air and a floor!!
So I pulled up the all the floor boards and added 2x2s to the 2x4s to make 2x6s. Pulled out all the old insualtion. Rolled down the foil which also makes a good vapor barrier! Then I added in the R19 6" Fiberglass insulation and screwed the floor boards back instead of nailing them!
As far as the air handler goes, it was high enough off the floor to get the 2x2s added to the 2x4s and put in the foil and insulation. Then the drip pan just fit nicely on top of the newly raised floor!
See pic on first completed floor section below: ( I did 3 floor sections at a time)
Thanks, it was alot of work but worth it. The boards can be unscrewed and the insulation picked up like a tent to work on the fixtures or wiring. That works well.
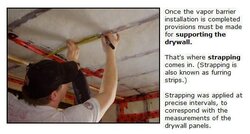
My 1962 house does not have a vapor barrier in the ceiling. When warm air from the warm living space hits cooler air in the attic, then moisture can form. So the new building code is to put up plastic sheets under the sheet rock ceiling below the attic floor. See url and pic below:
http://www.my-green-home-project.com/vapor-barrier-installation.html
So in my case adding the polypropylene encased reflectix foil under the attic floor insulation acts as the vapor barrier. It is a building code so I believe it works!
See foil in link below

Foil Insulation As Vapor Barrier
Polyethylene is not the only material that can be used as a vapor barrier. Foil insulation is an excellent material, but of course it's more expensive because it also acts as additional insulation. (Foil insulation is also known as foil vapor barrier and radiant barrier insulation.)
From Link above. This is really AIR SEALING !!
My Green Home Gets All Sealed Up:
Vapor Barrier Installation
I never thought I could get excited about a vapor barrier installation, but as I researched the steps required to make my house truly energy efficient, I soon realized that as an integral part of the system required for a tight house envelope, that layer of translucent plastic had an immense role to play.
Vapor Barrier Installation, Step-by-Step
In this page, I describe:
how we sealed up the house envelope with a vapor barrier;
the different kinds of vapor barriers we used; and
the techniques we used in order to achieve as tight a seal as possible.
This is the standard type of polyethylene vapor barrier.
It comes in widths from 12 inches to 20 feet and lengths of 60 to 375 feet. Our local store stocked the 100-foot roll, ten feet wide, which is the most common for this kind of application. This will cover 1,000 square feet, with a minimum of joints.
When buying vapor barrier, look for the gauge stamped on the product: .006 (.152 mm) represents what is referred to as "6-mil", which is the desirable thickness.
Any old plastic film will NOT do: the product in the photo has the National Standards of Canada acceptance number and the fire rating stamped on. This is important.
In order to be effective, the vapor barrier must be completely sealed.
Where pieces join and around windows and other components, a special red tape, called Tuck Tape® here, is used. It's quite expensive, but there is no substitute for it.
In corners and other uneven surfaces, acoustic sealant – the black stripes seen here – is used. They tell me there's no substitute for acoustic sealant either, which has the advantage of remaining flexible permanently.
Acoustic sealant is applied with a caulking gun. The large size represents quite an economy, so it's worthwhile investing in a giant caulking gun if you're going to carry out your own vapor barrier installation.
Attachments
Don, there is a big difference between an air barrier and a vapor barrier. Most moisture in old attics is not due to diffusion through the drywall, it is being carried there by convection through air leaks driven by stack effect. In most climates, polypropylene vapor barriers are not recommended in new construction.
woodgeek said:Don, there is a big difference between an air barrier and a vapor barrier. Most moisture in old attics is not due to diffusion through the drywall, it is being carried there by convection through air leaks driven by stack effect. In most climates, polypropylene vapor barriers are not recommended in new construction.
Hi woodgeek
From the Mass Building Code a Vapor barrier is certainly recommended !! So they are a good idea!
A good vapor barrier is also an Air Barrier!
http://www.mass.gov/?pageID=eopster...rs_one_two_family_dwelling_code&csid=Eeops#B7
Section 6106.2.1 Vapor Retarder reads that “an approved…vapor retarder….shall be installed on the warm-in-winter side of the thermal insulation.†Exception (1) reads “where it an be demonstrated to the satisfaction of the building official that the absence of a vapor retarder will not damage the materials or adversely affect the performance of the insulation due to moisture or it freezing.â€
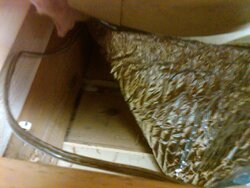
I for sure have no vapor barrier, while putting in a new ceiling fan support I had a chance to pull some boards up and see what kind of insulation I have, is this 1950's style insulation? It looks newer but the boards do not look like they have been pulled up before. This insulation has no backing.
Attachments
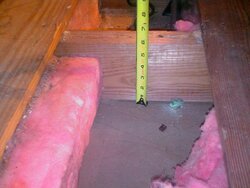
mellow said:I for sure have no vapor barrier, while putting in a new ceiling fan support I had a chance to pull some boards up and see what kind of insulation I have, is this 1950's style insulation? It looks newer but the boards do not look like they have been pulled up before. This insulation has no backing.
Thanks for the pic that really helps!
The insulation looks like fairly new Owens Corning Pink Fiberglass. However because it is less than 6 inches it is NOT R19 maybe R15 or so. the paper backing should be used in your case where there is no moisture barrier.
I suggest you put the reflectix foil under that for a good moisture barrier, radiant heat barrier and the extra R4 insulation value and you will be all set!
Hello
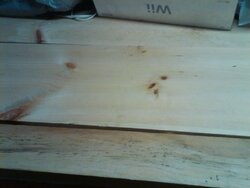
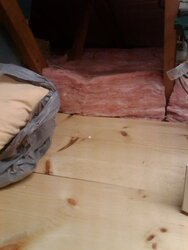
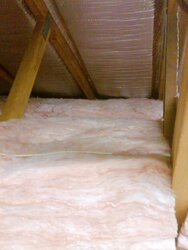
So here are some pics of my attic floor.
Pic 1 - 8 ft long 1/2 " thick pine floor boards
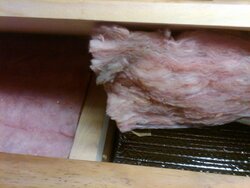
Pic 2 - Under floor board is 6 inch pink fiberglass R19 with paper backing on top of reflectix foil
Pic 3 - See sheetrock under foil
Pic 4 - Unfaced R30 Pink Fiberglass on back and front of floor boards on top of the R19 for a total of R53
Pic 5 - R30 goes to soffits where reflectix is stapled over the rafter vents and go all the way to ridge vent at peak of roof
So here are some pics of my attic floor.
Pic 1 - 8 ft long 1/2 " thick pine floor boards
Pic 2 - Under floor board is 6 inch pink fiberglass R19 with paper backing on top of reflectix foil
Pic 3 - See sheetrock under foil
Pic 4 - Unfaced R30 Pink Fiberglass on back and front of floor boards on top of the R19 for a total of R53
Pic 5 - R30 goes to soffits where reflectix is stapled over the rafter vents and go all the way to ridge vent at peak of roof
Attachments
- Status
- Not open for further replies.
Similar threads
- Replies
- 2
- Views
- 531
- Replies
- 4
- Views
- 293
- Replies
- 5
- Views
- 2K
- Replies
- 2
- Views
- 533