My progress in building a wood fired boiler based on the design by Richard C. Hill

  • Active since 1995, Hearth.com is THE place on the internet for free information and advice about wood stoves, pellet stoves and other energy saving equipment.

    We strive to provide opinions, articles, discussions and history related to Hearth Products and in a more general sense, energy issues.

    We promote the EFFICIENT, RESPONSIBLE, CLEAN and SAFE use of all fuels, whether renewable or fossil.
Status
Not open for further replies.
Hey, you got it going! Fantaastic! My congratulations.

It may not be necessary to further modify the heat exchanger itself. Probably all you need to do would be to put an extension of one of the pipes inside the tank to near the top. (It doesn't need to be completely "waterproof") If that doesn't work you won't have lost anything, since it is a halfway step on the approach that you have suggested.

It's best to lengthen the pipe from the hot end of the exchanger. This will make a counter-flow exchanger, which is much more efficient than the reverse.

How are you making the turbulators? The pdf of Dr Hill's paper doesn't say what his final design was, only that wire bottle-brushes worked but weren't durable. Not too surprising in an oxygen-rich flame.

I used to work with a guy who did his time on KA steam locomotives. Pity he is not still around, what a goldmine of info he would be. His stories were amazing. He was a big bloke and he still remembered the pain of crawling through a hot firebox to get at the fire tubes. Those old locos were amazing to see, they were still the mainline passenger express hauler when I was a young man, but the boilers had to be practically re-built after not too many round-trips between Wellington and Auckland. To minimise down-time, fire-tube replacement began the instant the firebox was dumped. Ouch!

I don't know anything about wood-furnace technology, but I imagine that here too the fire-tubes must burn out eventually. That would be end-of-life for this design. Anyone have any info about longevity of the tubes in this environment?
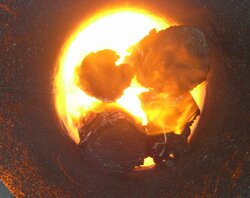
 
I have been using the boiler after changing the pipe connections between the heat exchanger and the storage tank. There is a learning curve involved but I am encouraged with the results I am getting.

The wood burns with extraordinary ferocity and very little ash is left. I have heated the water in the 1300 liter storage tank to seventy seven degrees which is high enough for my hydronic heating system. I have a number of things I want to do to complete the project. The main job being to insulate the heat exchanger and storage tank. At this point of time my three car garage is warm from the heat radiating from the device so there is a lot of heat being wasted.

During my test runs I have been using low grade timber and I expect better results when I load the wood chamber with long thick sticks of timber. It has been raining here in Hobart for the past week so I have to wait for some fine weather to collect more firewood.

My progress in building the boiler has been slow and difficult mainly due to the mistakes I have made in the fabrication. Welding used galvanized cylinders is not easy. If I was to build the boiler all over again it would be much easier the second time around. I certainly couldn't recommend building your own boiler to save money particularly if commercial units are locally available. However, I have a sense of achievement and satisfied my curiosity.
 
Good to see you have had success after your hard work. Will you be posting any details? I would be very interested in any key dimensions. However the ceramic materials are what really would be helpful down this end of the world. Prof Hill's paper refers to materials that as far as I can tell are not available at this time and place, so an update on the Australian materials that are suitable could be good. Also, was there anything special about your clay pots, or are they just run-of-the-mill garden shop variety?
 
If you spoke with Dick Hill, he would suggest using firebrick in lieu of castable refractory. It is simple to locate and is
serviceable in inexpensive.

Vermiculite is still available. It is used for potting plants and also for shipping glassware!

Dick is headed to age 93 and is still on the radio every Saturday morning with me.
 
Hi Tom,

A firebrick construction would be very different in shape. Would the corners and sharp angles not affect the flow and thus performance? I guess that it would be more difficult to have a firetube setup without at least some castable ceramic in the system?

The great thing about Dick Hill's paper is that it is so far the only comprehensively tested design that I have been able to find by Googling, that is also reasonably well documented. so that a DIYer can construct it with a reasonable hope that it will work properly. Do you know of any well-tested an designs in firebrick that are likely to match the efficiency of Dicks original design?

In this neck of the woods, there aren't many second hand furnaces available and the price of efficient new ones is truly frightful. The market is much too small to get real competition and economies of scale.

Good to hear that Dick is still going strong. It gives hope to the rest of us!
 
Hi Tom and Snail

I have no doubt good quality fire brick would do the job. In my case I used cheap unglazed clay pots as form work for the refractory cement.

I applied the cement in sections as it it was easier to apply in a horizontal position. After the cement went off I would turn the pot about ninety degrees and do another section. As the cement was applied within a couple of days and each section had a good overlap the whole thing has cured into one solid piece. I used Densecrete 145 which is described at the following link: http://www.darleyfirebrick.com.au/techcast.html

Some dimensions are: The pots were 31 cm high and 51 cm at the widest point. The burn chamber I created inside the pot is 34 cm wide and 26 cm deep. The burn tube connected the two pots is 12 cm in diameter and 26 cm long. The second pot is lined with Litecrete and the chamber diameter is reduced to 34 cm at the exit to allow the heat exchanger to fit nicely. (I used old propane cylinders for the wood feed tube and heat exchanger which are 34 cm in diameter.) The wood feed chamber is 78 cm high.

I used the ends of gas cylinders for the lid for the wood feed tube and the end of the heat exchanger. They work well as the ends seems to be made from thicker steel than the walls of the cylinder.

The main problem I have had is in fabricating the 1300 liter storage tank. In hind sight I should have followed Professor Hill's example by using very large ready made cylinders which are so much stronger than my square tank. You need to ensure the piping from the water jacket and the heat exchanger to the storage tank is of large diameter. I have changed to 1 1/2 inch steel tube with flexible stainless steel hoses inline to cater for movement.

It is a good idea to try and build the whole thing in modules so that you can pull things apart if needed. I have found that high temperature silicone is good for sealing the joints between components. Another thing that I have not mentioned is that the pots have developed a number of fine cracks but I am not worried as the refractory cement inside seems to be solid.

I bought the forced air pump and exhaust fan through Ebay USA and had them posted to me. Most parts seem to be much cheaper in the USA than in Australia.
 
Using firebrick does not introduce any major issues. The nice thing about firebrick is the cost and the stress relief that is built in since there are
joints every couple inches. I use a tile saw to cut special sizes and angles that are exact.
I know that we have used firebrick on many prototypes as did Dick back in the day. Castable materials need to be thoroughly cured and are still apt to crack over time. A cracked firebrick is a simple repair.

Building or locating tanks can be a challenge. Maybe that is why we manufacture them. :bug:

Square tanks want to become cylinders when loaded with water, but most materials lend themselves to building square tanks.
Dick started out using new oil tanks while trying to pressurize them a couple psi. Of course, this did not work very well and this is how we
started working together, since I was building tanks and heat exchangers.

There is some good information on www.builditsolar.com related to building tanks. If heat exchangers are a problem, stainless steel plate heat exchangers can be had for very reasonable prices with the additional cost of another circulator pump.

I think it is hard to consider any other material than smooth copper for coiled hx. When properly designed, they work extremely well and are cost effective. We came up with the initial design concept that we now use, and refined it to the point it is at today. We have been using the basic concepts for about 30 years with very good, long lived results.
 
Hi Tom,

When you recommend a copper-tube heat exchanger, do you mean for a water-to-water exchanger to isolate the furnace circulation water from the remainder of the system, or a furnace gases to water exchanger? I ask because Hobartian refers to the fire-tube in cylinder module of his construction as the heat exchanger, which it is. I was led to believe that copper would not live in the furnace gases, because they can be up to 2000 degrees (C or F I'm not sure). I assume that if you do go to firebrick, a water-tube exchanger would be easier? In that case, do you recommend going for black-iron as Hobartian did?

Hi Hobartian,

Thank you for those details. I'm sorry that you had such a lot of trouble with your tank. Sometimes the apparently simple things are what trips you up. On the plus side, it seems that you have nailed the furnace side of things, which is the complex bit and the part that there is little info on the web about. It would be very good if you could create a detailed HowTo showing what worked. There are so many small details that still puzzle me, e.g the turbulators.

I just had another thought. In your earlier post, you were concerned that the water in the heat exchanger was far hotter than in the tank. Whilst your concerns were justified, it may still be desirable for the heat exchange water to heat up rapidly, in order to prevent soot build-up. Most modern boilers have complex control systems that circulate water in a closed loop until the heat exchange water heats up. I wonder if a simple thermostat in the thermo-syphon system may do the same job more simply? Perhaps something like a car cooling system thermostat could work, opening at much lower temperature obviously. This is only relevant if you do have soot problems.

My brother, who lives in Sydney, describes Australia as "the land of dry sticks", referring to the ease of obtaining dry firewood in the NSW Highlands. I don't know if that would apply to Tasmania but if it does, maybe you won't have a soot problem.
 
I was referring to the water to water heat exchanger.
We have done a fair bit of work with copper heat exchangers in the boiler combustion area environment.
It can be used. There is not a lot of wiggle room when you lose circulation.
I have never melted one, but Dick has. It can happen quick.

Our current unit uses stainless steel (not tubing). It is always nice to be able to thermosyphon heat out of a boiler if flow is
interrupted.
Murphy's Law rules Supreme in the universe!
 
The image shown was taken from the top of the wood feed chamber and shows wood burning in the primary combustion chamber. The burning is extremely intense.

It will be noted that creosote has formed on the walls of the feed chamber but this is normal as the chamber has a water jacket around it to inhibit the sticks of wood burning in the vertical direction.

The burning wood consists of pieces of the trunk of a hardwood tree that had a diameter of about 18 cm (7 inches) I can easily fit three of these side by side.

I still have a number of modifications to make and the insulating to do. In the mean time I am having fun!
 

Attachments

  • Looking into the primary burn chamber.jpg
    Looking into the primary burn chamber.jpg
    208.9 KB · Views: 802
A picture of the monster!

The elevated cylinder on the right has the purpose of storing the overflow of water from the main tank due to heat expansion. When the main tank cools it should draw water back from the overflow cylinder.

I am using a tannin based treatment for the water to hopefully prevent corrosion. There should be no air in the main tank. A pressure relief valve set at ten psi is installed.
 

Attachments

  • My water heater 1.jpg
    My water heater 1.jpg
    151.7 KB · Views: 1,059
[quote author="Hobartian" date="1313412386"]The image shown was taken from the top of the wood feed chamber and shows wood burning in the primary combustion chamber. The burning is extremely intense.


Things of beauty. This is my latest' first burn. Something looks familiar!
 

Attachments

  • P1040522.jpg
    P1040522.jpg
    32.6 KB · Views: 790
Hi Tom,

The pictures are indeed similar. I presume your heater is based on Richard C. Hill's design. The surface of the chamber looks very smooth. What is the chamber made from?

I wish I had discussed making the heat storage reservoir with you before I started but I was not aware of your expertise in this area. I was surprised at the forces generated along the flat sides even with very low pressures. (5 psi) In contrast when I built the water jacket around the wood feed chamber I was able to test it for leaks at sixty psi

At this stage I have not done anything about fitting turbulators. That is something for the future. What are you using?
 
We have spent about three years working on the current unit and are patenting it.
This is the fourth generation.
When I step back and look at it, it is obvious that Dick has had a lot of influence on me. His
reports have been available since 1976.
Before I knew Dick, I asked an associate of his, Norm Smith about how to build a chip burning boiler.
He suggested that this should be left to professionals and I might burn my house down.
You know what that advice led to...

Dick has been encouraging since day one and we have many stories of trying to burn things down!

The construction is all stainless steel. The photo was from the first firing. The fuel tube is darker now.
I will be firing it within a month. It had only been in service for about a month before the heating season was officially over.
Other than dealing with six months of cold weather, I am looking forward to it starting up again.

There is enough that is different inside that a patent is possible, although Dick and my patent attorney warn to the contrary.
There are a lot of prior art wood burning patents out there.

There are currently no turbulators in the unit. The stack temperature runs about 300-400 depending on the firing rate without them.
 
Is the hassle of pressurising the system to 10psi and possibly having to get the tank certified as a pressure vessel worth the extra 15 degrees Centigrade maximum storage temperature? However, if it is pressurised, you may be able to use a car thermostat, if you need one to avoid soot problems. (I believe modern cars use a 15 psi pressure cap, so you may need a thermostat from an older model though.)

I am a bit puzzled about the need for a water jacket for the fuel chamber. Wouldn't the lack of air circulation alone be enough to encourage charcoal formation and the release of the volatiles? If it was, wouldn't it be best to have the volatiles at as high a temperature as possible, in order to promote rapid combustion and thus minimisation of creosote deposits?

When you open the hatch, to add more fuel, or to take photos, is there not a risk of escape of toxic, possibly explosive tar/creosote gases?
 
It is my humble opinion that the effort and cost involved in pressurizing the storage system is not worth the cost and effort.
Of course, I make my living manufacturing unpressurized tanks.
The start of the whole thing for us was to find a way that was easier than moving and installing a pressure system involved when it came to large
storage tanks.
We got to see a lot of site built tanks that did not work well. We also have spent about 30 years trying to develop a system that is simple and workable.
There is enough debate about which system is better. Both have strengths and weaknesses.
Fortunately, the temperature gap is less than it was, since we are now using a liner that is more tolerant of temperatures above the 160-170F that EPDM is limited by.


The water jacket on the fuel chamber is most important for vertical fuel tubes.
The idea is to control the amount of pyrolysis. It is not perfect, but it tends to chill the fuel enough to keep it from burning up
the fuel tube.
This only works to some degree, depending on the size of the fuel tube and other design issues.

Yes, the fuel tube can fill with smoke that can "bump" if oxygen is introduced too quickly.

Years ago, we have one unit that we were testing that had a vertical fuel tube that would shoot out a 6' flame that would lick the
ceiling! Fortunately the ceiling was two layers of 5/8" sheet rock. Big fun.

An induced draft fan helps minimize this problem and opening the fuel chamber door also helps.
 
author="Snail" date="1313551602"]Is the hassle of pressurising the system to 10psi and possibly having to get the tank certified as a pressure vessel worth the extra 15 degrees Centigrade maximum storage temperature? However, if it is pressurised, you may be able to use a car thermostat, if you need one to avoid soot problems. (I believe modern cars use a 15 psi pressure cap, so you may need a thermostat from an older model though.)

I am in the boiler industry and it causes me some level of anxiety to hear of safety equipment (car thermostat) used incorrectly in place of proper safety equipment. If your custom install NEEDS a safety relief, it should have a proper device that not only opens at the rated pressure, but can also blow off ALL the excess pressure generated by the heating equipment without allowing the pressure in the system to rise past the blow-off point. You can easily turn off the auto engine when the t-stat opens and steam blows out the hood. However, the wood fired equipment continues to make heat (and thus pressure). We don't want to make steam bombs. I AM SORRY if this sounds anti-experimental. It is not intended that way. If it is okay to keep it non-pressurized, then do it that way. IMHO, the 'European' method of using a tall riser to an elevated expansion tank, (say two floors up from the basement into the attic) is an elegant and safe way to apply some pressure to the heating equipment while still being an open system. (expansion tank is open to atmosphere) This can also help to reduce the likelihood of cavitation in high-head pumps, and reduces oxygen infiltration into the open riser and then into the system causing increased corrosion in all parts of the system.

This continues to be a very interesting thread and I hope it continues!!

Cheers!
 
A thermostat is not a pressure valve. Pressure regulation is handled elsewhere. The worst-case scenario is that the thermostat sticks shut and the water in the heat-exchanger boils. The pressure release valve system would need to be able to handle the volume of steam, which is of course far more than the expansion of the heated water. It should probably be designed for that even without a thermostat in the system.
I don't have any expertise on pressure relief valves, I'd avoid pressurised systems like the plague, but the boiling itself need not be a major problem, based on my experience with unpressurised systems (You just get a minor geyser out of the roof vent-pipe).
Car thermostats are highly reliable and when they do fail, it is almost always in the stuck-open state. If this were not the case, we would hear of many motors destroyed by the resulting overheating. I have never even heard of this happening and I am very familiar with exceedingly old, high mileage vehicles. In fact, in my experience, car thermostats are far more reliable than the electrical thermostats in Australasian electric hot water cylinders, which DO fail in the hot state occasionally.
It is probably a good idea to make a very small bypass to ensure that whatever happens, the heat exchanger cannot boil dry until the entire tank has emptied.
 
Anyone seen this page? http://www.afabusa.org/aldehyde_combustion.php
It hints at sophistication that is beyond anything I have been able to find details on in my googling. Is there any way that a DIY constructor could access any details of these enhancements? It's a pity that lambda sensors are such a horrible price.

The modularity of the Hill design would seem to make it possible to experiment with the combustion chamber?

One idea that I have been playing with, in my head only, not in clay, is to have a sort of a cyclonic combustion chamber. The primary combustion gases would enter at the cup-shaped bottom of the chamber via a nozzle that protrudes slightly into the chamber. Secondary air would enter at the top of the chamber, via angled jets. The idea would be to have the secondary air spiral down the outside of the chamber and then be reversed by the cup and flow up the sides of the nozzle. As the secondary air is forced into the centre, towards the nozzle, conservation of angular momentum will speed up the rate of spin. The outside of the nozzle would be ridged to cause turbulence. The result would be a highly turbulent, rapidly-spinning flame from the nozzle. The flame would pass up the centre of the chamber and exit via a pipe that also protrudes into the chamber. The secondary air spiraling down the outside of the chamber will be pre-heated by the flame before mixing with the primary fuel-air at the nozzle. The rapidly spinning central flame will throw out heavier material, such as tar aerosols, smoke and ash particles, which will be entrained in the secondary air and recirculated through the flame, until they are fully-burnt.

I know that this won't be as simple as I made it sound. The devil is always in the details. Anyway someone else is bound to have thought of it before me and the idea has probably already been tried and either patented, or discarded as unworkable. Quite apart from the tricky aerodynamics (even basic cyclone separators are not trivial to design), the bottom of the cup may not heat up enough to prevent tar build-up. Cleaning out the ash particles from there may also be difficult to arrange. I'd be interested in what people know and/or think about it though.
 
Those pics look just like the Dumont I had. The hair on the back of my hands was gone every winter :) , that baby burned with some intensity
 
I look through Google patents for old technology. Perhaps new technology may be displayed. Many ideas are patented, but then for whatever reason never get introduced.
 
Hi Wallyworld and other members,

Quoting from Wikipedia:

Jetstream furnaces (later Tempest wood-burning boilers), were an advanced design of wood-fired water heaters conceived by Dr. Richard Hill of the University of Maine in Orono, Maine, USA. The design heated a house to prove the theory, then with government funding become a commercial product.

My heater and your old heater are siblings!

My heater has no commercial value due to its size and construction which would not allow it to be built and put on a pallet for delivery. Nor does it have the sophistication of modern designs but then it's simplicity allows people like myself to build it for a reasonable sum of money.

I note that Europe seems to be driving the development of gasifier wood fired boilers probably because of their population and long periods of cold weather.

Initially I considered building something based around a rocket stove but realized the small wood feed and burn chamber would not readily allow me to heat three hundred gallons of water. Never-the-less, the rocket stove has its place as it burns efficiently without the need for electric fans.

Another thing I would like to do is build the same type of heater only dispense with the heat exchanger and water and have the hot gases heat a large stone wall like masonry heaters do. Controlling the temperature would be difficult but the whole thing would be much cheaper to build without water and plumbing.
 
JimboM said:
This is interesting to me. Thanks for sharing. Tasmania must get a few shots of cold from the great south ocean. Better hurry if this is to help this winter.

Jimbo, He's in Australia........January is summer down under.......
 
Hobartian said:
Another thing I would like to do is build the same type of heater only dispense with the heat exchanger and water and have the hot gases heat a large stone wall like masonry heaters do. Controlling the temperature would be difficult but the whole thing would be much cheaper to build without water and plumbing.

I am a great admirer of well-designed and well made masonry heaters- have seen them and felt them in action and they're a wonderful mix of some really well-refined concepts and some bulletproof simplicity...

One factor, though, is, that there is nothing (unless you get into really exotic stuff like phase-change materials) that even comes close to water in terms of specific heat- how much heat energy is stored in a given available amount of space/ weight. And a water-based system lets you keep that heat banked and then circulate it if/ as/ at the pace needed.... Systems that run on pure passive thermal mass of masonry or stone end up being like big flywheels, and if you "rev it up" too hard compared to the way the weather happens to play out, you're suddenly (and sometimes for quite a while) baking in it...
 
Hi Hobartian,

Guess that Spring is sufficiently advanced by now and you won't need your furnace for a while. Any update on how it has been going?
 
Status
Not open for further replies.