Out and Up or Up and Out? Through Wall Install

  • Active since 1995, Hearth.com is THE place on the internet for free information and advice about wood stoves, pellet stoves and other energy saving equipment.

    We strive to provide opinions, articles, discussions and history related to Hearth Products and in a more general sense, energy issues.

    We promote the EFFICIENT, RESPONSIBLE, CLEAN and SAFE use of all fuels, whether renewable or fossil.
Status
Not open for further replies.

railcon56

Member
Nov 11, 2010
37
Central Pa.
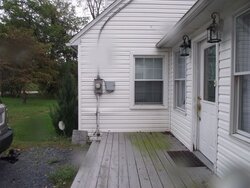
After reading the forum I have decided that the only option I have is a Corner install through the wall. I will also be exiting on the Front of the house. I am leaning towards the up and out method. So I am thinking Clean out Tee on the bottom, and then 3 ft vertical, 45 degree ....Then 1 ft to wall thimble? I have been trying to find a black vent pipe kit also... any help would be appreciated.


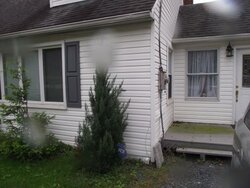
Ok the Stove would go where the chair is about where the mirror is, and then out of the front. I would remove the bush.Also the peeling ceiling is from recent Storm damage.
 

Attachments

  • Front.jpg
    Front.jpg
    31.5 KB · Views: 591
  • Corner Install Inside.jpg
    Corner Install Inside.jpg
    16.7 KB · Views: 609
If able, I would elect to go out the wall with the power meter on it. If you can avoid the meter, wire and be the right distance from the window, this would be the least noticeable. Also, if you went on the front, you'll need to prepare to do scheduled cleaning of the soffit and gutters. None on the meter side so that won't happen there. Can't find black pipe? It does cost more and you can paint any of the metal colored ones easily with heat resistant paint. That cost a whole lot less. For me, the up and out is preferred. The OAK can go right out with no elevation needed. Plant a shrub or put up a trellis on the front corner and the meter and stove vent will hardly be noticeable.
Hope you enjoy your stove. Post some pic's when it is in. good luck!
 
save$ said:
If able, I would elect to go out the wall with the power meter on it. good luck!


I want to go out of the side But there is a deck there...... the side would be perfect ...But I cant figure out a way around that deck.... Just returned from vacation have cutting and cleaning to do...lol
 

Attachments

  • Side.jpg
    Side.jpg
    33.4 KB · Views: 573
X2 on painting the pipe.

Going out the front is not as bad as people think. My Quad is direct vent, straight out of the middle of my house. If done right, it will not look bad. As for cldaning the soffit. My termination is 18" away (whatever the minimum clearance was away) and I have never had an issue with dark sooty siding or soffit. Which leads me to the next question.

What stove are you looking to install?
 
I like the up then out route. If you ever change the stove in the future, Your able to use the same hole in the house. If you go out and the new stove has a higher exit location. Your stuck making a new hole and blocking off the old. Or choosing a stove with the same exit height.
 
Just talked to Mike..... Wow what an awesome guy.... He helped me lot....
 
rail said:
Just talked to Mike..... Wow what an awesome guy.... He helped me lot....

Yep, Mike is "da man"!

I agree with what jay said above about going up & then out.

I don't think the pipe "kits" come in black, but it's not a big deal to paint w/ high heat paint......the galvanized just needs to be "pickled" first.

For good places to get pipe, try these:

www.kinsmanstoves.com Call Eric at the Brookfield #. Great guy, and a Hearth.com member....he'll give discounts to hearth members.

Another possibility is www.dynamitebuys.com Good company to do business with, and free shipping.
 
I also would go with the up and out. I did that for Jay's reason and also with the pipe inside, I figured the gasses would stay warmer longer and not condense...although I still had a buildup of creosote at the termination. I painted my pipe semigloss black and I think it looks great. Like a real woodstove :)

Chan
 
I am looking at a up and out set-up mainly if the power ever goes out you get a natural stack effect so the smoke goes out instead of backing up in the house. But since the Quad 1000 I am looking at has the outlet on the bottom it maybe a moot point?
 
I'm with j-takeman up and out. That's the reason for my up and out. My piping is sprayed black duro vent.
 
I would go up, out, and up to the top of the roof, you would get a very good draft and if power is lost you'll still have a natural heat pull up that pipe. Cost a few extra bucks but worth it in the long run.
 
imacman said:
the galvanized just needs to be "pickled" first.

I have been trying to find the pickling cream... Not sure how to pickle it.

Thanx
 
Nicholas440 said:
I would go up, out, and up to the top of the roof, you would get a very good draft and if power is lost you'll still have a natural heat pull up that pipe. Cost a few extra bucks but worth it in the long run.

Wouldn't that be too many turns? I am looking at an adapter, 45 degree, cleanout tee, 3 ft rise, 1 or 2 ft vertical , then 3 to 4 ft vertical rise .... I would attach it to the to near the roof....
 
As someone else mentioned, either way always terminate on a vertical. Which means if you go up and out, you should have a 4ft rise outside. This may get close to your roof line. Also look at your manual, there are restrictions regarding how close to windows or other stuff are in the way.

Splurge and go with 4" dia venting. It's a permanent installation and the machine doesnt work as hard to exhaust.

3" venting restricts you to 15 FT EVL

Elbow = 5 ft
45 deg = 3 Ft
1ft Horizontal = 1 Ft EVL
1 vertical = .5 EVL

So if you go up & out you have 3 elbows (15 Ft), looks like your busting out your 3" specs anyway. Better go with 4"
 
It seems that virtually all corner installs with a rise would require a 4 " pipe? .A clean-out tee =5, 90 degree =5, 45=3 ,3 to 4 ft rise = 1.5 to 2 there is your 15 right there. I bought a 3" corn vent kit (I was told that was all i needed) and a 45. Now I am going to have to try to exchange for a 4" kit , 4" 45 , a 2 ft and another 1 or 2 ft. return shipping wont be pretty.... But I need to do the right thing for safety.

And Ideas?
 
rail said:
imacman said:
the galvanized just needs to be "pickled" first.

I have been trying to find the pickling cream... Not sure how to pickle it.

Thanx

Pickling galvanized steel uses white vinegar. It cleans the oils off, and etches the surface. Galvanized that isn't pickled may start to peel off when it gets hot.

I poured the vinegar in a bucket (straight, not diluted), dipped a piece of "OO" steel wool to rub it around and help scratch-up the surface good. I let it sit on the surface while I did the other pieces, and then came back to rinse them all with clean water. Air dry completely, and then spray paint w/ Rustoleum Satin stove paint.

This info came straight from a tech at Simpson.
 
Status
Not open for further replies.