Building My Own Custom Gassifier...Need Help From Engineer or Someone Who Has the Experience

  • Active since 1995, Hearth.com is THE place on the internet for free information and advice about wood stoves, pellet stoves and other energy saving equipment.

    We strive to provide opinions, articles, discussions and history related to Hearth Products and in a more general sense, energy issues.

    We promote the EFFICIENT, RESPONSIBLE, CLEAN and SAFE use of all fuels, whether renewable or fossil.
Status
Not open for further replies.

boatboy63

Member
Feb 6, 2010
205
Northeastern TN
Before anyone flames me for taking on such a project, please understand, I have done my homework on how these things work. I came by the steel at a very cheap price and am buying the other components as I can afford.

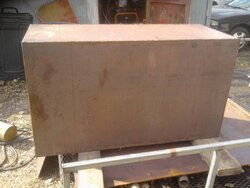
This project started last fall, but winter started over a month earlier compared to normal for us. I am building a gassifier that is similar to an Econoburn 150. The outside dimensions of the inner box (primary and secondary burn chambers) is already cut, welded, and pressure tested. I actually tested it to around 100 psi with an air fitting tapped into the box before doors were cut out. Sealing leaks were a pain, but it is not leaking any pressure now. It measures 18.5" wide by 26" deep by 46" tall. It is built from 1/4" A36 steel plate. I have approximately 250# of 3000 degree refractory mortar waiting to be mixed and put in this after I weld up my tubing for secondary air.

I am trying to look ahead and get ready for the outside box (water jacket). It will be made from the same 1/4" A36 plate and will be approximately 40" wide by 45.5" deep by 60" tall. This will allow a water storage area of about 11" to each side of the firebox, 1.5" to the front (excluding the doors), 18" to the back, and about 6" on the bottom and 8" to the top. From my math, the water capacity of the tank/water jacket will be somewhere around 350 gallons. The plate I am using is in 1/4" x 60" x 171" sheets. I plan to take the sheet for the outer jacket and have it bent in a brake so I can eliminate over half of the welding involved in making the tank.

My biggest concern is the water jacket capacity. I know most manufacturers are only making their boilers with 30 to 80 gallons of onboard storage where mine will have around 350. My water jacket is going to be 1/4" plate compared to most of their 1/8" plate and I will be attaching the jacket to the burn chamber with 1/2" or larger rod about every 12" to help support the added weight and pressure of the larger water box. By the time it is all said and done, the whole boiler will weigh around 2000# without water. The water will add another 2900# +/-.

Does anyone see a problem with this that I need to look for? This boiler will be going into an enclosed woodshed I have outside and will be piped to the house to be used with forced air heating.

Thanks in advance.
 
boatboy63 said:
Before anyone flames me for taking on such a project, please understand, I have done my homework on how these things work.

I'm pretty sure that the only way you're going to get flamed is IF YOU DON'T POST ANY PICS!!! :lol: Let's see 'em!
 
Congrats for taking on such a project. You sound as though you are going about it in a thought through manner. The only thing I can see & that's a big "maybe" as this is def not my cup of tea, is more water on the top of the unit as that is where the majority of heat will be. There are actually a few members on this forum who have built their own. I am sure they will be along, as well as the huge "been there done that crowd with a few generations of boilers" when they see this thread, with far more helpful info than I can provide. Once again congrats & we look forward to the photos of your project.
 
These pics were taken in November last year when I first started. Got to finish the box before our early winter started during the first week of December. Haven't done anything else with it this year, but it is time to start again. Basically, it looks the same except for some rust that started up as it has sat around the farm. The first pic shows a few sheets of the steel before the project started. The second pic shows the box itself. The third pic was taken from the bottom side looking from the secondary burn chamber before the bottom was welded on. You can see the cutout where the secondary air nozzles will be pumping air toward the secondary chamber. Hope to get going again in the next week or so and will post pics as it makes progres
 

Attachments

  • Steel 2 resized.jpg
    Steel 2 resized.jpg
    92.7 KB · Views: 593
  • Photo0192 resized.jpg
    Photo0192 resized.jpg
    118 KB · Views: 610
  • Photo0193 resized.jpg
    Photo0193 resized.jpg
    142.9 KB · Views: 611
Hello, Looks like a good start. I built my own boiler also from a pile of steel have in basement seems to work good, Make sure you can adj. the air for each chamber separtley to get the best flame. first time I lit my boiler was ok but took me 4 times adj. the homemade nozzels to get it just right. AND something else you may know or not, on your sides make sure you put some kind of solid rod from inner wall to outter wall about every 10 sq. inch or so to keep sides from flexing with the pressur up and down. Could cause cracks in time. My secondary fire brick and pannel glows bright red hot, sometimes I think it to hot but people tell me it ok.
Good luck!
 
Ozzie, what kind of water volume do you have in your boiler alone? I am still debating back and forth over having 350 gals of internal storage, or go with a smaller jacket and use some external storage. Already have idea of adjusting air mixtures on primary and secondaries. Also, if you have pics of your boiler, please post them. Thanks to all of you.
 
Stay bolts [rods] are put threw both inner wall and outer wall and stick out 1/2 minimum and are then welded continuous. [once you strike an arc,weld completely around the bolt] Sounds like this thing will be pressurized, don't skimp on the bolts. If you are not a welder that can weld out of position with ease I would do all the fab work and hire a welder for a day and let him go to town, this is not a place to learn to weld pressure vessels.
 
Hello, About water capacity my house is only 2000 sq. feet with basement so only have 50 gal. in boiler and couple propane tanks one with copper baseboard heat strips for DHW for around 180 gal. Yous with 350 would be ok just keep water moveing while heating and it wont run as ofton with more storage. My water comeing out of boiler is 15 to 20* hotter than ging in which is ok from what I could find out. And have some sort of over heat control, when boiler comes up to temp. and shuts off there still alot of heat inside with brick and all . I have an over heat switch which comes on at 190 and off at 160. the main control comes on at 150 and off at 180 so they work each alone but keep it cool. My preasure runs around 28lb. be sure you have enough expansion tanks for amount of water. Is yours going to be preasurized?? And also I have the air intake with a ele. control flap which works with water temp if ele. goes off it suts off fire to starve it out.
You could put in search my nane ozzie88 it will bring up post I put in with photos, I can send you different ones if you want, good luck, Chuck
 
I had plans on running unpressurized, but have also thought about running maybe 5psi. Have you considered changing your setpoints since you are running at 28psi? That should raise the boiling point of water significantly and would allow you to run hotter. You mentioned your firebrick was glowing. I am doing mine a little different. I contacted a place that sells different types of insulation and told him what I was looking for, specifically something that would allow high temps, not easily breakable, and could re-ignite the fire after sitting for extended periods. He took the info, made some calls, and then called me back. He suggested a castable refractory called Mizzou castable plus. It is rated at 3000 degrees and is nearly as hard as a rock. It is a ceramic type refractory that comes in 50# bags and mixes with water and is similar to mortar for laying block. I bought 5 bags of it ($48 each) and have it sitting here waiting.

I looked thru your postings about building your boiler and you mentioned something about researching nozzle material, swirl, etc. Can you give more info on where you found the info? As I mentioned before, I went to a member's home last year and saw their Econoburn 150 and am building mine similar to the layout of it. At the bottom of the burn chamber, it had refractory about 2.5-3" deep in the middle and it tapered upward to the left and right to promote allowing the wood to settle. The nozzle setup in his was basically a rectangular slot from the primary to the secondary that was about 1.5" wide and 4" long from front to back. If I recall correctly, it had around 4) 3/8- 1/2" square steel tubing molded into the refractory at various angles pointing slightly downward to supply secondary air and control the swirl. I was planning on welding 2 pieces of 1" tubing (1 left side and 1 right side) to the plate I have seperating my 2 burn chambers. I would then cut into it and connect my 3/8-1/2" square tubing to feed the nozzles. This will all be buried inside the castable refractory so the heat from it will heat the air going to the secondary nozzles. I will have an inducer (draft) fan mounted to the front of the boiler just outside the refractory. It will be piped to the 1" tubing going to the left and right to supply the nozzles. I have considered welding the 1" tubing to the top of the secondary chamber and running along the sides, then cutting out a hole in the plate between the primary and secondary chambers toward the back, running this tubing up into the primary and then be buried in the refractory before supplying the smaller nozzle tubing. I just don't know what will work best.

I also plan to make a small platform from the castable refractory and place it on the bottom of the secondary chamber, directly under the nozzle. I will make this so that it will take the added heat and divert it to the sides to help the heat transfer to the water jacket.

Also, what wall thickness is your pipe used for the heat exchanger for the exhaust in the water jacket? Somebody recommended using thinner pipe (1/16"?) like what is used in an automotive exhaust as they said it would give better heat exchange to the water. I started to build it out of 1/8" wall for longevity, but am second guessing myself now. I am thinking about using 1.5" diameter pipe for this. Also wondering about how to do the turbolator deal to knock off residue from inside the pipe each week.
 
ok. sounds like a good plan, first I think you said you have steel plate between the two chambers,dont have any steel in the second chamber it will melt and break down fast,running the pipes along side to preheat air is good and is what I did. my boiler is haveing the second chamber on top[up draft] so keep in mind when I talk. I put just small amount air in primery chamber[bottom] 1/2inch x 1inch. wich I can adjust if need, Then top of bottom chamber I have 1 1/2 to 1inch pipe 11inch long in chamber with 3/8 holes drilled in on both sides to start swerl my bottom to top chamber is only 2 x 6inch starting the choking ,then second the second chamber the pipe is 1 1/2 to 1 inch with a tee by 5inch long with 7 3/8 holes drilled in this,and the second chamber is 4inch by 13 wide with a 2inch piece all wy across 10 inch from back where nozzles are[it is the choker to swerl the air and complete secondary combustion.after that is just the heat no more flames and fire brick ends 8inch from the choker,this is where the real heat takes place is before the choker,sorta compresses the air and swerl to get complete burn. Keep in mind I had to make 4 different nozzels and hole sizes to get it right. Some would push fire to one side,some would not fire second chamber,etc. If you get it right you should be able to adj. air and see color of flame change,yellow,blue,purpel. My pipes threw tank are 1/4inch, 1/8 shoule be ok but any thinner will not last long. be takeing more chance on cracking, I also welde 1 1/2 inch pipe threw both chambers in different spots threaded end outside with caps n them so I can see fire and also be able to clean them out. I made my panels so I can slide them front to back and clean and the top with 4 bolts so can remove to clean out tubes. When looking threw the secondary chamber threw the pipe and it is not lit yet but close,when it does light it shot a flam out 5inch in my face,I dont do that anymore??just like adding propane to it,


I looked under the Garn and how they made it,choker and swerl,then ther was a site [ www.heuristicengineering.com/papers/richmond.pdf ]
 
As you can see in the pic above, I do have a solid piece of 1/4" plate seperating the primary and secondary combustion chambers. It does have a cutout in the plate where the refractory will come thru from the primary into the secondary. I put the plate in there to support the weight of the wood and the refractory. I had thought about using expanded metal (mesh) and burying it in the refractory to support it, but was concerned about it trying to flex. The early models of the Econoburns had refractory as a divider between the primary and secondary and they also had refractory all around the metal in the secondary chamber. The newer models have changed and do still have solid refractory between the primary/secondary chambers but the sides and back of the secondary chamber are all steel. All their steel surfaces do have water on the other side of them. I don't even think their new models have the refractory pedestal or diverter that sits on the floor of the secondary chamber directly beneath the burn nozzle. I do plan to make a pedestal to divert or stir the flame/burning gases in the secondary to distribute it to the sides somewhat instead of it impacting directly against the steel in the floor (water jacket) of the secondary. This pedestal will be about 9" below the nozzle. My theory is that since my steel plate between the chambers is not in direct contact with the flame/burning gases coming from the nozzle, hopefully it will be ok. The extreme heat from the nozzle (1800-2000 degrees) will be directly in the cone it produces and the temp will drop substancially by the time it gets back to my steel plate. I am open to any discussion about this if someone thinks I am wrong.

My biggest headache now is trying to properly size and layout my heat exchanger tubes. I am thinking about 6 or 8 straight pipes that will be about 24" long each. I am still trying to figure out a way of making these pipes easily accessible for cleaning. Am also trying to figure out how I am going to open/close the bypass on the primary chamber when I get ready to open the loading door. The bypass cutout will be a 6" diameter hole in the back wall of the primary chamber. I am wondering where I can run a rod thru to the front at the door to open and close this bypass. Also concerned about how to seal the bypass hole at the back when the bypass is closed and boiler operating normally.

Thanks for any further advice.
 
not tryin to poo-poo your project here boatboy, but you may have more time and effort in actual research and construction to make it not so cost effective. If that's what you want then go go man! but Add it all up and the purchase of a new econoburn may be in the cards. Just my 2 cents, where is the deerfanitic when you need him? Didn't he try to do this? Good luck regardless. sweetheat
 
sweetheat said:
not tryin to poo-poo your project here boatboy, but you may have more time and effort in actual research and construction to make it not so cost effective. If that's what you want then go go man! but Add it all up and the purchase of a new econoburn may be in the cards. Just my 2 cents, where is the deerfanitic when you need him? Didn't he try to do this? Good luck regardless. sweetheat
Unless I win at Powerball, there won't be a new one in my future. The way things are around here, it is tough enough to keep food on the table. The way I look at it is that if I am home and not on the clock for my employer, my labor for me is free. I consider this as a hobby to myself so it doesn't seem like work. I love welding, love the internet, and love saving money on the utilities while keeping the house warmer during the winter. I like being able to build something and it work the way it was designed...as well as the bragging rights that go along with it. Sure, I love to pile up on the couch or my Lazyboy and watch tv, but there will be plenty of time for that a couple of months from now when the snow is flying. :)
 
Status
Not open for further replies.