Hearthstone Shelburne Install & First Burn

  • Active since 1995, Hearth.com is THE place on the internet for free information and advice about wood stoves, pellet stoves and other energy saving equipment.

    We strive to provide opinions, articles, discussions and history related to Hearth Products and in a more general sense, energy issues.

    We promote the EFFICIENT, RESPONSIBLE, CLEAN and SAFE use of all fuels, whether renewable or fossil.
Status
Not open for further replies.
Agreed. I'm glad you stopped here for a safety check. We want you to burn safely and really enjoy the experience. Hopefully you will continue to check in as things progress. Get it right now so that you are not worrying about safety in the middle of a blizzard when the power goes out.

Code and stove mfg. clearances are for a reason. The stove needs to be set up for the worst case scenario, not a mild weather test. Things will be working a whole lot harder and hotter when it is below zero outside than they are now. All clearances are based on this.

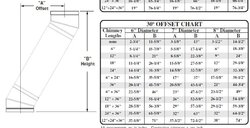
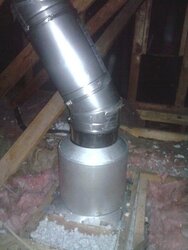
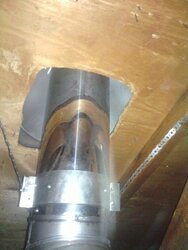
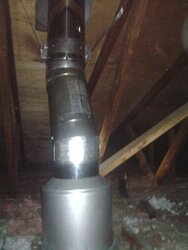
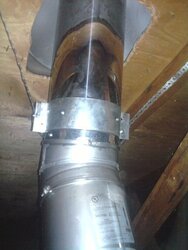
It's good to hear that you are having a pro come and check this out. Your buddy did improve things. The ceiling support looks better and so does the roof flashing. But he is dead wrong about the single wall in the attic. It must be all class A, High Temp pipe, no exceptions. 30 deg class A elbows are the max allowed. What needs to be done is to look at the offset tables from the mfg for this pipe and make it all class A pipe.

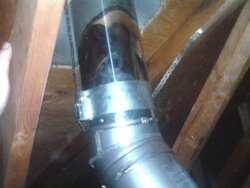
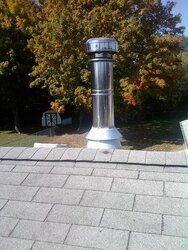
Is this Supervent pipe? The offset tables will provide you with the height and offset you will get using 30 deg. class A elbows. You may be able to drop down the class A ceiling pipe and raise the roof pipe enough to fit with 30 deg elbows and a short connector pipe. The offset table will determine whether this is possible or not in the distance between the top of the insulation shield and the roof. If the roof pipe gets raised a foot, that will be good. It still looks shy of 3ft. This is not measured to the top of the cap, it is to the top of the pipe.

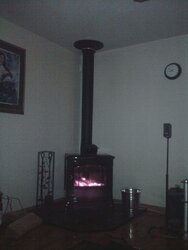
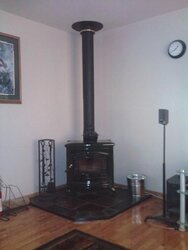
Finally, we can't see how the single wall stove connector pipe is installed. It should have the crimped end of the pipe pointing down toward the stove. And each joint should be secured by 3 screws, 120 deg apart. Code says it needs to be 18" from any combustible.
 
Well, nothing to add to all the critiques so far. They are all right on. I just want to add my concern for you and your family. I have been to too many fire calls caused by faulty installations of heating appliances, some very tragic.
 
Thanks for all the great information. Were not burning again until it's all inspected. Yes, all the pipe is Supervent from Lowes, even the elbows. Understand that I have not nor will I take offense to the advice offered in here. I understand that you all are just looking out for a new guy and it's much appreciated and well taken. I'm waiting on a return call from an installer. After reading in here even before I bought my stove I originally wanted double wall from the stove up due to the tight corner the stove is going in.


tfdchief, I feel your pain as far as having to respond to those calls. I'm the one who get's the worst part of being there & having to notifying the family. I'm not on the fire side as I actually work for a living. ;-P My fault was in asking a friend to help in a major thing like this. He offered from the start and I should have refused and went with that my wife & I discussed. I fear that a friendship may have been damaged over this. I harbor no ill feelings and am thankful he took the time out of his schedule and away from his family. I got the feeling that he is taking a different stance. I guess we all learned something this weekend. Somethings in life that may be free could just cost you more than you originally wanted to spend.
 
Not only are the single wall elbows illegal and dangerous, it also looks like the offset is greater then the 30 deg allowed. This means you are in a real pickle as the holes in the ceiling and roof are done. You are not allowed to use anything greater than a 30 deg elbow in the US.
 
Both the sections of class A can adjust up or down. I'm hoping that with a pair of class A 30 deg elbows and a short connector that the offset will work out. If you can do it with a 12" connector you get an 8 1/4" offset, with an 18" connector you will get an 11.25" offset. Worst case scenario will be to patch the hole and make another. That's a bummer, but not the end of the world and certainly not worth ending a friendship over. Buy your buddy a nice gift, bottle of wine or booze and let him know there are no hard feelings.

In the future, in case anyone is reading this - the piping manufacturer's provide good documentation on how to install their pipe. When in doubt, read the manual first.
 

Attachments

  • supervent_offset.jpg
    supervent_offset.jpg
    64.8 KB · Views: 394
Got it fixed today. I thought I had pics of the chimney. I'll get more tomorrow. I had a certified installer out today. We got er done and have a nice fire going. It cost a bit, but my wife and I will sleep better at night.
 

Attachments

  • Attic Fix 1.jpg
    Attic Fix 1.jpg
    37.6 KB · Views: 378
  • Attic Fix 2.jpg
    Attic Fix 2.jpg
    35.3 KB · Views: 380
  • Attic Fix 3.jpg
    Attic Fix 3.jpg
    37.2 KB · Views: 368
  • attic fix 4.jpg
    attic fix 4.jpg
    34.6 KB · Views: 383
  • Attic Fix 5.jpg
    Attic Fix 5.jpg
    37.3 KB · Views: 376
  • Fixed 1.jpg
    Fixed 1.jpg
    26.8 KB · Views: 356
I am so glad to see that you got it done correctly it looks great! Enjoy that new stove now.
 
There ya go Sheepdog,enjoy.Now you and the rest of us got that piece of mind.Now you can get that Shelburne up and going and KNOW that it's right.Rest easy,you've made some new friends.Oh 1 more thing,BURN PICTURES!!!!!!!!
 
Great. Looks like an 18" connection between the elbows worked. I'm glad you could use the existing hole. Hopefully that pushed the pipe up a bit higher above the roof too.

Enjoy the new stove and don't be a stranger. You may have had a bad situation, but you dealt with it well.
 
way to go sheepdog, I'am glad you got your install fixed right and most of all legal, to nice of home you have to risk having a fire and most of all you can't replace your family, good luck with the stove enjoy it this winter.
 
sheepdog000 said:
Got it fixed today. I thought I had pics of the chimney. I'll get more tomorrow. I had a certified installer out today. We got er done and have a nice fire going. It cost a bit, but my wife and I will sleep better at night.


Fantastic. Apart from the cost, I'm glad the fix went smoothly.
 
Looks good!

I'd offer you a beer, but you would have to spend the stove and install budget all over again to come and drink it.

Glad it turned out well...enjoy the heat.
 
So glad you posted here and got some safe, proper guidance. I've seen some people in the same situation get mad, post a rant, then never return (and, presumably, never correct the bad install). You took it all in stride and corrected the situation immediately. Well done!
 
Man o man, sheepdog000. Very commendable that you jumped on this and got 'er done so quickly.
Obviously, the pro knew what needed to be done. Enjoy the Shelburne, and definitely get us some pics of that thing burning.
We luvs us some pics. :lol:
 
Thanks for the replies. I would not take anything personal as I have very thick skin. Plus, I don't live in a glass house..... ;-P I came to this website to learn from the experts and get good honest feedback. The clearances on this stove with double wall pipe is 6" from combustibles from the ceiling down. The chimney pipe may look crooked in the pic, but it's not, that's just my photography skills. That night I had a small bed of coals from some paper and tinder that I set only 1 log on. That log was about 19-20" in length, 6" wide, and 3 " thick and was seasoned a couple of years. It got so damn hot in my house that I put on the fan in my bedroom and opened the window. I think I lost a couple pounds in sweat that night. The pics of the two lanes of wood are various hardwood. That's next years stash. I need to tarp the top and It's gonna sit and season. The single stack is 90% apple and the top layer is Honey Locust. It's also getting tarped and forgotten for at least a year, maybe two.

Frostbit, I'd love to take ya up on that offer. I kick myself in the ass everyday for moving back to MI from Alaska. I really miss living there.

DanCorcoran, those pics are beautiful. I would love to move out into the Alaskan wilderness into a cabin just like that.

Thanks again everybody, you guys are great.
 

Attachments

  • Chimney.jpg
    Chimney.jpg
    84.2 KB · Views: 283
  • Stove 1.jpg
    Stove 1.jpg
    23.9 KB · Views: 265
  • Wood 1.jpg
    Wood 1.jpg
    83.8 KB · Views: 281
  • Apple.jpg
    Apple.jpg
    99.3 KB · Views: 272
Looks great and ready to rock and roll! I like that stove a lot.

Don't worry about overheating, when your temps drop a bit it will be burning steadily. In the meantime just make small 2-3 split, hot fires and let them burn out.
 
Congrat on the installation & correction. The pipe work looks great now. But make sure that the stove clearance from the wall meet the minimum requirement. May be it is but the picture makes it looks pretty close to the wall.

Cheers......Som
 
Got a nice spread there, along with the nice wood!

Don't get in too big a hurry to wanna be back in Alaska....we're freezing up here pretty good, down in the 20's at night. All the green is now brown; waiting on the snow which isn't far away.
 
Status
Not open for further replies.