Pitcures of or new hearth and PE Alderlea T-5

  • Active since 1995, Hearth.com is THE place on the internet for free information and advice about wood stoves, pellet stoves and other energy saving equipment.

    We strive to provide opinions, articles, discussions and history related to Hearth Products and in a more general sense, energy issues.

    We promote the EFFICIENT, RESPONSIBLE, CLEAN and SAFE use of all fuels, whether renewable or fossil.
Status
Not open for further replies.
Apr 6, 2011
36
Sodus NY
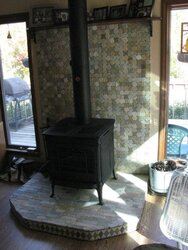
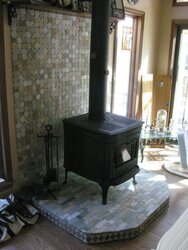
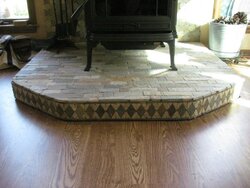
Bought the stove in April and it sat at their warehouse till the hearth was done. Started in earnest in August on hearth but ran into tile problems. The design on some of the tiles that are on the wall was 180 degrees out and would not fit together. The tile shop was super helpful and could not understand how even the same lot number had different sheets in them. We finally finished and installed the stove after cleaning and painting the old stove pipe, which in very good condition after 20 years of burning. Bought a new thermometer to install in the double wall pipe (wife was upset about where I placed it). We've done our "cure" burns and a few fires just to warm the house. Even with very limited time with this stove I find it is incredibly easy to operate, compared to the old Dutchwest. I think it'll heat better but don't know that yet. It does seem to put out heat faster from a cold start than the Dutchwest did.
 

Attachments

  • IMG_6558_1.jpg
    IMG_6558_1.jpg
    62.5 KB · Views: 443
  • IMG_6559_1.jpg
    IMG_6559_1.jpg
    59.6 KB · Views: 521
  • IMG_6560_1.jpg
    IMG_6560_1.jpg
    54.8 KB · Views: 451
Looks great! I am heading into my first full season with my T5 as well. Its a beautiful stove.
 
Very nice looking install.
 
Looks great. The T5/T6 will be in the running (along with the VC Defiant, which also has tight corner clearances) when I add a new stove next season -- will be interested in any updates once you begin running it in earnest.
 
Great looking hearth that must of took some time to have it turn out that nice. It will be interesting on how you like that stove wnen the cold weather sets in.
 
Where are the flames?!? Looks great.
 
Very well done.

pen
 
Stunning tile work and an all around great install! Keep us updated with how you like the T5. I have found the T6 an incredibly easy stove to run and so far I'm thrilled with it.
 
Almost bought the T5 myself. Beautiful setup. Let's see some fire!
 
Very cool, thanks for the pics.

Does the pipe go straight up , and how tall is the total stack?

Looks like you will have to find someone with skinny arms and a short stubby screw driver if you decide to add the blower, which depending on the home size and layout, you may wish to add down the road. Looks like a lot of windows so you may need the blower increase the output.
 
Nice work, hell of a job !!

Shawn
 
Thank you for all the nice comments. I've done many tile projects, but these tiles were stone on sheets, so I bought a tile saw. Wish I had done that sooner. Well worth the $100.00 investment. The stove pipe goes straight up through the ceiling. About 25 feet total length. never had draft problem with old Dutchwest (can only pull so much through cumbuster). Had a couple of fires with it 45-50 outside and draft didn't seem excessive, still a little concerned with it 20 out, it'll pull too much. I'll wait and see. As far as the blower goes our house is a passive solar design so the room it's in has a 17 foot cathedral ceiling with a ceiling fan that runs all winter long (can tell the difference during a power outage how much work the fan does). The upstairs is open to the main room and a short hall to the downstairs master bedroom (cooler during the winter but great for sleeping), so I feel I won't need the blower. again thanks for all the nice comments
 
Very nice setting for that beauty. You have done well. I agree that it's worth trying out the stove convectively first. If power outages are frequent, maybe get an ecofan to keep the air moving?
 
Status
Not open for further replies.