
i have been reading this forum for the last few days, and i have found it to be very informative. in a previous post i seen someone mention that the draft control knobs will spin a full 4 turns. mine do not. on one door it will turn 2 full turns, the other 2 and 1/4 turns. this does not seem to be enough. in order to keep the flue pipe temp over 300 degrees i must keep them wide open. i took out the allen screw and found the washer is welded on . so in other words if i could unscrew the knob more it wouldnt increase air flow. this stove was purchased in may of 1984 if that helps any. when i purchased this stove 4 days ago i was given the original warranty card completly filled out but for some reason was never sent it. any help would be greatly appreciated . thanks, mike.
need help with my fisher grandma bear
- Thread starter redwings618
- Start date
-
Active since 1995, Hearth.com is THE place on the internet for free information and advice about wood stoves, pellet stoves and other energy saving equipment.
We strive to provide opinions, articles, discussions and history related to Hearth Products and in a more general sense, energy issues.
We promote the EFFICIENT, RESPONSIBLE, CLEAN and SAFE use of all fuels, whether renewable or fossil.
You are using an out of date browser. It may not display this or other websites correctly.
You should upgrade or use an alternative browser.
You should upgrade or use an alternative browser.
- Status
- Not open for further replies.
Hmm, No allen screw, no washer , and no weld on the intake air system.....
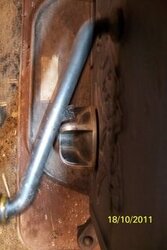
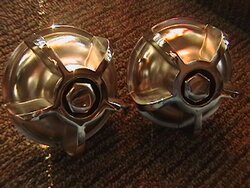
I really need to see pictures of your draft control. They were patented as "air damper" but I usually call them "draft caps"....... The original was a simple pipe cap with a bolt welded inside in the center. The patented ones are called "EZ-Spin". None of them use or have a set screw or washer. The knob (draft cap) is threaded and the good ones have a steel insert like a nut cast into them to prevent the soft material from wearing the threads. Maybe you mean the mount bolt? The only set screw used was on the original chrome ball on the handle, and the ball feet. So I have no clue as to what you have.
The problem with the first cap, was the bolt turned with the cap, and the soot on the threads would bind and wear the door. So his dad came up with the idea to mount a 1/2" bolt in the door, double nutted to the door. This becomes a threaded shaft on the outside of the door that the draft cap spins back and forth on. Mine spin 5 1/2 to 6 turns, but I'd say when lighting it, only 2 or 3 turns are needed. It soon roars with that much intake air, and I have to close the exhaust damper half way. Once the exhaust damper is partially closed, 2 turns max is all it takes, and as the stove heats, closed to one turn brings it up to full operating temp. Overnight 1/2 turn is about right for semi cold nights. Mid winter nights may take 3/4 to a full turn.
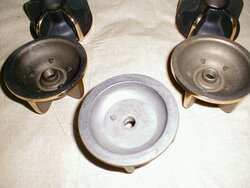
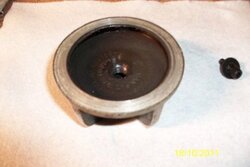
I just measured the actual air opening, and I get about 1/4 inch to 3 turns. That's good for starting it a minute or so, then I have to start closing it down. Here's some pictures of the backside and front of draft caps. The bolts are 3 1/2 inches long, so the maximum opening is governed by how much of the bolt sticks outside the stove. (the longer the bolt, the farther you can unscrew it open) If the inside nut is at the end of the bolt, too much bolt sticks out the front, and when the knob is closed, the bolt head sticks out about 1/2 inch or more. So I thread the bolt into the knob, install one nut (should be a thin half nut, but full size nuts work) then thread it into the door. By closing the draft cap, you can adjust the bolt head even with the outside of the cap. Install the second nut inside the door and tighten against the door. Only the first 3 turns are required to open for plenty of air.
I really need to see pictures of your draft control. They were patented as "air damper" but I usually call them "draft caps"....... The original was a simple pipe cap with a bolt welded inside in the center. The patented ones are called "EZ-Spin". None of them use or have a set screw or washer. The knob (draft cap) is threaded and the good ones have a steel insert like a nut cast into them to prevent the soft material from wearing the threads. Maybe you mean the mount bolt? The only set screw used was on the original chrome ball on the handle, and the ball feet. So I have no clue as to what you have.
The problem with the first cap, was the bolt turned with the cap, and the soot on the threads would bind and wear the door. So his dad came up with the idea to mount a 1/2" bolt in the door, double nutted to the door. This becomes a threaded shaft on the outside of the door that the draft cap spins back and forth on. Mine spin 5 1/2 to 6 turns, but I'd say when lighting it, only 2 or 3 turns are needed. It soon roars with that much intake air, and I have to close the exhaust damper half way. Once the exhaust damper is partially closed, 2 turns max is all it takes, and as the stove heats, closed to one turn brings it up to full operating temp. Overnight 1/2 turn is about right for semi cold nights. Mid winter nights may take 3/4 to a full turn.
I just measured the actual air opening, and I get about 1/4 inch to 3 turns. That's good for starting it a minute or so, then I have to start closing it down. Here's some pictures of the backside and front of draft caps. The bolts are 3 1/2 inches long, so the maximum opening is governed by how much of the bolt sticks outside the stove. (the longer the bolt, the farther you can unscrew it open) If the inside nut is at the end of the bolt, too much bolt sticks out the front, and when the knob is closed, the bolt head sticks out about 1/2 inch or more. So I thread the bolt into the knob, install one nut (should be a thin half nut, but full size nuts work) then thread it into the door. By closing the draft cap, you can adjust the bolt head even with the outside of the cap. Install the second nut inside the door and tighten against the door. Only the first 3 turns are required to open for plenty of air.
Attachments
coaly check your email . i just sent you several pics of my draft control. it took the ol'lady 3 hours to figure out how to get the pics onto her computer then email them to me. i forwarded it to you. i am not computer savy enough to figure out how to get them posted on this forum
here are some pics of my draft controls. wow i tell ya all i sure hope that worked. it took we all day and a bit of argueing with the woman.
Attachments
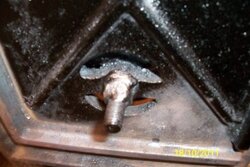
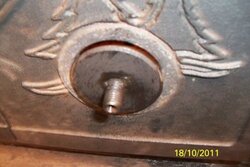

OK, thanks. That washer is blocking off all the air flow. Looks like you need to take an angle grinder to the bolt and weld to remove it. You may have to drill the old bolt out of the door. Even though the door is threaded, if you ruin the threads it's no big deal since double nutting the bolt in the door holds it tight. Just be very careful around the wall of the door casting. The cast bar that goes across the air opening is the weakest part of the door !
No idea why they did what they did. Now I see they put an allen screw on the end of the bolt where the head should be. Interesting. You can remove the draft cap to grease the threads without reaching through the backside of the door working through your closed up air opening.......
I sent you a short course on saving, dragging and dropping pictures and sending them in mail. It will give you two something else to share the love.
Here's the air opening required;
Attachments
ok coaly thanks for all your help. i will try to figure this forum out a little better and post my replys on here instead of directly emailing you. maybe my dilemma may help out others who read this. so what do you think? is my stove a manufacturing defect ? i have worked in several factorys in the past and there sure is people out there who do not take pride in there work. only there just for a paycheck. the pic that you posted does not have a washer welded on the the stud on the outside of door like mine does. how about if i take a grinder and cut off most of the washer but do not touch the stud ? that would increase the air flow. but then again the draft knob would still only have roughly 3/16 of an inch clearance to the door when fully open. when i purchased this stove less than a week ago , it was covered with creosote. i thought the previous owners burned alot of green wood or maybe even pine due to the amount of creosote inside. there was alot of pine trees in the area where the stove come from. but it was near columbus ohio. which is basically hard wood territory. but i thought maybe it was the conveniance of a tree in the yard they decided to use instead of buying quality seasoned hardwood which is not hard to find in this area. now after this discovery maybe it was because of the restriction to air flow thru the draft controls. anyone else with tips or comments please fill free to jump in. i personally emailed coaly because for one reason, i knew he would lead me in the right direction. and second of all, he has posted his email address on here before. it was easier for me to email him directly.
Yes, I would grind that washer away and use the existing stud welded to the door as long as it's long enough on the outside to open far enough. (the 2 turns you get out of it now will stay the same. So that's as far as you're going to open it) With the washer gone, only you will know if you get enough air "wide open" that way. It will probably be fine since once up to temp, you don't need 2 full turns.
Building the stoves, licensees were sent blueprints to go by, and it would have been much quicker and cheaper to stick a 3 1/2" bolt through the draft cap, and nut it to the door. Some of the reasons I can think of that someone would want to modify the air intakes would be chimney related problems. Most "stove" problems are chimney or installation problems and people try to modify the stove to correct it. If you close the damper too soon before the chimney is hot, the draft can stall and as it cools, gets heavier and drops back towards the stove. This smoke from the chimney is now coming out the intakes. Or if they burn it too cool, and plug the holes in the exhaust damper, when it's closed it can't vent. Fire dies from lack of oxygen coming in, and can puff violently back out the intakes. This could cause them to believe they need to modify the stove and close up that big hole behind the knob to prevent sparks and flame from coming out. Another scenario is a senile or forgetful person running the stove and forgetting to close the dampers. This washer installed by a relative or neighbor would limit the intake for sure. The proper way to do that would have been to loosen the jam nuts on the door, and run the bolt in a few turns. The knob would only open a few turns and hit the bolt head limiting the intake opening. So who knows?
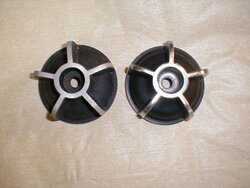
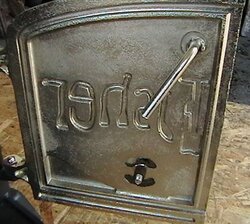
Here's what the outside of the knobs should look like with bolt heads in them. These bolts were not factory plated brass. They were a mild steel bolt with no head markings. A worn threaded knob can be tightened up by plating the bolt to make it oversize, tightening the worn threads back up. Replacement draft caps ARE still available in aluminum, brass, or bronze with steel inserts to prevent wear of the draft cap.
One of any fisher restorer's pet peeves is getting a socket on the bolt head when many aren't drilled exactly centered and you can't get a socket inside the knob to get a stuck bolt out of a door. Sometimes you can remove the inside lock nut against the inside of the door, and use 2 nuts tightened against one another to grip the bolt to loosen the outside lock nut with a very thin wrench under the cap. Once loose, turn it through the door to remove. When you have to do this a few times, you learn to install the bolt so the head sticks out when draft cap is closed. You can always get a wrench on it this way !
Building the stoves, licensees were sent blueprints to go by, and it would have been much quicker and cheaper to stick a 3 1/2" bolt through the draft cap, and nut it to the door. Some of the reasons I can think of that someone would want to modify the air intakes would be chimney related problems. Most "stove" problems are chimney or installation problems and people try to modify the stove to correct it. If you close the damper too soon before the chimney is hot, the draft can stall and as it cools, gets heavier and drops back towards the stove. This smoke from the chimney is now coming out the intakes. Or if they burn it too cool, and plug the holes in the exhaust damper, when it's closed it can't vent. Fire dies from lack of oxygen coming in, and can puff violently back out the intakes. This could cause them to believe they need to modify the stove and close up that big hole behind the knob to prevent sparks and flame from coming out. Another scenario is a senile or forgetful person running the stove and forgetting to close the dampers. This washer installed by a relative or neighbor would limit the intake for sure. The proper way to do that would have been to loosen the jam nuts on the door, and run the bolt in a few turns. The knob would only open a few turns and hit the bolt head limiting the intake opening. So who knows?
Here's what the outside of the knobs should look like with bolt heads in them. These bolts were not factory plated brass. They were a mild steel bolt with no head markings. A worn threaded knob can be tightened up by plating the bolt to make it oversize, tightening the worn threads back up. Replacement draft caps ARE still available in aluminum, brass, or bronze with steel inserts to prevent wear of the draft cap.
One of any fisher restorer's pet peeves is getting a socket on the bolt head when many aren't drilled exactly centered and you can't get a socket inside the knob to get a stuck bolt out of a door. Sometimes you can remove the inside lock nut against the inside of the door, and use 2 nuts tightened against one another to grip the bolt to loosen the outside lock nut with a very thin wrench under the cap. Once loose, turn it through the door to remove. When you have to do this a few times, you learn to install the bolt so the head sticks out when draft cap is closed. You can always get a wrench on it this way !
Attachments
Sorry my friend, I got a bit ancy and emailed you directly and after I sent it , I realized you answered my post. I got to say that it sucks that I don't have an original equiptment stove. Someone tampered with its operation and actually didn't do it any good. So my draft knobs are supposed to have a bolt head that is visible in the center ? Instead if the allen screw that is tapped into the center of the stud ?
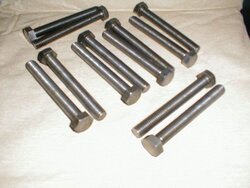
Yes, the center picture in post #1 is a few sets of new bolts never installed in stoves when they closed down in 1988. "New old stock". You thread the bolt into the cap first from the front side of the cap as shown in picture above. Then install a nut on the bolt, then thread it through the door. Adjust the bolt where you want it, and install the last nut inside the door to lock it in place. The picture above is what it should look like in the closed position with bolt head even with the knob. Spinning the knob up towards the bolt head opens it, and the head limits it's opening. The farther the bolt head sticks out when closed, the more turns you can "over open" the damper if like. That;s why I suggested to cut the old bolt off and drill it out as necessary to bring it back to the correct parts. But grinding away the washer is much easier if it gives you enough intake. And you can replace your knob if needed (or grease the threads at least yearly) by removing the set screw stop bolt on the end.
Here's the Patent drawing of the cap showing it's installation;
http://www.freepatentsonline.com/4037584.pdf
Here's the Patent drawing of the cap showing it's installation;
http://www.freepatentsonline.com/4037584.pdf
coaly, you are the king . Thanks so much for all of your help. I will let you know which route I take. For now I may just cut off most of the washer. But you are right , I still will only be able to open the knobs 2 full turns on one door and 2 1/2 on the other door. For a quick fix I may try that. But I would much rather have it back to the way it was intended to be. As far as the bolt goes does it matter what grade bolt I use ?
Grade doesn't matter, it will just have markings on the head if grade 5 or 8. Usually the cheapest mild steel hardware will have no markings. That's what was used originally. NOT zinc plated or galvanized ! Plain steel 1/2" bolt 3 1/2 or 4 inches long. Zinc creates galvanic corrosion problems between the door, bolt and dissimilar metal draft cap. Zinc should never come in contact with brass or aluminum. It will corrode together.
Nah, the Stove King is alive and well in Oregon. He turned 70 this past August.
Nah, the Stove King is alive and well in Oregon. He turned 70 this past August.
- Status
- Not open for further replies.
Similar threads
- Replies
- 5
- Views
- 721
- Replies
- 11
- Views
- 532
- Replies
- 1
- Views
- 802
- Replies
- 60
- Views
- 6K