econoburn 150 with pressurized storage install and piping diagram

  • Active since 1995, Hearth.com is THE place on the internet for free information and advice about wood stoves, pellet stoves and other energy saving equipment.

    We strive to provide opinions, articles, discussions and history related to Hearth Products and in a more general sense, energy issues.

    We promote the EFFICIENT, RESPONSIBLE, CLEAN and SAFE use of all fuels, whether renewable or fossil.
Status
Not open for further replies.

Garth B

Member
Feb 25, 2010
42
New Brunswick
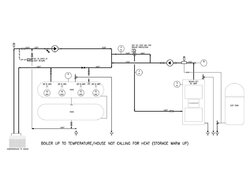
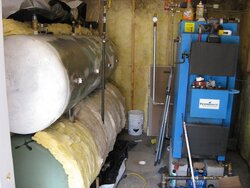
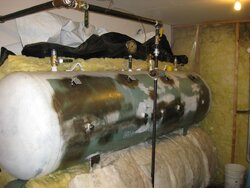
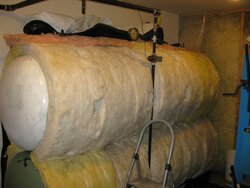
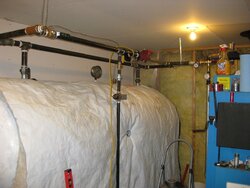
Thought I would start posting some pics and info on my installed system which has been working very well for me. Still have some insulating to do but other than that its complete. The PID is of the boiler room piping, my boiler is in the insulated half of an exterior woodshed (16'x20'). I have insulated 1" pex supply/return lines that travel 50' through 8" corrugated pipe underground to my basement.

Happy with the econoburn, but I would not be happy with it in my basement without very good draft or a draft fan... it can be smokey. The storage is also very nice, I can use programable t'stats and wake up to warm floors!
 

Attachments

  • Drawing1 Model (1).jpg
    Drawing1 Model (1).jpg
    51.6 KB · Views: 786
Some pics of the tank install, they are hard to make out but there are four hot water heater elements and four t'stats installed in the upper tank, I will get some pics of the radiant floor manifolds up later this week... they are a work of art, custom made using honeywell zone valves which will be available 40yrs from now! Unlike many other manifold valves which change every 5 yrs.
 

Attachments

  • IMG_2899.jpg
    IMG_2899.jpg
    154.1 KB · Views: 585
  • IMG_2903.jpg
    IMG_2903.jpg
    142.5 KB · Views: 449
couple more pics, closer to finished product
 

Attachments

  • IMG_2906.jpg
    IMG_2906.jpg
    127.6 KB · Views: 389
  • IMG_2907.jpg
    IMG_2907.jpg
    142.3 KB · Views: 384
The house I heat with this system has some big heat losses on its southwest exposure as you can see from the pic, twelve months to build the house and 10 months to get the heating system (almost) fully installed, the price of doing things yourself!
 

Attachments

  • IMG_2305.jpg
    IMG_2305.jpg
    146.6 KB · Views: 388
Nice setup, beautiful home. I see the Moose is loose and gone..........
 
Some weak points of this system are that you loose stratification in the uper tank a few hours after the boiler shuts down if the house is calling for heat. Also getting hot water from the lower tank is reliant on convection currents flowing through the two pipes conecting the tanks, one carries cooler water to the lower tank bottom, the other lets hot water up into the upper tank. These convection currents are not as fast as the house heating demand and therefore the upper tank can at times become cooler than the lower tank. Not really a problem as eventually the house stops calling for heat and the upper tank heats up again. There are definitly better set-ups available but this one fit my needs, budget and space constraints. The thermostatic valve for boiler protection is also undersized (1"), but it was such a good deal on ebay! lol with a larger one I could have a smaller delta T between my boiler supply and return temps, but its acceptable the way it is
 
There were many moose consumed during assembly! lol Its a wonder it got done
 
Looks nice Garth. Congrats on getting the system up and running! Enjoy. When I heated with a wood stove I use to say, "There is nothing like heating with wood." Now I guess I am going to have to start saying, "There is nothing like heating with wood with a gasser." Have a good heating season, I will be tipping back a few Lebatt Blue with ya this heating season. ;-)
 
Status
Not open for further replies.