Received my Summit Friday afternoon and started the install process Saturday. Whew is all I can say. I cut the existing cast iron damper out to allow the liner room for entry. In hindsight, I wish I had cut several inches more in all directions but I was trying to allow just enough room for the liner plus insulation plys 1 inch space around it.
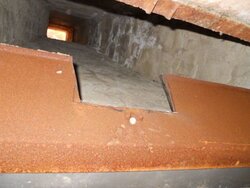
Next I prepared a block off plate that would be installed at the top of the fireplace brick opening. I bent the sides down 1 inch and the front would rest on the steel beam that holds the face brick while the back of the block off plate would butt against the fire brick. I cut a hole in the block off plate again big enough to allow 1 inch around the liner + insulation. If I did it over this would be several inches bigger as well. After screwing the block off plate up on the edges much to my disappointment the block off plate sagged in the middle leaving me to drive through it and the steel beam with 1/8 holes to hold it up.....hard as heck because the plate was made of stainless steel that I got from a friend that was the only scrap he had around. So after a hour or so of pushing like heck to get through the SS and 1/4 inch steel plate that holds the face brick, I'm through it ...on to the liner
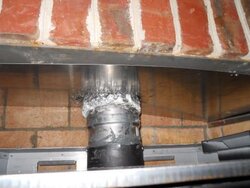
I prep the liner by cutting it 2 foot longer than what I need and wrap it with insulation and wire mesh. Easy enough. Then I hoist it to the roof, drop it down the chimney and wrestle getting it through a barely large enough damper hole and also barely large enough block off plate hole. WHEW!!
I decided to use my ash cleanout as an outside air intake so I bend some steel metal to provide a duct elbow just the right size that when the stove is pushed back into the space it will sandwich the made up duct to the back of the fireplace brick...about 4 inches....not to hard.
Ok now to the fun stuff, getting the stove in place. I finally got the liner through both plates and tied it off up top so it would dangle just above the stove once pushed in.
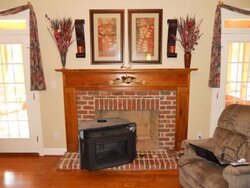
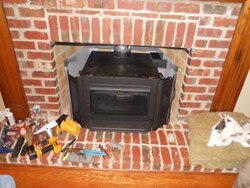
We walked the stove into the fireplace and heres where the fun begins......3 hours of wrestling with a connector that would not seat all the way into the stove opening. I think ultimately it was in somewhat of an angle which put it in a bind going into the stove assembly.
So after wrestling with trying to get the liner connector into the stove assembly for hours, I just can't get it to seat all the way down. Its 2 inches in the stove assembly out of 2.75 or 3 inches possible. It is past the holes that are provided for screwing the liner connector to the stove and thats the plan. Is that far enough? I don't see how it could come out if I can get 3 screws in it. Opinions?
Pictures are coming...I was tired and will post later in the week.
Next I prepared a block off plate that would be installed at the top of the fireplace brick opening. I bent the sides down 1 inch and the front would rest on the steel beam that holds the face brick while the back of the block off plate would butt against the fire brick. I cut a hole in the block off plate again big enough to allow 1 inch around the liner + insulation. If I did it over this would be several inches bigger as well. After screwing the block off plate up on the edges much to my disappointment the block off plate sagged in the middle leaving me to drive through it and the steel beam with 1/8 holes to hold it up.....hard as heck because the plate was made of stainless steel that I got from a friend that was the only scrap he had around. So after a hour or so of pushing like heck to get through the SS and 1/4 inch steel plate that holds the face brick, I'm through it ...on to the liner
I prep the liner by cutting it 2 foot longer than what I need and wrap it with insulation and wire mesh. Easy enough. Then I hoist it to the roof, drop it down the chimney and wrestle getting it through a barely large enough damper hole and also barely large enough block off plate hole. WHEW!!
I decided to use my ash cleanout as an outside air intake so I bend some steel metal to provide a duct elbow just the right size that when the stove is pushed back into the space it will sandwich the made up duct to the back of the fireplace brick...about 4 inches....not to hard.
Ok now to the fun stuff, getting the stove in place. I finally got the liner through both plates and tied it off up top so it would dangle just above the stove once pushed in.
We walked the stove into the fireplace and heres where the fun begins......3 hours of wrestling with a connector that would not seat all the way into the stove opening. I think ultimately it was in somewhat of an angle which put it in a bind going into the stove assembly.
So after wrestling with trying to get the liner connector into the stove assembly for hours, I just can't get it to seat all the way down. Its 2 inches in the stove assembly out of 2.75 or 3 inches possible. It is past the holes that are provided for screwing the liner connector to the stove and thats the plan. Is that far enough? I don't see how it could come out if I can get 3 screws in it. Opinions?
Pictures are coming...I was tired and will post later in the week.