
Hi folks,
Happy Thanksgiving!
I just picked up this stove this week. I grew up with the FA224CCL so I'm sort of familiar with it.
This came with the fan mounted on the side. There were no plates blocking the bottom vents so I cut out some sheet metal and bolted them on(they're not airtight, but very little air blows by at this point).
I took the Fasco fan off and mounted it to the rear and the airflow is still very low out of the top vents.
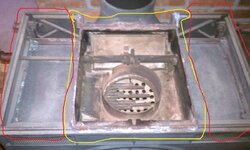
Could it be possible that I need to take the top off and reseal around the air chambers? It looks like I may be able to feel some slight airflow coming through the seems where there used to be furnace cement.
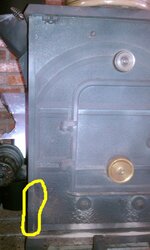
Also the rear panel that's held on by 4 bolts. It mounts flush up near the top, but there is a noticeable gap(1/16") towards the bottom near the ash pan. In fact, if I hit the back plate near the bottom some ash dust falls out. See where I circled in yellow in the attached pic.
I have the stove running nice & hot with the cat engaged(not sure of temp b/c the numbers on the gauge are all burnt off) but I am not able to heat an 11'x36' room that it's in at 28F.
Any help would be greatly appreciated!
Thanks,
beatle78
Happy Thanksgiving!
I just picked up this stove this week. I grew up with the FA224CCL so I'm sort of familiar with it.
This came with the fan mounted on the side. There were no plates blocking the bottom vents so I cut out some sheet metal and bolted them on(they're not airtight, but very little air blows by at this point).
I took the Fasco fan off and mounted it to the rear and the airflow is still very low out of the top vents.
Could it be possible that I need to take the top off and reseal around the air chambers? It looks like I may be able to feel some slight airflow coming through the seems where there used to be furnace cement.
Also the rear panel that's held on by 4 bolts. It mounts flush up near the top, but there is a noticeable gap(1/16") towards the bottom near the ash pan. In fact, if I hit the back plate near the bottom some ash dust falls out. See where I circled in yellow in the attached pic.
I have the stove running nice & hot with the cat engaged(not sure of temp b/c the numbers on the gauge are all burnt off) but I am not able to heat an 11'x36' room that it's in at 28F.
Any help would be greatly appreciated!
Thanks,
beatle78

 !
!