
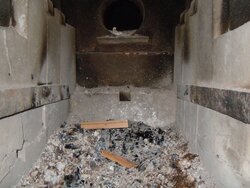
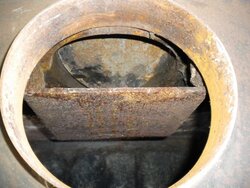
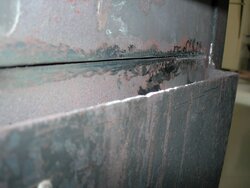
I have a Fisher Papa Bear VI 1980 in a workshop of a house I bought five years ago. New to this forum as I decided to get the chimney cleaned and inspected, and the guy that came by today said my stove was dangerous and shouldn't be used. He put a flashlight inside the stove and you could see light streaming out of the back. Specifically, it looks like the seam between the top and bottom steel plate in the back has opened up. Not sure if this seam was originally welded or filled with stove cement. I have attached a photo of the inside of the stove - you can see where the gap is. I love this stove and want to save it. Is this something I can/should weld up with my MIG welder? Is stove cement a better fix? After I fix this (if it is something that I can/should do) are there other spots/issues I should focus on? One other thing I noticed was that the cap on the back flue seems to be pretty thin. Where can I get a replacement for it? Also, some of the bricks are beat up - I presume that is a simple replacement. Are there any tips/tricks I should be aware of? Thanks!
Can I save my Fisher?
- Thread starter ADKFisher
- Start date
-
Active since 1995, Hearth.com is THE place on the internet for free information and advice about wood stoves, pellet stoves and other energy saving equipment.
We strive to provide opinions, articles, discussions and history related to Hearth Products and in a more general sense, energy issues.
We promote the EFFICIENT, RESPONSIBLE, CLEAN and SAFE use of all fuels, whether renewable or fossil.
You are using an out of date browser. It may not display this or other websites correctly.
You should upgrade or use an alternative browser.
You should upgrade or use an alternative browser.
- Status
- Not open for further replies.
mdocod
Burning Hunk
If you have a welder and some cutting/grinding tools, there isn't much of anything on a Fisher that you can't fix if you know what you are doing with your tools. Many of the Fisher's use 1/4" plate steel in many places, so you'll want quite a bit of heat on that welder if you're working in an area like that. I like to run my 180amp MIG cranked up pretty much all the way for 1/4".
Eric
Eric
A seam across the back on any Fisher is new to me. Normally only the front is made of multiple pieces. If it's a VI, it should have bent corners with no welds except where the wrap around stove body meets. If you have a horizontal seam, you would have vertical seams at the corners as well, since a VI shouldn't have angle iron corners. Perhaps a poor cut of the vent hole on the back necessitated the new back upper section?? It would have been welded, no furnace cement was used. You should grind a V into the seam for best penetration and weld it with whatever you have. A flat plate an inch or two wide across the back covering the seam, then welded would assure the seam stays sealed. Camfan can probably give you more specifics on that. He built many from the Georgia fabricator. Your tag should tell you where yours is from. Does it give the fabricator name?? I'd like to see pictures of the outside of your stove and a close up of that tag.
Somethings Fishy at the Fisher plant when you have to Fish-plate that stove. :coolsmirk:
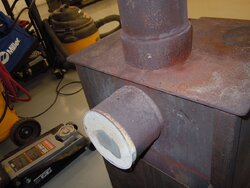
Not sure what you mean by "the cap on the back flue". Does this stove have a top and rear vent? Or is there a cap on a pipe T? Pictures of that would be needed as well.
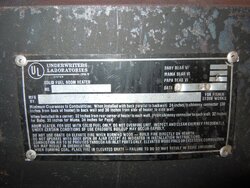
Did you get the date and model from the UL tag? 1980 would be one of the first of that model made too.
Somethings Fishy at the Fisher plant when you have to Fish-plate that stove. :coolsmirk:
Not sure what you mean by "the cap on the back flue". Does this stove have a top and rear vent? Or is there a cap on a pipe T? Pictures of that would be needed as well.
Did you get the date and model from the UL tag? 1980 would be one of the first of that model made too.
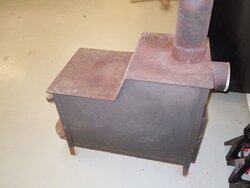
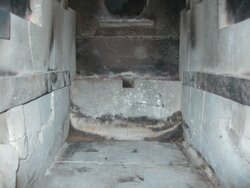
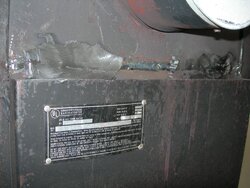
Here are the photos you wanted. I meant rear vent - sorry, new to wood stove world so not sure about some of the right terms! The top vent is currently the one in use. The rear vent is white (overheated?) and kind of spongy. The tag is hard to read in the photo, but the manufacturer was "Heston Corp. Heston Division Heston, Kansas." The serial number is F491950. It has a "2" stamped next to "Papa Bear VI".
BTW, this is a great forum.
BTW, this is a great forum.
Attachments
webbie
Seasoned Moderator
I'll let cam confirm, but I have to assume that this stove was modified by hand.
In any case, some welding of one sort or another can fix it right up.
In any case, some welding of one sort or another can fix it right up.
Thanks for the pictures. Can't tell you why it has both rear and top outlets, or why it was made with a two piece back. There were barometric stoves with two collars, but your inside picture doesn't show the box that would cover the rear vent hole. A barometric damper was installed in the rear hole as an intake up the stack. 2 pictures of the barometric air box below.
Hesston was the largest fabricator. I don't know if they would special build one for someone ordering one with the option to vent top or rear. If so, they would have used a top with the vent, and a back with the vent on one stove. I don't see a need to cut it across the back.
It's definitely a transition stove going from the old pre 1980 box with welded angle iron corners to the new wrap around with bent corners and bolt on legs. Most VI models look like the Mama pictured below; Notice the seamless corners.
Attachments
Thanks for your insights on this. I am now hooked on this because of your forum, and motivated to clean the stove up - new fire brick and paint. Will dig through your wiki for more info on that stuff. Thanks again and I hope everyone had a great Thanksgiving.
I just noticed the seam is about the same height as the rear shield. Does the lower rear wall plate measure the same size as the shield? Could they have screwed up and cut the rear sheet to the size of the shield? Then extended it? It's certainly one of the first VI's made with the old box style.
If you haven't read the Fisher Stove Story, check it out. Hesston Corp. is mentioned and is the big manufacturer that required a $750,000 guarantee from Bob to retool their factory to make his stoves if they didn't make as many as he claimed. Fabricators across the country were 20,000 stoves behind, and this is the company that could make them for distributors and catch up. This contract signing is also where he had his stroke. A little known fact is when he was the last to sign the contract, it was passed to him, and as he pulled his pen out of his pocket and signed, the pen point wasn't clicked out. He was too embarrassed to resign it, so folded it in half, threw it on the table and said "you've got a deal". They made far more than anticipated on the contract, and the signature went unnoticed.
If you haven't read the Fisher Stove Story, check it out. Hesston Corp. is mentioned and is the big manufacturer that required a $750,000 guarantee from Bob to retool their factory to make his stoves if they didn't make as many as he claimed. Fabricators across the country were 20,000 stoves behind, and this is the company that could make them for distributors and catch up. This contract signing is also where he had his stroke. A little known fact is when he was the last to sign the contract, it was passed to him, and as he pulled his pen out of his pocket and signed, the pen point wasn't clicked out. He was too embarrassed to resign it, so folded it in half, threw it on the table and said "you've got a deal". They made far more than anticipated on the contract, and the signature went unnoticed.
Danno77
Minister of Fire
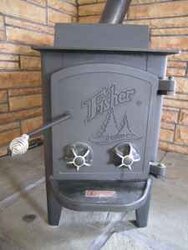
Respectfully, I'd like to submit that I know nothing about fisher stoves, but what is the possibility that this is not a fisher and is, instead, a stove that needed a UL tag for inspection? I notice that the corners of the tag are damaged (heck the stove is 30 years old, so maybe it's to be expected), and that there is a swirl mark around the upper right rivet, just like if the rivet was drilled out...
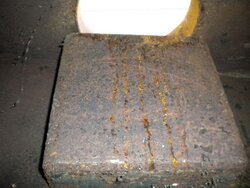
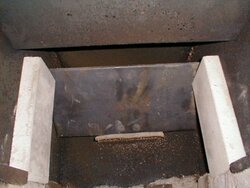
No idea if this is a real Fisher or not....here is a photo of the front (and inside after being cleaned out) . Welded it up today. Apologies for the ugly weld, but I am still relatively new to MIG welding. Photo of the cleaned up seam before and after welding also posted. Coaly, the seam is about half an inch above the top of the heat shield. Kind of tough to grind out fully so it isn't pretty, but it works! BTW, read the book last night - great read.
Attachments

The door certainly is not from a Papa VI. (They used the same door as pictured above on Mama VI) It is a pre-1980 stove body and door; (with older 4 fin dampers at that) With the lower back, shield and tag from a 1980. It could have been during the transition from flat to arch top door, there were a few UL listed new style boxes with old doors. And quite a few old style boxes with new arched top doors in the double door stoves. Apparently fabricators had the old style boxes made up, and started getting the new doors for 1980 and used them.
If done by the fabricator, the seam would have more than likely been welded correctly.
Looks like you've got a little '79, a little 1980, a little top vent, and a little rear vent going on. It's unique. Never a dull moment at the Fisher factory. Those were hectic times.
With the second course of brick, you can easily lay a piece of 5/16 steel plate on top at the rear as a baffle under the top vent hole. A 1 3/4" (or 2 inch) slot all the way across the stove right about at the bend in the top is equal to the cross sectional vent area of your outlet. The more you make the rising heat change directions in the upper chamber the better. You'll see a drastic reduction in smoke and a hotter stove than the pipe ! I'm on a Baffle Crusade. It's all good.
Attachments
CamFan
Feeling the Heat
This looks like a Johnny Cash they got it one piece at a time stove.
Heston built stove boxes for us too and the flue that either came out of the top or the back was welded on the inside of the stove. So they welded the flue before they installed the top or back. Another thing they did on all the stoves we got from them was all the legs were tappered. It did not matter if they were angle iron or weld on legs. I would guess this stove was made by a welder that worked for heston and used what ever they could get. Now why the back was pieced and not welded is beyond me. I would imagine the seam is below the top of the brick. That would also make me wonder if they got it how ever they could and they forgot to weld that seam up. Getting a tag was probably not a problem either. If the welder and finisher were friends that tag could have been blank and engraved as it was installed. So that would explain how that was done.
2 flues
angle legs
old door
two part back. It does not add up")
Camfan
Heston built stove boxes for us too and the flue that either came out of the top or the back was welded on the inside of the stove. So they welded the flue before they installed the top or back. Another thing they did on all the stoves we got from them was all the legs were tappered. It did not matter if they were angle iron or weld on legs. I would guess this stove was made by a welder that worked for heston and used what ever they could get. Now why the back was pieced and not welded is beyond me. I would imagine the seam is below the top of the brick. That would also make me wonder if they got it how ever they could and they forgot to weld that seam up. Getting a tag was probably not a problem either. If the welder and finisher were friends that tag could have been blank and engraved as it was installed. So that would explain how that was done.
2 flues
angle legs
old door
two part back. It does not add up
Camfan
CamFan
Feeling the Heat
I went back and looked at the pictures closer. The legs are tappered on the stove. The seam does appear to be above the brick. We will not find drawings on this stove. lol
Coaly the Mama you posted here is the door handle not latched or it that far out of alignment? It should angle up.
I remember getting some stoves from Canada once. I think they had problems getting them over the boarder. I do not think they did it twice.
Coaly the Mama you posted here is the door handle not latched or it that far out of alignment? It should angle up.
I remember getting some stoves from Canada once. I think they had problems getting them over the boarder. I do not think they did it twice.
The door was open and closed against the latch. Look at the sideview picture to the right. The handle is up where it should be. Don't ya hate it when handles go limp?? Or you open a door and it drops an inch ! I had a truck like that......
- Status
- Not open for further replies.
Similar threads
- Replies
- 33
- Views
- 2K
- Replies
- 1
- Views
- 794
- Replies
- 5
- Views
- 712
- Replies
- 5
- Views
- 433