Building a raised tiled hearth for a pellet stove again! Nice day for raised hearth building!

  • Active since 1995, Hearth.com is THE place on the internet for free information and advice about wood stoves, pellet stoves and other energy saving equipment.

    We strive to provide opinions, articles, discussions and history related to Hearth Products and in a more general sense, energy issues.

    We promote the EFFICIENT, RESPONSIBLE, CLEAN and SAFE use of all fuels, whether renewable or fossil.
Status
Not open for further replies.

Don2222

Minister of Fire
Feb 1, 2010
9,117
Salem NH
Hello

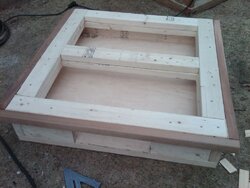
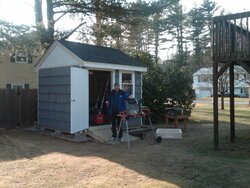
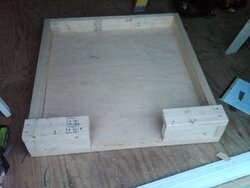
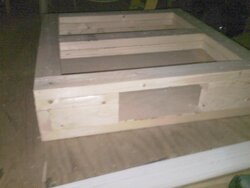
So now since my shed is done I had some left over lumber to build a raised hearth for it!!
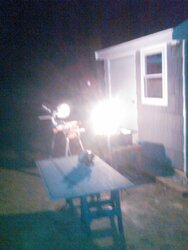
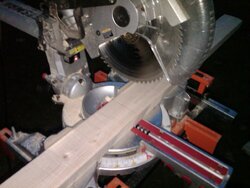
So I started cutting the frame while my carpenter still is around so I could use his framing nailer! Cool tool, but the recoil was making me pull the trigger twice until he showed me the proper way to use it !!! LOL Has anyone done this?

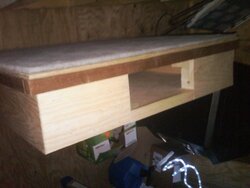
I also had 1/4" smooth birch plywood so I threw that in the bottom. This way I can put a door on the hearth front and have a nice cubby to store all the tools. Is that a good idea?

See pics below.

Let's see put the red laser beam on the pencil line made with the framing square. LOL This is fun!
 

Attachments

  • TRHShedHearth006FrameCutSC.jpg
    TRHShedHearth006FrameCutSC.jpg
    80.3 KB · Views: 1,354
  • TRHShedHearth010bottomSC.jpg
    TRHShedHearth010bottomSC.jpg
    76.8 KB · Views: 1,370
  • TRHShedHearth020bottomfrontSC.jpg
    TRHShedHearth020bottomfrontSC.jpg
    54.1 KB · Views: 2,064
Looks good, but I don't see that 1/4" plywood anywhere. The bottom appears to be 5/8" or 3/4". If you are talking about the subflooring for the tiled floor, I'd use 5/8" or 3/4" subflooring random strand board with Dura-Rock or a simular tile backer board under the tile.
 
Waterbug said:
Looks good, but I don't see that 1/4" plywood anywhere. The bottom appears to be 5/8" or 3/4". If you are talking about the subflooring for the tiled floor, I'd use 5/8" or 3/4" subflooring random strand board with Dura-Rock or a simular tile backer board under the tile.

Looks like the 1/4" is on the lower frame portion.
 
Waterbug said:
Looks good, but I don't see that 1/4" plywood anywhere. The bottom appears to be 5/8" or 3/4". If you are talking about the subflooring for the tiled floor, I'd use 5/8" or 3/4" subflooring random strand board with Dura-Rock or a simular tile backer board under the tile.

The 1/4" birch plywood is in the bottom of the 2nd picture. It will be the bottom for the storage area under the hearth.

The top of the hearth will be the 5/8 or 3/4 inch plywood with the cement board on top. I have not done that yet.

As you can see in the 3rd pic I only have the 2x4s on the top right now.
 
smoke show said:
Waterbug said:
Looks good, but I don't see that 1/4" plywood anywhere. The bottom appears to be 5/8" or 3/4". If you are talking about the subflooring for the tiled floor, I'd use 5/8" or 3/4" subflooring random strand board with Dura-Rock or a simular tile backer board under the tile.

Looks like the 1/4" is on the lower frame portion.

That is correct. That is only for the storage area.
 
I enlarged the picture and see that you are probably right. I didn't realize that there were 2X4 at the bottom. I thought that it was 5/8" ply on the floor. I would have done that rather than pile tools on 1/4" ply. That pedistal floor will end up 8" off of the floor. (2 ea. 1 1/2 boards, 1 ea. 3 1/2 board, 1 ea 1/4" board, 1 ea. 5/8" board, 1 ea 1/2" tile backer, 1 ea 1/4" tile)

EDIT: I was replying at the same time that you were. Looks good ! If anything, it's overkill, but better overkill than sloppy. :)
 
Waterbug said:
I enlarged the picture and see that you are probably right. I didn't realize that there were 2X4 at the bottom. I thought that it was 5/8" ply on the floor. I would have done that rather than pile tools on 1/4" ply. That pedistal floor will end up 8" off of the floor. (2 ea. 1 1/2 boards, 1 ea. 3 1/2 board, 1 ea 1/4" board, 1 ea. 5/8" board, 1 ea 1/2" tile backer, 1 ea 1/4" tile)

EDIT: I was replying at the same time that you were. Looks good ! If anything, it's overkill, but better overkill than sloppy. :)

Yes, thanks I like a high hearth it makes the stove look bigger and better. LOL

My tools will not be to heavy for the 1/4" bottom. I made a similar hearth for the basement and used PT 2x4s on the bottom just in case any water pipes broke!

So that is why I like the tool storage to be a little bit off the floor.
 
smoke show said:
I'm thinkin you could park a small car on that sucker.

Yes It is strong enough for any type of stove!

Instead of buying one of those fancy Stove Shop tiled hearths for $275.00 the one I am making will be much better for alot less cost!!!
 
I did a brick hearth with bricks that were left over from the construction of my home years ago. All it cost me was the mortar and a little sweat. (and a lot of advice/criticism from the wife. :) )

EDIT: If you have concerns about moisture, those ground/floor contact 2X4s should be treated lumber.
 
I made a tiled hearth out of cement Wonderboard and ceramic tile, that I got at a building surplus place. I cemented the two pieces of Wonderboard together with tile adhesive and stuck and grouted the tiles onto the one inch thick Wonderboard. Total cost $60.00.

Dave
 
DneprDave said:
I made a tiled hearth out of cement Wonderboard and ceramic tile, that I got at a building surplus place. I cemented the two pieces of Wonderboard together with tile adhesive and stuck and grouted the tiles onto the one inch thick Wonderboard. Total cost $60.00.

Dave

Yup, same here. Much cheaper than buying one of those pre-made things. I still need to to some trim around the edges of mine but it turned out good with the help of a friend who does awesome tile work.

Heavy as all hell though!
 
Mine cost me about $36. Used steel "unistrut" for the frame. Fireboard for the underlayment.
 
jlord1169 said:
Thanks.. Yours is alot beafer. Do you think I used enough fire protection ? Good luck with your project

Hi jlord

Yours should be fine.
 
i built my own hearth as well...

used 1/2 inch plywood with 1/4 inch backer board screwed to it
then went with 6 by 6 ceramic tile

for a first time tile job i'd say it came out pretty decent and a heck of
alot cheaper then store bought
 
Hello

Well it was 50 out today and a great day for hearth building!

Since I finished the electrical in the new shed, I put it to the test!
I had my compressor charging, a 1500 watt quartz heater going and started up my sliding mitre saw and table saw all on one cirduit!! The compressor charging slowed and I could hear the difference but the breaker did not quit!

So to be more perfect I probably should plug the compressor into the 2nd shed circuit and I will be all set!!!

Anyway, I went to the HD store to get an 8' stick of 2x2 popular wood like I used in the other hearth and no more. I finally went to the luber store and he explained that noone carries that length anymore because the wood is no longer being dried properly and curls up and is thrown out. In otherwords they lose money!!!!sd

So I was forced to by the darker and much shorter cedar 2x2 in 1 - 4' and 2 - 3' lengths to go around the hearth to create my overhang for the rope lighting. See below see what I call the new "Buster Brown Collar" !!!
 

Attachments

  • TRHShedPS160sc.jpg
    TRHShedPS160sc.jpg
    90.5 KB · Views: 749
  • TRHShedPS150sc.jpg
    TRHShedPS150sc.jpg
    129.9 KB · Views: 770
Thanks for sharing Don. Looks like a fun project.
Went to 58F here today. I was outside in a t shirt
washing my windows.
 
Xena said:
Thanks for sharing Don. Looks like a fun project.
Went to 58F here today. I was outside in a t shirt
washing my windows.

Thanks Xena

Yes a fun project to provide a little wood pellet heat in the Shed/Workshop. :)
 
Hello Don,
I think the cedar will provide for some nice aroma. Can't wait to see the new rope lighting set up. I hope you dedicated an individual circuit for it!
 
Wood Nugget said:
Hello Don,
I think the cedar will provide for some nice aroma. Can't wait to see the new rope lighting set up. I hope you dedicated an individual circuit for it!

Really do not thing I need another circuit, but I did set up an outlet for it. The top of the duplex is on the inside light switch. Should make it easy to turn on. :)

Ran out of Daylight again to cut the cement board, but with power there is light!!

Also got the bottom trim board on.
Now I need to cover the ceder with the last 1x4 trim board I just picked up.
See pics below.
 

Attachments

  • TRHShedPS170 (2)sc.jpg
    TRHShedPS170 (2)sc.jpg
    67.7 KB · Views: 545
  • TRHShedPS170 (1)sc.jpg
    TRHShedPS170 (1)sc.jpg
    104.7 KB · Views: 543
I just used the double hardie backer and tile left over from the bathroom. Our tile never gets hot, so I have never gave it another thought. a zero clearance fireplace is closer and to flooring and of you go under your house after a few hours of running it and pull back the insulation and feel, its nice and warm under that zero clearance stove.

You project looks very nice and well inspired also
 
DirtyDave said:
I just used the double hardie backer and tile left over from the bathroom. Our tile never gets hot, so I have never gave it another thought. a zero clearance fireplace is closer and to flooring and of you go under your house after a few hours of running it and pull back the insulation and feel, its nice and warm under that zero clearance stove.

You project looks very nice and well inspired also

Thanks Dave
I put the top trim board on today and picked up some nice slate tiles that I can install. I just need a warm dry spot to do it!! The weather for tomorrow does not look good!!
 
Nice project!

After finding out back in 2004 how much pre-made tile hearths from the dealer cost -- $275 way back then -- I decided that even though I had no tile experience, it couldn't be that hard to do one. And it sure as heck wouldn't cost me $275 in materials!

Turns out I was right. I made mine with 3/4" industrial grade particle board so it wouldn't warp, then used 1/4" cement board over that. I used 12x12 ceramic tiles from Lowes that cost about $1 each. The only mistake I made was buying one of those cheapie tile cutters, I couldn't get nice, clean cuts with it. I ended up taking the cheap tile cutter back and just paying Lowes the .25 cents per cut to go ahead and cut the tiles for me! I only had about 8 pieces to cut, so the $2.00 it cost me was much cheaper than buying a tile saw for $99.

It really turned out great. I used solid oak edging for the trim, and it actually looks much nicer than any of the ready-made tile boards that my dealer was selling. I think I had about $60 in it by the time it was finished, plus it was kinda fun to build. Not so fun to lug up the basement steps though, that sucker is HEAVY!
 
Status
Not open for further replies.