Crack in my firebox Summer's Heat 55-SHP10

  • Active since 1995, Hearth.com is THE place on the internet for free information and advice about wood stoves, pellet stoves and other energy saving equipment.

    We strive to provide opinions, articles, discussions and history related to Hearth Products and in a more general sense, energy issues.

    We promote the EFFICIENT, RESPONSIBLE, CLEAN and SAFE use of all fuels, whether renewable or fossil.
Status
Not open for further replies.

skydmark1

Member
Jun 29, 2008
47
Northern NH
Hello everyone!

So I have the small Englander pellet stove and while it works great I've been having problems this year. I've already burned through over 1.5 tons of pellets and it seems to burn dirty. It was made 2/08 and this will be the 4th season with it. I've never replaced the burn pot gasket so I have one on order and hope this helps with the dirty burn.

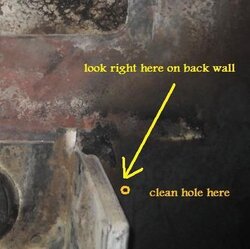
Also, while give it a thorough vacuuming today we noticed that behind the impingement plate there is a crack and it is bowed out. Also the impingement plate fits a bit loose and leans forward some. Is this crack going to be a problem? Is there a way to repair it? I should think I can get more than 4 seasons out of this stove!! HELP!!!

Here's a picture of what I'm talking about.

DSCN2167.jpg
 
I think you need to send this pic and the info about the stove model and serial # to Mike H. He would be the best person to determine if this is a problem, and whether or not a repair can/should be done. Either send it by PM, or email him.
 
The warping and cracking is an indication of overfire.

Do you use a High setting all time? The placement of the crack does not seem to effect performance. But the way the impingment plate sits, is pretty important (way I understand it) as this directs the exhaust gases so they dont go straight out. So they may slightly effect it (slightly).

When was the last time the exhaust passage was cleaned all the way to the combustion blower (passage behind impingement plate)? This area can be tricky and needs some long and thin brushes. The leafblower trick is what I would recommend to clean the stove and remove all the hidden fly ash. Also when was the last time the vent was fully cleaned? And finally, have you changed the bottom 3 button settings any? Are they still factory settings?
 
The settings are still at factory, as far as how high I run the stove....it hasn't been over 2 on the heat setting yet this year and I've NEVER had it over 5. Prior to the start of the season I had cleaned out the exhaust blower and thoroughly cleaned the vent pipe, since then I have run the brush through it a couple times. I've never done the leaf blower trick although we try to get the passage behind the impingement plate with the shop vac, perhaps we're not that successful.
 
Good hiding place. Cops will never look for it in there!
 
The crack can be welded but I would echo what Dexter said the deformation says there's been a lot of heat present at one time or another. If you have never run the stove above 5 then you may have some serious blockage problems.
 
I will have to try the leaf blower trick to get this thing blown out and cleaned to see if that helps. Also hoping to have my burn pot gasket soon so I can replace that, I think the fire may be getting too much air with the old gasket. It doesn't appear that the crack is detrimental to the operation of the stove but still concerned me a bit.
 
skydmark1 said:
I will have to try the leaf blower trick to get this thing blown out and cleaned to see if that helps. Also hoping to have my burn pot gasket soon so I can replace that, I think the fire may be getting too much air with the old gasket. It doesn't appear that the crack is detrimental to the operation of the stove but still concerned me a bit.

That crack can spread (I'm not saying it will, just that under certain condition it can).

I suggest that you add the stove make and model to the tread title so Mike Holton of England Stove Works will be able to see it and comment.
 
It sure looks like it was overfired! If you're going to weld crack, drill a small hole at the end of the crack first to eliminate the 'stress riser'. The other warped part would be the real worry. Definitely talk to England SW.
 
Clean the stove really well, use the leaf blower as described.

Go in there with a drill 3/16 and drill a hole right at the end of the crack to stop it from going farther.

Just be sure that when you drill, that it does not go though into someplace that it should not.

The crack is due to heat and structural stress in the area.

Snowy
 
"Crack In My Fire Box"
Boy, if there was ever a thread header that I wanted to pun.....
Well anyways..... it has always been my understanding that stoves will typically not overfire because there is a built in heat sensor to shut it down if it gets too hot. (Am I wrong) But, in some cases I have heard that the heat exchanger can warp or crack if the feed rate is up high and the convection fan is too low. In essence, the stove creates a lot of heat but the convection fan is not on high enough to blow that heat out of the stove. As far as a safety issue?....That is a question best left answered by the experts. Please, whatever you do, do not let us read about you in the paper. Play it safe and consult a pro. But I do agree with you, you should get more than 4 years out of your stove. Good luck!
 
Normally the stove should see the over fire and shut things down but if the area where the temperature sensor/snap disc is gets insulated by ash it is possible for it not to see the condition until way past the point of damage, the same thing can also happen if the sensor or snap disc is defective.

That stove needs to be gone over really well before being fired up again.
 
Another idea is the stove is really dirty and air takes path of least resistance all the heat is concentrated on this one spot.
 
maglite67 said:
Another idea is the stove is really dirty and air takes path of least resistance all the heat is concentrated on this one spot.


I think you may be on to something here. Being new to the pellet world when we got this nobody ever explained to me the proper way to clean the ENTIRE unit. I always cleaned out the burn pot and surrounding areas but have never gone as far as getting inside where you can't see. I plan to use the leaf blower trick, maybe tomorrow and hope that will help. I also have a problem with the pellets burning down so that the fire is out, then when new pellets hit the burn pot it ignites again, everything is on factory setting I think the pellets are burning up to quick. maybe getting too much air?

My stove is a Summer's Heat by England stove works Model # 55-shp10 manufactured 02/08 with a serial number of 065435

Also, I don't think the crack is unsafe as behind that plate is open air. I'm more concerned with WHY it did it and how to proceed. This is my ONLY source of heat right now because I can't afford to fill my oil tank. Thanks to everyone that has helped so far. Hopefully Mike will pop in and give me some tips and advice.
 
Ooo. I've got that stove and that pic looks scary. It looks like that top shelf is warped too, maybe its the pic though. You've clearly got some problems there.

I'd not run it until you get it sorted out. If you can't get an oil delivery then 10-15 gallons of diesel should get you through a few days. It's better than killing the stove imo.
 
dont know how i missed this one for so long...

what i see is the back firewall crack next to the brace. the most likely cause for this is that the heat exchanger area was loaded up and the exhaust path was concentrated in the area that was affected. looking at the firewall note that there is a rusty colored red line along the path that was affected and the shelf below was warped downward on that same line. the crack can be welded (mig) using a small stop hole at the end of the crack then weld the seam , it is possible to tap the wall to flatten out any warpage somewhat before welding and it should if welded well stay relatively flat. the location of the crack is not one which would cause smoke spillage from the unit so its not a safety issue in that respect however, if its not fixed soon its going to continue to crack and eventually be beyond repair.

once repaired we'll need to be more diligent with ash removal from this area to prevent it from breaking again and also to get overall better performance from the unit


EDIT: in retrospect and a friendly note from a pro, i would recommend having the unit checked out by a service entity for any other potential damage.gonna need to get it welded anyway might as well check it all out. i should note i have seen this type of cracking before usually due to the reason i discussed above so im not gonna beat a dead horse about it and in pretty much every case i can recall off top of my head there wouldnt be any other areas of the stove hull that would be compremised but prudence begs that it gets a good looking over just in case.
 
stoveguy2esw said:
dont know how i missed this one for so long...

what i see is the back firewall crack next to the brace. the most likely cause for this is that the heat exchanger area was loaded up and the exhaust path was concentrated in the area that was affected. looking at the firewall note that there is a rusty colored red line along the path that was affected and the shelf below was warped downward on that same line. the crack can be welded (mig) using a small stop hole at the end of the crack then weld the seam , it is possible to tap the wall to flatten out any warpage somewhat before welding and it should if welded well stay relatively flat. the location of the crack is not one which would cause smoke spillage from the unit so its not a safety issue in that respect however, if its not fixed soon its going to continue to crack and eventually be beyond repair.

once repaired we'll need to be more diligent with ash removal from this area to prevent it from breaking again and also to get overall better performance from the unit

Thanks for the update, I just did the leaf blower trick and now that I know about it this is something I will be performing regularly. I'm planning on doing it every 2 ton burnt (let me know if I should do it more often?) I drill a hole to stop the crack and tried taping it back some, I moved it a bit but didn't want to get too aggresive with it. I have a new burn pot gasket on the way which I plan to install as soon as it hits my mailbox. Just barely fired the stove back up and I'm hoping that the cleaning made a difference. I will have to see about getting the crack welded. I would assume I would have to remove the stove from the house to weld it due to the gases and what not from the MIG.

Thanks again for the update, and hopefully I've made some progress and learned a valuable lesson on how to keep my stove clean.
 
ok, need to clean out this area more frequently than that , however you dont have to leaf blower it every time. what i use with my shop vac is a home made adapter usimng a "cone shaped" adapter and a short length of an old garden hose. this allows me to actually vacuum out this area with relative ease. i would do this every few weeks. this area is what we refer to as the "heat exchanger" area of the unit , we scrub heat out of the exhaust on its way out and transfer it to the blower chamber that surrounds it. thus geting more heat into the room and less leaving out the pipe. keeping this area free of ash not only protects the stove from overheating but at the same time provides more heat into the room through better transfer. ash acts as an insulator and thus we lose this heat, also as we have seen too much ash concentrates all that heat in a small channel which can damage the steel in that channel.
 
Ok, I like the garden hose idea...was trying to think of something to get the vacuum in there. Also, as I mentioned we just did the leaf blower trick and a good vacuuming inside the stove. Refired it and I'm still getting what I've been calling a burn down. The flame will die out completely before the next wave of pellets comes to the burn pot then the flame kicks back up again. My settings are at factory - 6-4-1. Could this have anything to do with the burn pot gasket that needs replacing? Have one on the way, hope it comes today!
 
installed new burn bot gasket and cleaned out the burn pot area really well. Did not realize there were holes on the sides near the bottom of the burn pot inside for air, they were full of ash. Cleaned that out too. Fire looks better now, but still burns down to no flame then starts back up again from time to time.....what the heck! What's causing this? I will say I replaced the top auger motor with a Gleason Avery unit last year, which I heard has a slightly faster RPM than the stock MK auger motor. Do I need to adjust my feed rate because of this?
 
skydmark1 said:
installed new burn bot gasket and cleaned out the burn pot area really well. Did not realize there were holes on the sides near the bottom of the burn pot inside for air, they were full of ash. Cleaned that out too. Fire looks better now, but still burns down to no flame then starts back up again from time to time.....what the heck! What's causing this? I will say I replaced the top auger motor with a Gleason Avery unit last year, which I heard has a slightly faster RPM than the stock MK auger motor. Do I need to adjust my feed rate because of this?

Are you sure you are using the default settings for the lower three buttons and at what heat range are you running it at?

When you did the auger work did you realign the augers?

Is there anything stuck in the transition area between the upper and lower auger?

If there was ash in those holes where the air comes in did you also clean the rest of the air intake?
 
skydmark1 said:
installed new burn bot gasket and cleaned out the burn pot area really well. Did not realize there were holes on the sides near the bottom of the burn pot inside for air, they were full of ash. Cleaned that out too. Fire looks better now, but still burns down to no flame then starts back up again from time to time.....what the heck! What's causing this? I will say I replaced the top auger motor with a Gleason Avery unit last year, which I heard has a slightly faster RPM than the stock MK auger motor. Do I need to adjust my feed rate because of this?

My Fathers 25-PDV will do that on the #1 heat setting. Just not enough fuel to keep a continous fire. On 2 and above, No problems.

Like Smokey said, What heat setting are you running? You said you never go above 5.
 
If when the baffle plate is removed you stick your hand (fingers) down the left side (keeping fingers under the angle) you will feel the hole where you want the adapter hose to go. I'm sure you will here the shop vac chugging the first time as it chokes on the ash. After that once a week is fine, while your in there take a paint brush and clean the whole thing, with the shop vac running there isn't that much dust.
 
if its dropping to coals and relighting its one of just a few things, either the LFF is too low and we arent getting big enough "doses" of fuel per cycle, or the "door ajar" switch is dropping. look for a litttle hole just to the outside of your burn pot on the back wall. i'll try to find a picture to post of it, anyway , location of the hole is about a half inch outside the right outer wall of the pot and about 3/4 of an inch lower thann the top edge of the pot on the back wall, note ITS OUTSIDE OF THE POT to the right not inside of the pot. locate this hole and ream it out with a toothpick or sewing needle, dont use coat hanger its tooo thick. see if the stove starts feeding consistantly after clearing this port.

EDIT picture shold show approximately where it is but its hard to get right on it due to camera angle. hope this helps
 

Attachments

  • vac hole.jpg
    vac hole.jpg
    25.6 KB · Views: 1,272
Been running it mostly on heat settings 1 and 2 and yes I'm sure the bottom three buttons are at the default 6-4-1. Now that's it has been running for a few hours I will say it is blowing ALOT more heat. Forgot that it puts out this much heat on the lowest setting. Will be sure I keep this thing squeaky clean from now on to get the most out of it. After taking the impingement plate out I did run my garden hose shop vac attachment down the hole on the left but having just done the leaf blower trick I didn't have too much down there. Really the only concern I have now is that the fire peters out and starts back up, I guess that's no big deal though. Not like it ever stops blowing heat, just wondered if I'm not getting a full burn on the pellets, will see what my ash situation looks like after a full bag burns through.

I'll try reaming the hole out, I knew it was there and scraped and vacuumed the area but didn't try putting a toothpick in. Will try that next. I could try turning my LFF up to 7 but I'm already burning alot of pellets it seems.
 
Status
Not open for further replies.