Unknown Fisher insert (Maybe??) in need of information

  • Active since 1995, Hearth.com is THE place on the internet for free information and advice about wood stoves, pellet stoves and other energy saving equipment.

    We strive to provide opinions, articles, discussions and history related to Hearth Products and in a more general sense, energy issues.

    We promote the EFFICIENT, RESPONSIBLE, CLEAN and SAFE use of all fuels, whether renewable or fossil.
Status
Not open for further replies.

Cadillaccuz

New Member
Dec 7, 2011
7
Central PA
I would like to say that I have found a lot of great information searching the forums on this website. I can now say that I am in need of some more specific information and this seems like a good place to find that. I will post some pictures but for now I will enter what information I do have.
Was in the home when I bought it 2 months ago, Chimney is clean (as per inspector)
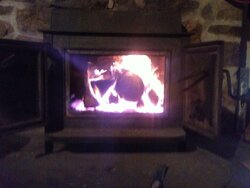
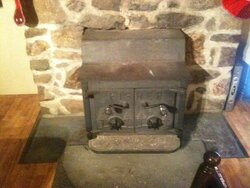
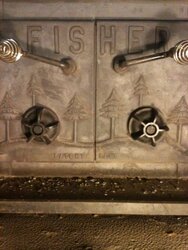
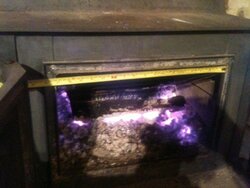
double door with six trees, "Fisher" across the top.
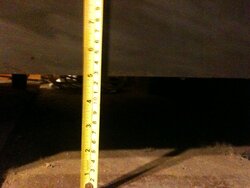
Door opening width is 17 inches
door opening height is 10.5 inches
depth from the interior back wall(fire brick) to front inside is 20 inches.
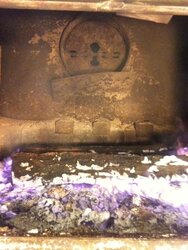
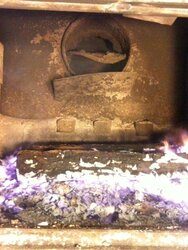
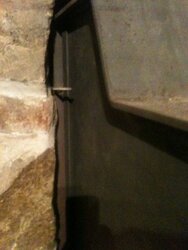
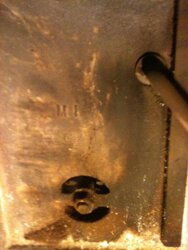
baffle/damper (unsure about this) top back center.
I have been burning it and so far no real troubles. seems to burn fast but not sure what fast or slow is for this stove.
now for some pictures...

So what kind of information am I looking for.
Can I update this older stove to burn more efficiently?
Is there anything as seen from these picture that I should or need to do? (repair wise)
What kind of fisher do I actually have?
Any suggestions as to how to load the stove?
Any suggestions as to setting the damper/baffle?
Any suggestions as to setting the door vents?
Any suggestions for overnight burning setup?
Anything I should know that I haven't asked?
Is there anything I should look for or at on this stove to check it?

Sorry for all the questions but I like to know as much as possible about anything I have. I like to know I am using things as efficiently and safely as is possible.

If anyone can provide me with the information I am looking for I have nothing to offer other that mine and my family's gratitude. I thank you ahead of time.
 

Attachments

  • Damper closed fisher.jpg
    Damper closed fisher.jpg
    58.5 KB · Views: 506
  • damper open fisher.jpg
    damper open fisher.jpg
    62.4 KB · Views: 501
  • Damper-fisher.jpg
    Damper-fisher.jpg
    38.3 KB · Views: 512
  • Front-fisher.jpg
    Front-fisher.jpg
    53.5 KB · Views: 493
  • doors fisher closed.jpg
    doors fisher closed.jpg
    50.4 KB · Views: 486
  • inside left door fisher.jpg
    inside left door fisher.jpg
    48.5 KB · Views: 521
  • inside right door fisher.jpg
    inside right door fisher.jpg
    41.5 KB · Views: 496
  • door width full pic.jpg
    door width full pic.jpg
    42.7 KB · Views: 491
What you have is a Grandma free standing stove that was made to be like an insert. I imagine the opening etc was made just for the stove. The angle iron legs were cut to sit on the hearth.
As far as the burn Coaly is more technical than me and likes to type long indepth help. Me I would tell you while starting the fire open the draft caps (spin caps on the doors) and after it starts burning good start closing the caps by spinning them in towards the door. This will slow it down and burn less wood. Most of my stoves would burn with the caps closed all the way or backed off 1/4 turn. When you want to add wood open the caps and allow air to get started flowing again and then open the doors.

Now we can wait for the good stuff from Coaly :)
 
Welcome to the Forum;
Wow, the damper is melting from being stuck back in the masonry. This WAS a Grandma made to radiate in all directions with a proper clearance to the back. An insert, made for this type installation has a double wall air jacket around it, naturally convects, and capable of connecting a fan to move the air out a slot at the top. The hottest part of this stove is the elbow, or whatever is behind it. A baffle plate on about a 45* angle in front of the rear outlet would deflect most of the heat forward to the top of the stove, where it should be. Here's a link to a simple made baffle. Newer models (yours is pre 1980) had this type baffle installed.
https://www.hearth.com/econtent/index.php/forums/viewthread/82318/

That stove needs at least a 2 inch airspace around it to prevent warping and overheating.

The first one invented was placed sideways on the hearth with a side vent. 3 years later the double door models were added. (1976) This allowed the stove to radiate in all directions, and take advantage of the two cook tops. 3 years later, the Insert was added for people who wanted to install a stove in their hearth, taking up less room. I'd pull it out, and get it at least 2 inches away from the masonry doing what you have to do for floor protection, or make the masonry fit an Insert.

That leads to another question; There's no way to tell from your pictures if this hearth is on a slab, or built on a combustible surface. (framing or subfloor)
I'm not an installer, or code official, and try to refrain from installation advice. I read the codes and interpret them like anyone else. I do get into the UL testing and what is required to pass from a manufacturer standpoint. Cutting legs down is a no no on anything but a cement pad. This was built before UL testing.
As far as NFPA standards; With the 6 inch minimum original legs, on a combustible floor, this would require 4 inch brick with holes laid sideways, open on the ends to vent, laid closely together on 24 ga. sheet metal over the combustible floor. With legs over 6 inches to 14"in height, (or 6" legs set upon bricks to make over 6") 2 inch thick pavers over 24 gauge sheet metal is required. Cutting the legs under 6 inches requires a masonry pad. (hopefully what you have) Most UL listed stoves today pass requiring "ember protection only" usually done with 1/2" cement board and tile or pavers over the combustible.

Hey Philip, this could be one of yours sold in central PA, feel free to chime in. (A distributer in central PA that bought from Fisher Stoves of PA)
 
coaly said:
Welcome to the Forum;
Wow, the damper is melting from being stuck back in the masonry. This WAS a Grandma made to radiate in all directions with a proper clearance to the back. An insert, made for this type installation has a double wall air jacket around it, naturally convects, and capable of connecting a fan to move the air out a slot at the top. The hottest part of this stove is the elbow, or whatever is behind it. A baffle plate on about a 45* angle in front of the rear outlet would deflect most of the heat forward to the top of the stove, where it should be. Here's a link to a simple made baffle. Newer models (yours is pre 1980) had this type baffle installed.
https://www.hearth.com/econtent/index.php/forums/viewthread/82318/

That stove needs at least a 2 inch airspace around it to prevent warping and overheating.

The first one invented was placed sideways on the hearth with a side vent. 3 years later the double door models were added. (1976) This allowed the stove to radiate in all directions, and take advantage of the two cook tops. 3 years later, the Insert was added for people who wanted to install a stove in their hearth, taking up less room. I'd pull it out, and get it at least 2 inches away from the masonry doing what you have to do for floor protection, or make the masonry fit an Insert.

That leads to another question; There's no way to tell from your pictures if this hearth is on a slab, or built on a combustible surface. (framing or subfloor)
I'm not an installer, or code official, and try to refrain from installation advice. I read the codes and interpret them like anyone else. I do get into the UL testing and what is required to pass from a manufacturer standpoint. Cutting legs down is a no no on anything but a cement pad. This was built before UL testing.
As far as NFPA standards; With the 6 inch minimum original legs, on a combustible floor, this would require 4 inch brick with holes laid sideways, open on the ends to vent, laid closely together on 24 ga. sheet metal over the combustible floor. With legs over 6 inches to 14"in height, (or 6" legs set upon bricks to make over 6") 2 inch thick pavers over 24 gauge sheet metal is required. Cutting the legs under 6 inches requires a masonry pad. (hopefully what you have) Most UL listed stoves today pass requiring "ember protection only" usually done with 1/2" cement board and tile or pavers over the combustible.

Hey Philip, this could be one of yours sold in central PA, feel free to chime in. (A distributer in central PA that bought from Fisher Stoves of PA)


I am adding another picture, It is kind of dark but you can see that the legs are still intact. They seem to be about 5 to 6 inches but I am not at home right now to measure or take any other pictures if needed. (will post that later) as far as the combustibility the whole home is made from blocks and cement. First floor is steel reinforced slab and the second floor is steel reinforced slab. I figure it was a cold war paranoid individual during the 50's who built it. By looking at it the hearth or at least in front is sheet metal or something, I have a stove plate and fire pad in front in case of any errant coals just for protection. But it is definitely not combustible. As far as space around the insert there is a gap and I can see a steel plate behind the insert at which point it looks like the mortared more stone around it to bring in the gap a little. Bit I would say there is approx and inch gap around the whole insert. Anyways if there are any specific photos anyone would like me to take of this converted insert I would be glad to take them so as to gain any info I can get. I figure if it is safe enough to make it through this winter I can wait till spring before doing anything to either update or enhance this unit. So I look forward to any replies already I have gained some valuable information. Thank you
 

Attachments

  • fireplace.jpg
    fireplace.jpg
    131.8 KB · Views: 428
Im not seeing 5 inches of legs there but im pretty sure we all would like our wives to think that is five inches ;-)
That stove was designed to be free standing and judging from youre pics it looks to me like someone has crammed it almost into that fireplace. the warped damper is indicative of overfiring and too little clearance behind stove. It potentially could be more effective if moved out into the room just a bit. But the damage has been done to the damper it should probably be replaced. But if it doesnt jam up i guess it might get you by for a while. I have an insert and removed my damper all together.
 
Bone1099 said:
Im not seeing 5 inches of legs there but im pretty sure we all would like our wives to think that is five inches ;-)
That stove was designed to be free standing and judging from youre pics it looks to me like someone has crammed it almost into that fireplace. the warped damper is indicative of overfiring and too little clearance behind stove. It potentially could be more effective if moved out into the room just a bit. But the damage has been done to the damper it should probably be replaced. But if it doesnt jam up i guess it might get you by for a while. I have an insert and removed my damper all together.

I am adding another pic that shows it is five inches. insert joke here.. ;-)
I think I will try the baffle plate as suggested in this post. I may upgrade but I am with this stove till spring. I just bought the home. The furnace is in need and this is the most reliable source of heat we currently have so I need it to work as best as is possible. Any information would be greatly appreciated by myself and my family. If there are suggestions as to things I can do (like the baffle plate) I would be more than happy. I am just so glad there are sites like this where people who don't know can get info from people who do
 

Attachments

  • insertheight.jpg
    insertheight.jpg
    128.6 KB · Views: 410
Status
Not open for further replies.