Lets not bring up Chevy. I am bringing in the car this afternoon for repair of 4 recalls
I got one for the Caddy...for the ignition switch.... Thats unreal.
Lets not bring up Chevy. I am bringing in the car this afternoon for repair of 4 recalls
I got one for the Caddy...for the ignition switch.... Thats unreal.
Well your describing my situation to the tee as well. I have a refurb/blemish PAH from amfm. Worked fine for the first couple weeks but the last couple months its been nothing but trouble. Mine will degrade over a week to week and a half to where it wont even burn properly on a 1 setting and soot up the whole stove bad in a few hours. A thorough cleaning including leaf blower seems to get it back to factory, but each time lasts less than 2 weeks. I keep finding issues and fixing, but the problem still is there. I too have gaskets that didn't pass the dollar bill test. This stove was bought just this past fall. I could insert the dollar bill into the ashpan with it fully closed! I was sure this was allowing air in and creating an improper burn. My stove has a good bow to the face of it. Finally went to a stove shop and got some new gasket, went thicker than the factory gaskets, and sealed up the door and ash pan well. I didn't do the hopper lid yet, but can't believe it could leak enough air to be causing my problem when I can run the stove with it wide open and not notice any difference.
Also I found my burn pot slightly warped too, and air was leaking through the edge in the middle, like under the chute. I put some gasket under it and its not leaking air any more there. But that didn't fix the degrading burn. I'm guessing at this point that it is my venting, but going to do a thorough cleaning again as soon as I have a day off, including sweeping the chimney instead of just the leaf blower. I'd like to pull the stove out and get at the combustion blower to clean and inspect it, just have to figure out something for the gasket.
Hope you figure yours out. I'll let you know if I figure out anything for sure on mine.
The combustion blower should vary based on the control board. You'd probably have to have the heat set on 9 and also the LBA on 9 I would guess for it to be maxed out, unless the stove hits the max sooner and the LBA adjustments only mean anything for lower heat setting. Would be curious to know.
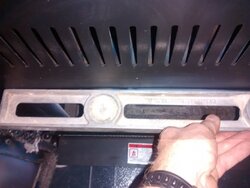
I have basically left my settings of 1-4-1 alone. You can almost see burning pellets moving around in the burn pot. I have tried tweaking it but it seems to run fine at those settings, as long as it is clean. Got home yesterday to a cold stove so I thought I would run the "diagnostic" and verify all working as should. Upon entering diagnostic first up is the temp sensor? Get 8 and A in top two displays. Not sure what should be in them maybe someone here knows? Check exhaust blower, it is running at 3385 rpm on my handheld tach,, i"m sure that is a good #. Finish with convection blower, auger, igniter etc. all working as should. One thing I have noticed is with the OAK tube when I first started it up you could hear the air going thru but over time it was less noticeable, even after cleaning. So after finishing the diagnostic I opened the door on the stove and proceeded to connect my shop vac to the screen end of the air tube to clean any dust, bugs, or other matter out of the fresh air supply. Not sure what came thru the screen but there were some small chunks of clinkers? or rust particles or? that would not come thru the screen. After finishing up and restarting the stove seemed to be running as it did back in Nov. not quite a blow torch flame but definitely better than it has been for the last month. You could actually hear the fresh air being sucked into the stove again. Still plan on reworking door gasket this weekend to cure any leaks around it. Also attached is a pick of front of stove, kind of hard to see but there is about 1/8-1/4" in the middle (stove was still warm at that time). Hopefully some gasket work will make up for this. Glass was also much cleaner this AM than it has been for awhile.
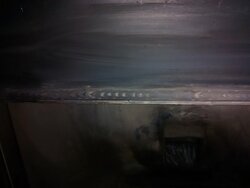
The "bow" basically runs just across the opening where the lip/support extends. It is a solid weld on this lip to the housing so I can see why it would have distortion from welding. I think it is caused in the building process and not from any type of over fire. The lip itself is straight. I have a feeling when the stove heats up it expands/moves and creates a possible air leak. Will likely send ESW a better picture and see if the have any comment. Meanwhile i'll try and get the gasket to seal it up. Thanks for all the input.
Yes I have sent them a picture inquiring about it as well. They have already replied about the 8 A temp sensor and all is good with that. Maybe will hear something about the "bow" later. I figured on building up the gasket somewhat across the top when I go to replace it also as you suggest. ThanksOPtaylor,
Did you ever contact ESW?
Talking to folks here will not result in the situation getting taken care of.
We can suggest adding a short length of gasket cemented to the stove frame where the bow is or even seeing if someone with metal working experience can realign things. But you shouldn't need to do either.
I'll post another pic tonight, pretty sure it's solid, but I could be wrong.Solid weld seems not in keeping with something production made... Sure it's not a stitch weld?
Solid weld seems not in keeping with something production made... Sure it's not a stitch weld?
I'd say from the pictures in post #29 that the face is definitely bowed concave, and enough to cause some major door gasket sealing. I'd let Englander make that one right.Is the face of the stove warped or is the door itself warped? It sounds like the door is warped to me. Easy to find out, take the door off and lay it face down on a countertop and see if it rocks.
I'd say from the pictures in post #29 that the face is definitely bowed concave, and enough to cause some major door gasket sealing. I'd let Englander make that one right.


What kind of trims on the LFF and LBA are you running? I've found that to maintain a clean burn for over 24hrs, especially when the temps are headed below 20*F, I need to be running a fuel trim of 3 and an air trim of 9 on high (which is essentially the only heat level I run until the T-stat kicks it to idle once or twice a day for a few hours). With those settings I can go about 2 days before the burn starts to degrade to the point where I'm seeing the flames getting lazy and bent over up against the heat exchanger, and black smoke tips on the edge of the flame.
In industry standards, thats not much, However, if the door is warped (not flat) an equal amount or more, adequate sealing might be an issue. 1/8" overall isn't going to compromise sealing of a rope gasket. Thats what it's for, to seal irregularities.
I do want to know how the OP accesses the cleanout (in post 29). It's impossible to access with the stove that close to the wall or at least stupid difficult.