55-TRPEP (Refurb) Install

  • Active since 1995, Hearth.com is THE place on the internet for free information and advice about wood stoves, pellet stoves and other energy saving equipment.

    We strive to provide opinions, articles, discussions and history related to Hearth Products and in a more general sense, energy issues.

    We promote the EFFICIENT, RESPONSIBLE, CLEAN and SAFE use of all fuels, whether renewable or fossil.
Status
Not open for further replies.
Oct 1, 2012
79
Saco, Me
Good afternoon everyone,

I just bought a house (raised ranch/split) with a finished basement. The previous owners had a propane - gas stove downstairs in the media room which they took with them. It was exhausted out of an existing chimney (which they lined with type b gas vent). I have since taken gas vent out and I am left with a clay lined fly with a cross section (diagonal) of about 9 inches. The chimney itself if approximately 21 feet high.

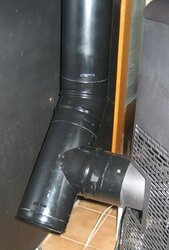
The pellet stove install will be in the basement which will require 1 T cleanout (Selkirk 4VP-3T), vertical about 18-20 inches, 90 degree bend, horizontal 16-18 inches, horizontal bend and then up the 21 foot chimney which I am going to attempt to line with rigid 4VP-60 (4 sections) and another 2 footer or so. I could have tried the flex pipe, but I am going to try and not do that for now.

I also have build my own brick hearth (since I already cut the carpet). Is 270 degrees of turns too much? I am increasing from 3 inches to 4 inches from instructions. Any suggestions? What pellets work well in this stove (I live in Southern Maine).

Thanks
 
I can not comment on your specific questions, but I can say welcome!
I am sure that some of the resident experts will chime in and provide guidance/answers.

Bill
 
that should be fine. I didn't see a mention of outside air which is a requirement for the EP series units.
I will be drilling a hole in the wall (2 feet above the ground) from the outside for the intake. Is that too low? I don't mind shoveling the area if snow accumulates this winter. I believe it came with stock 2.5 inches of flex piping but I may go to 3 inches? If so do I need an adapter or a clamp to get it down to 2.5"?
 
Might be a silly question but if you can drill for your oak could you simplify your install by doing the same with the exhaust. Where your stove sits might make this impossible i thought i would just offer another option with a potentially shorter exhaust. FWIW i have my intake about 28 inches off the ground but i havent tried it out yet.
 
This is the set up downstairs. I am thinking about purchasing a heart for about $400 or so to save some time. I am not sure if I should put the carpet back and the hearth over the (cut) carpet or place the hearth on the concrete floor and make further cuts to the carpet. My other option is to do it with brick but I don't like the silver paint the sellers left me and I am not sure if that paint will come off. I will most likely have the intake to the left of the stove. Since the exhaust vent is off center from the stove, there will have to be a slight angle going up in the masonry. I purchased the SUSI from Selkirk to insulate the horizontal run in the masonry. You may or may not be able to tell but I've already got the 90 degree elbow heading up the 20+ foot run of the chimney.

On the 3rd thumbnail, do you have any ideas what I can use to seal the gaps of the collar and pipe?


HIMG_5199.jpgHIMG_5200.jpgHIMG_5204.jpgHIMG_5206.jpg
 
Seal it with RTV (it comes in several colors and clear, read the installation instructions that comes with the vent and stove to choose the right temperature rating).
 
that should be fine. i didnt see a mention of outside air which is a requirement for the EP series units.
Mike,

Should I be worried about, what looks like rust on the top of the inside of the stove? I haven't used the stove yet. Is this part of the daily cleaning or should I be worried.IMG_5208.JPGIMG_5209.JPG
 
Hello

I rebuild stoves and have seen rust like this. It is just surface rust. What I would do is use a wire brush or a wire wheel on my drill and get most of it off. Then sand it down with emery cloth that you can pick up at Home Depot. Then clean it with Acetone and then use High Temp Flame Proof Flat Black Header paint from the auto parts store on the inside of the fire box and Stove Bright Satin Black paint for areas on the outside of the stove. Many of us do this painting after 3 or 4 years of use because the heat makes the paint fade.

Here is some painting I did.
http://www.pelletstovemaster.com/1_21_Stove-Re-New-Service.html
The second stove on the web page is 15 years old but you would never know after painting! LOL

Nice stove and setup. Good luck!
If you ever need parts for it let me know.
 
heck, don's right, its just surface rust, but if ya want give me a call at the office tomorrow 800-245-6489 (8-5 eastern) i'll do your registration over the phone and key up a can of touch up to take care of it. as for the rust in the burn pot, its not gonna hurt a thing will be gone afterthe first fire.

just call in and ask for me, i'll square ya away
 
.....Since the exhaust vent is off center from the stove, there will have to be a slight angle going up in the masonry.......

There is a fairly easy way to "center" the pipe behind the stove...see my pic below of how did it.....use a T off the appliance adapter and angle it toward the center of the stove, then 45 up.
 

Attachments

  • Exhaust "T".JPG
    Exhaust "T".JPG
    29.3 KB · Views: 146
  • Like
Reactions: mepellet
There is a fairly easy way to "center" the pipe behind the stove...see my pic below of how did it.....use a T off the appliance adapter and angle it toward the center of the stove, then 45 up.
So SMAHTTT! I never thought about doing that. I'll have to head over to my local hardware store this weekend. Have any of you worked with adjustable length pellet pipe? I've go an adjustable from Selkirk that it looks like I need to screw into the other lengths or elbows.
 
There is a fairly easy way to "center" the pipe behind the stove...see my pic below of how did it.....use a T off the appliance adapter and angle it toward the center of the stove, then 45 up.
Did you have to seal any of pipes with rtv silicone sealant? The piping I am going to use is "twist lock" but I want to make sure I don't need to seal the pipe to the stove or any of the pipes to pipes or elbows.
 
That stove adapter needs to be sealed to the stove and unless your vent has decent gasket seals you'll be hard pressed to get a gas tight seal without using something even if it is high temperature metal flue tape.
 
As Smokey said, the appliance adapter needs silicone sealer in the part that slides onto the stove exhaust. The rest of the pipe joints were sealed with high heat foil furnace tape (foil tape wasn't on the pipe in that pic....I added it later).
 
As Smokey said, the appliance adapter needs silicone sealer in the part that slides onto the stove exhaust. The rest of the pipe joints were sealed with high heat foil furnace tape (foil tape wasn't on the pipe in that pic....I added it later).
UL rated?
 
Since I have a 90 bend into the chimney, should I use the 3m high temp foil temp in place of silicone for the vent?I want to make sure I can take it apart to clean once every year?
 
Any venting you might need to remove should be fastened with screws and taped not rtv'd while you can get the rtv sealed ones apart it is a slow and frustrating job and frequently results in damage to the venting.
 
Status
Not open for further replies.