Hey all,
Thought I'd share the story for the woodstove we just installed in our circa 1870 home up here in Maine. I scoured the interwebs looking for info throughout the process and a lot of my searches led me to this forum. I got some help on a couple questions and read tons of posts so I thought I'd share what I did to pay it forward (and maybe show it off a little).
So, we have a tiny house. The footprint for the main house is 16'x20' and the total square footage is about 750. Thank goodness we have a insulated 20'x24 barn (with Jotul 602) for workshop and storage space. My wife and I have both always wanted a woodstove and a tiny house so this project was a big deal to us. We married in May and in lieu of a bunch of stuff we asked for contributions to the "house fund" with the main goal being putting a warm, fiery heart in our little house. I had already picked up the VC Intrepid used for $200 prior to the wedding. Score! It's the exact same stove as the one I grew up with and I've always loved it's styling and efficiency.
Early on we thought about punching a hole in an exterior wall & putting the stove in a corner. Problem with there was my concern over draft quality with an external chimney and the existing baseboard heaters being in the way. And it would look like crap in Our house at some point had a chimney as evidenced by a few patch jobs in the floor and the tiny attic hatch in our bedroom. After some measuring and a site eval by a chimney guy we decided to remove non load bearing wall so we could send the chimney up through the middle of the house.
DISCLAIMER! - I am not a carpenter, just a willing DIYer who is getting better at this stuff. I did all the work on this except the chimney install. Please keep your criticism constructive

Here's some pics as things unfolded...
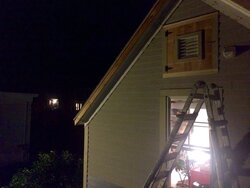
Since I was going to be using the old attic access hole inside for the chimney, I needed to put external access to the attic in. This required some quality attic time re-routing the bathroom fan exhaust. Finished the external access well after sunset. It's actually nice in a way since we can now fit larger items up there for storage.
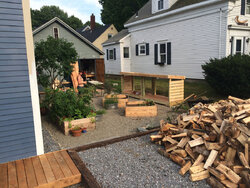
Once the chimney install was scheduled we ordered up 2 cords of kiln dried hardwood cut to 14". It was a lot more than we thought. To store it all we built this outdoor covered storage which will also have a "green roof" planter on top. It fit about 80% of a cord. The rest went in the barn. I was a little pensive about storing wood inside but since it was kiln dried I had read there wouldn't be any critters. Working on more outside storage for next year.
1st floor ceiling - You can see where the old wall was. The foreground is original plaster. The background is drywall over the original plaster. As a result they were uneven. We could have either ripped all the ceiling down and started over or built up the plaster ceiling to match the drywalled stuff. We chose the later. It was a bear, but it looks great finished.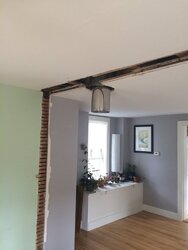
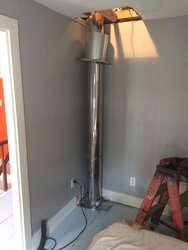
You may have noticed the chimney is kind of "out there" on the first floor. That's as good as I could get while maintaining the required 2" clearance in the corner of the bedroom seen here. We'll be walling this in after we get the ceiling repaired.
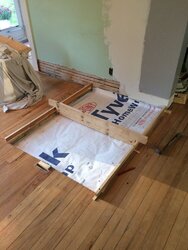
The sub floor was a mosaic of patch jobs and sloping in all directions to boot. There is a post under the center of the house in the crawlspace that the house has settled around. Considering the houses age and my inability to DIY or pay for the repairs needed to level the entire house I decided to work with it. I needed a level spot for the tile I was going to lay and the only way to do it was to set up a level screed to the required depth and make a level pad using "S" mortar. I also considered self leveling cement but my buddy suggested this as an alternative due to the finicky nature of leveling cement. It worked great.
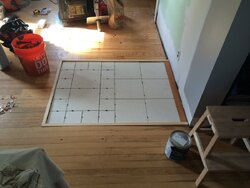
We picked up the tile, tile set, and grout for $20 at the local ReStore. my first time ever tiling... went okay. Since the stove wasn't going to be sitting right on this tile pad I didn't worry as much about the fireproofing. It's more there to act as an inflammable pad in case burning wood were to ever tumble out of the stove. You'll see what I mean at the end. Note the uneven trim around the tile.
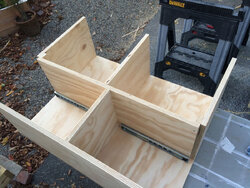
The beginning of the elevated hearth. Love me some 3/4" project board. The two bays at the top will hold 2-3 armloads of wood. The back two bays will house drawers. One each for kindling and matches/paper/misc.
You can't see it but there are 2 layers of 1/2" Durock cement board under the 1-1/2" thick slab of soapstone. You can also see how the tile is just below the surface of the floor/trim. I picked up a Fein Multitool a few months ago and I'm constantly amazed at how much easier it makes things. I took the sheet of metal I was going to use for the heat shield on the wall and laid it down around the perimeter of trim as a guide for the 4" circle blade attachment. Took me about an hour to get it all flush and sanded. We were both worried about stubbing our toes!
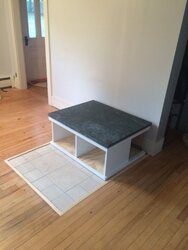
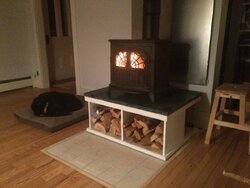
The first fire. Our dog Bella was more than happy to have her bed relocated to this spot. The heat shield is temporary. Hoping to put a nice one up with flat river stones next year. All in all it was a fun project with only a couple unexpected hurdles. The reward of seeing a project like this come to fruition is always a pleasure. We look forward to enjoying it for years to come!
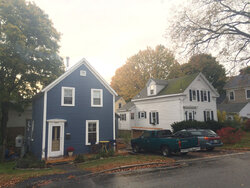
I stopped and snapped a pic of the house with smoke coming out the chimney as I left for work on a chilly & rainy October morning. Nice to know mumma and the beasts are inside staying warm. Can't wait to get home, grab a libation and a book, and sit in my rocking chair and relax!
Thanks for reading! Hope it helps inspire/instruct someone in the future.
Thought I'd share the story for the woodstove we just installed in our circa 1870 home up here in Maine. I scoured the interwebs looking for info throughout the process and a lot of my searches led me to this forum. I got some help on a couple questions and read tons of posts so I thought I'd share what I did to pay it forward (and maybe show it off a little).
So, we have a tiny house. The footprint for the main house is 16'x20' and the total square footage is about 750. Thank goodness we have a insulated 20'x24 barn (with Jotul 602) for workshop and storage space. My wife and I have both always wanted a woodstove and a tiny house so this project was a big deal to us. We married in May and in lieu of a bunch of stuff we asked for contributions to the "house fund" with the main goal being putting a warm, fiery heart in our little house. I had already picked up the VC Intrepid used for $200 prior to the wedding. Score! It's the exact same stove as the one I grew up with and I've always loved it's styling and efficiency.
Early on we thought about punching a hole in an exterior wall & putting the stove in a corner. Problem with there was my concern over draft quality with an external chimney and the existing baseboard heaters being in the way. And it would look like crap in Our house at some point had a chimney as evidenced by a few patch jobs in the floor and the tiny attic hatch in our bedroom. After some measuring and a site eval by a chimney guy we decided to remove non load bearing wall so we could send the chimney up through the middle of the house.
DISCLAIMER! - I am not a carpenter, just a willing DIYer who is getting better at this stuff. I did all the work on this except the chimney install. Please keep your criticism constructive


Here's some pics as things unfolded...
Since I was going to be using the old attic access hole inside for the chimney, I needed to put external access to the attic in. This required some quality attic time re-routing the bathroom fan exhaust. Finished the external access well after sunset. It's actually nice in a way since we can now fit larger items up there for storage.

Once the chimney install was scheduled we ordered up 2 cords of kiln dried hardwood cut to 14". It was a lot more than we thought. To store it all we built this outdoor covered storage which will also have a "green roof" planter on top. It fit about 80% of a cord. The rest went in the barn. I was a little pensive about storing wood inside but since it was kiln dried I had read there wouldn't be any critters. Working on more outside storage for next year.

1st floor ceiling - You can see where the old wall was. The foreground is original plaster. The background is drywall over the original plaster. As a result they were uneven. We could have either ripped all the ceiling down and started over or built up the plaster ceiling to match the drywalled stuff. We chose the later. It was a bear, but it looks great finished.

You may have noticed the chimney is kind of "out there" on the first floor. That's as good as I could get while maintaining the required 2" clearance in the corner of the bedroom seen here. We'll be walling this in after we get the ceiling repaired.

The sub floor was a mosaic of patch jobs and sloping in all directions to boot. There is a post under the center of the house in the crawlspace that the house has settled around. Considering the houses age and my inability to DIY or pay for the repairs needed to level the entire house I decided to work with it. I needed a level spot for the tile I was going to lay and the only way to do it was to set up a level screed to the required depth and make a level pad using "S" mortar. I also considered self leveling cement but my buddy suggested this as an alternative due to the finicky nature of leveling cement. It worked great.

We picked up the tile, tile set, and grout for $20 at the local ReStore. my first time ever tiling... went okay. Since the stove wasn't going to be sitting right on this tile pad I didn't worry as much about the fireproofing. It's more there to act as an inflammable pad in case burning wood were to ever tumble out of the stove. You'll see what I mean at the end. Note the uneven trim around the tile.

The beginning of the elevated hearth. Love me some 3/4" project board. The two bays at the top will hold 2-3 armloads of wood. The back two bays will house drawers. One each for kindling and matches/paper/misc.

You can't see it but there are 2 layers of 1/2" Durock cement board under the 1-1/2" thick slab of soapstone. You can also see how the tile is just below the surface of the floor/trim. I picked up a Fein Multitool a few months ago and I'm constantly amazed at how much easier it makes things. I took the sheet of metal I was going to use for the heat shield on the wall and laid it down around the perimeter of trim as a guide for the 4" circle blade attachment. Took me about an hour to get it all flush and sanded. We were both worried about stubbing our toes!

The first fire. Our dog Bella was more than happy to have her bed relocated to this spot. The heat shield is temporary. Hoping to put a nice one up with flat river stones next year. All in all it was a fun project with only a couple unexpected hurdles. The reward of seeing a project like this come to fruition is always a pleasure. We look forward to enjoying it for years to come!

I stopped and snapped a pic of the house with smoke coming out the chimney as I left for work on a chilly & rainy October morning. Nice to know mumma and the beasts are inside staying warm. Can't wait to get home, grab a libation and a book, and sit in my rocking chair and relax!

Thanks for reading! Hope it helps inspire/instruct someone in the future.

Last edited:


 )
)
