Addition progress & a brain teaser ;)

  • Active since 1995, Hearth.com is THE place on the internet for free information and advice about wood stoves, pellet stoves and other energy saving equipment.

    We strive to provide opinions, articles, discussions and history related to Hearth Products and in a more general sense, energy issues.

    We promote the EFFICIENT, RESPONSIBLE, CLEAN and SAFE use of all fuels, whether renewable or fossil.
Status
Not open for further replies.

Hogwildz

Minister of Fire
Welp, back working on the addition full force on weekends.
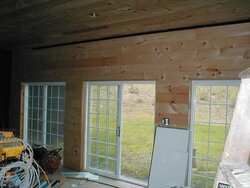
Office has all the T&G;pine walls & ceiling up, electric, tv, phone, networking & satellite internet wiring run.

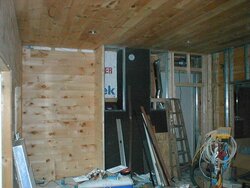
Bedroom has 1 small and 1 large wall left. The end walls are for the end of project. Everything concrete will be covered in dry stack ledge stone cultured stone. (Gonna be a wopper in cost).

Heres a few shots of the newly insulated and covered in pine 8" T&G;. I went overkill for tightness. All the 2"x6" outside wall studs & top & bottom plated caulked with silicone where the inside of outside sheathing meets the studs. No gap sparred. Even around doors where studs are doubled & trippled in some spots, the places where the studs meet side by side are caulked. There are NO air gaps. Even caulked the outside lamp boxes where the go through wall.

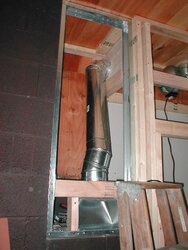
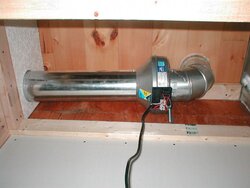
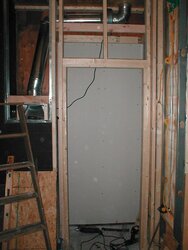
Now working on enclosing & prettying up the old exterior chimney which is not interior in the new bedroom. That will also get covered in cultured stone. Except the sides. While it is not unbearably hot to touch when Summit is cooking along. It does get warm, and I figure I'll take the free heat towards the bedroom. Hopefully the cultured stone will radiate a lil, even if minimal. and decided to box the sides at the step in's and put a cloverleaf pattern aluminum perforated sheet metal on the faces to let any other even if small bit of heat radiate out into bedroom.
 

Attachments

  • BACK WALL.JPG
    BACK WALL.JPG
    65.1 KB · Views: 583
  • AROUND CHIMNEY.JPG
    AROUND CHIMNEY.JPG
    72.6 KB · Views: 588
Since the office is 12' x 17' and I have the Summers heat 50/30 in there LMAO, I figured I will want to move some of that heat to the bedroom(15' x 25'). Hence a fantech FG6 inline duct fan. A outlet in the corner of the office ceiling, duct up into the attic, across the attic for about 8' and down into the closet, to the fan, into the right ledge of the old chimney and a register at the opening(see photos). I will most likely paint everything (duct, outlet etc. inside the right chimney ledge high heat black, so it doesn't show & shone through the cloverleaf cover real bad.
 

Attachments

  • STOVE OUTPUT VENT.JPG
    STOVE OUTPUT VENT.JPG
    58.1 KB · Views: 574
  • FANTECH DUCT FAN.JPG
    FANTECH DUCT FAN.JPG
    38.3 KB · Views: 572
Brain teaser time, not real hard, but I am surprised my Neanderthal 1/2 cooked brain figured it out.
How did I get this 44" x 8' sheet of 1/2 drywall in this closet opening and on the back wall without cutting it into completely separate pieces?
I'll tell you this..... it cannot be tilted and slid in, its about a foot wider and even taller than the closet opening?
 

Attachments

  • DRYWALL IN CLOSET.JPG
    DRYWALL IN CLOSET.JPG
    50.3 KB · Views: 586
Scored the back. Cracked it forward. Slid it in at an angle and unfolded it?
 
You're a drywall whisperer. Rick
 
LMFAO, Nope didn't build around it, didn't whisper sweet nothing to it,
Bart ya damn close man.
I did score the back, folded it, slide it angled up & in, and the f'er wouldn't unfold without hitting the back of the closet opening. Thus not allowing me to swing the damn thing open.
So I pulled it back out, opened it to like a "v" then slid it in and unflolded the rest of the way., Top is screwed into the old plywood sheathing, the bottom had to be tapconned into block. At midnight, the rest of the house musta loved me that night....... f'em ;)

Sometimes the simplest things, puzzle me LOL.
I was just about ready to slide & dice the motha into several pcs. I get a lil cranky at midnight after sweating my arse off in that attic all day.
Should made that a winter project.
 
What? No crap about code & firestop vents blah blah blah???
Elk would love my duct set up. ;)
 
Elks not here!
 
Hogwildz said:
What? No crap about code & firestop vents blah blah blah???
Elk would love my duct set up. ;)

He was the first thing I thought of when I read the original post. I miss him going ballistic on that stuff.
 
That one piece that the pipe is going horizontal through is a ceiling tile I bought. Said fire retardant LOL. I will most likely replace it with drywall.
I also kept the wood tied into the chimney blocks out at the perimeter of the blocks, it doesn't get real warm around the edges.
I am not just slapping it all up. I do give thought as to how to keep the wood as least exposed to the warmer parts of the chimney.
And,I have the double wall insulated liner and flex at bottom inside. It really doesn't get hot. I checked during the winter, it gets warm at best, but why not get that free heat no matter how small into the bedroom?
I may end up getting fire stop vent grates if I can ever find then in 10" x 6", haven't found much luck finding any at all. Didn't search to the ends of the earth either. ;)
 
I didn't mention it because I figured I already knew the response :coolsmirk:, but adding a fire damper is a good idea. Put it in the pipe, not at the grille.

For some fusible link fire dampers check out Atlanta Supply. Click on the fire dampers link:
http://www.atlantasupply.com/firesafety.htm
 
Status
Not open for further replies.