Hi all,
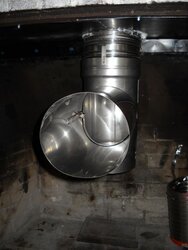
I wanted to show off my progress on my install – obviously I am not a pro but everything I did was learned from this site (so thanks!) - I hope to get the Fireview in place this week.
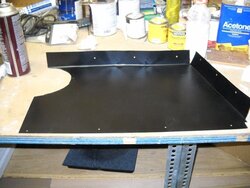
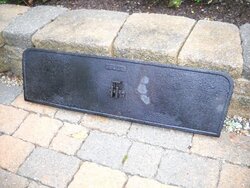
I had some 22 gauge metal left over from my heart install so I used that to make the block off plate.
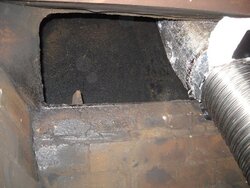
I template the damper area with cardboard first – decided it was easier for me to used two pieces instead of one – cut the metal and since I didn’t have a break formed the side edges using a vise and 2x4.
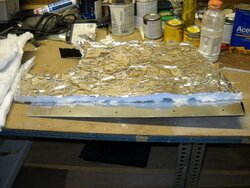
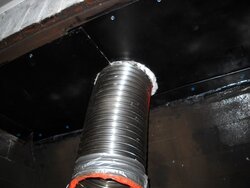
I was going to buy the Rock wool at Lowes but they only had it in huge rolls that I decided to use what insulation I had left from my liner install.
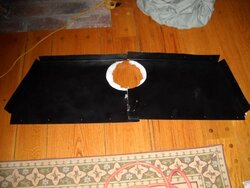
Drilled into the steel lentil in the front part of the damper area and used tapcons for the brick.
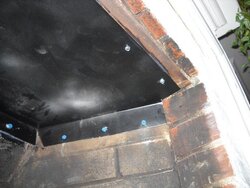
One area I was not overly happy with is I used silicone along the edges of the plate to help adhere to the masonry as well and stop any additional drafting. For the most part the plate was very tight all by itself against the brick however the back of the plate was not (maybe as much as 3/8 inch gap in some areas) and as it was curing I noticed that the silicone was only rated for 350 F continuous. Although I think this was fine to use along the outer edges (sides and front) I wasn’t happy about the back since the liner rests up against the back of the plate – so I decided to pick out the silicone and will replace with some type of cement.
Question – does the block off plate get really hot or could I have used silicone around the entire area?
Question – (this maybe rudimentary but hey I am new!) I place my hand at the liner opening and I feel a down draft. Now I know heat rises and cold air drops so I assume when I light a fire this will reverse itself...yes?...if this is the case what happens when during the winter in which I am not lighting a fire?...wouldn’t this allow for the very cold air from the outside into the room?...
~jim
I wanted to show off my progress on my install – obviously I am not a pro but everything I did was learned from this site (so thanks!) - I hope to get the Fireview in place this week.
I had some 22 gauge metal left over from my heart install so I used that to make the block off plate.
I template the damper area with cardboard first – decided it was easier for me to used two pieces instead of one – cut the metal and since I didn’t have a break formed the side edges using a vise and 2x4.
I was going to buy the Rock wool at Lowes but they only had it in huge rolls that I decided to use what insulation I had left from my liner install.
Drilled into the steel lentil in the front part of the damper area and used tapcons for the brick.
One area I was not overly happy with is I used silicone along the edges of the plate to help adhere to the masonry as well and stop any additional drafting. For the most part the plate was very tight all by itself against the brick however the back of the plate was not (maybe as much as 3/8 inch gap in some areas) and as it was curing I noticed that the silicone was only rated for 350 F continuous. Although I think this was fine to use along the outer edges (sides and front) I wasn’t happy about the back since the liner rests up against the back of the plate – so I decided to pick out the silicone and will replace with some type of cement.
Question – does the block off plate get really hot or could I have used silicone around the entire area?
Question – (this maybe rudimentary but hey I am new!) I place my hand at the liner opening and I feel a down draft. Now I know heat rises and cold air drops so I assume when I light a fire this will reverse itself...yes?...if this is the case what happens when during the winter in which I am not lighting a fire?...wouldn’t this allow for the very cold air from the outside into the room?...
~jim