Ashford 30 break in burn

  • Active since 1995, Hearth.com is THE place on the internet for free information and advice about wood stoves, pellet stoves and other energy saving equipment.

    We strive to provide opinions, articles, discussions and history related to Hearth Products and in a more general sense, energy issues.

    We promote the EFFICIENT, RESPONSIBLE, CLEAN and SAFE use of all fuels, whether renewable or fossil.
Status
Not open for further replies.

ohiojoe13

Feeling the Heat
Dec 22, 2014
390
alliance ohio
What is the proper method for the break in period for my Ashford 30. What do you guys recommend. It's gonna be in the lower 60s this weekend and I really want to try it out. Is 60 degrees to warm out for the stove to have a proper draft? Thanks for the help without this site in would be so lost.
 
I don't have an Ashford, But my Buck required 3 small fires to dry the Fire Brick, then 3 progressively larger fires to cure the paint. I'd think yours is about the same..
 
Depends on the house and the chimney setup. If the flue is 20ft straight up, you should get some ok draft.
 
It tells you how you should break in the Ashford in the manual. Last year when I did mine I pretty much just followed what the manual said. It was a similar day, around 60 and I didn't want to wait for it to be cooler. Some people have said they got some real bad smoke and smells. This is one good reason for doing the break in on a warmer day when you can open all windows and doors. The finish on mine is matte black and I had some smoke and smells but it really wasn't too bad. Give the manual a good read and follow the break in fire instructions and you won't go wrong. Post some pictures too!
 
I followwd the manual exctly for the break in burns. I burnt eight cords last year, stove ran prerty much wide open theottle from mid dec to late feb, 24.7 x 2.5 months.

The brown enamel on mine looks factory great, no discoloration. The first couple burns were kinda stinky.
 
to test your draft take a little newspaper and lite it, make sure your by-pass is open, close your door but don't latch it shut; if the smoke goes up, you should have good draft. If your draft it good then take news paper or fire starter, build a small fire using kindling only, let that burn all the way, then build another fire same way but adding a few larger pieces. Remember that the whole break in period does not include cat light off, the by-pass stays open, your only burning off cooking oil and curing the paint.
 
[q
to test your draft take a little newspaper and lite it, make sure your by-pass is open, close your door but don't latch it shut; if the smoke goes up, you should have good draft. If your draft it good then take news paper or fire starter, build a small fire using kindling only, let that burn all the way, then build another fire same way but adding a few larger pieces. Remember that the whole break in period does not include cat light off, the by-pass stays open, your only burning off cooking oil and curing the paint.
OK I'll try checking the draft that way. My chimney is about 16' total but has 2 elbows.
I just read through the manual and it didn't say anything like that. It said that once the fire was going to close the by pass.
 
You want to gradually heat the stove in steps, then one ur last fire heat it up normally, only close the bypass when ur cat probe is in the active zone
 
You want to gradually heat the stove in steps, then one ur last fire heat it up normally, only close the bypass when ur cat probe is in the active zone
How many fires do I need to have the manual only talks about the first time. Never really says anything about break in. Just states on first fire you may have a smell coming from stove.
 
Did your stove come with a tag from the manufacturer of the paint? My Sirocco did, and I followed the required steps and temps listed on that.

Line 7 of the first fire directions in the manual states to close the bypass. DO NOT burn the stove up to the break in temps for long with the bypass open - you risk warping the bypass retainer.
 
A small fire will help dry out residual moisture held the firebrick. Three 2-3" thick splits should do the trick. Then follow the manual. FWIW, I like to do the same at the start of every season.
 
Did your stove come with a tag from the manufacturer of the paint? My Sirocco did, and I followed the required steps and temps listed on that.

Line 7 of the first fire directions in the manual states to close the bypass. DO NOT burn the stove up to the break in temps for long with the bypass open - you risk warping the bypass retainer.
Mine does not say that
 
Are you sure? I just checked both the current AF30.1 and archived AF30 manuals on BK's site, and in both it states to close the bypass under line 7.
 
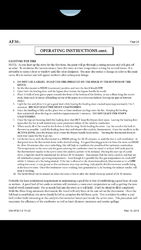
This is what mine says. Maybe it's different because it's a 30.1?
 

Attachments

  • Screenshot_2015-09-12-11-23-36.png
    Screenshot_2015-09-12-11-23-36.png
    79.4 KB · Views: 149
Hmmmmm....maybe they re updated the manual on their site. In any case, it's there on line 8 in your manual - close the bypass when it's in the active zone.
 
Status
Not open for further replies.