Hello Everyone and COOL website
My name is Jeff and I am new here and to wood stoves. I just bought one on a whim to put in my future workshop in my future North Georgia log cabin.
So I bought an Atlanta Stove Company wood box #125 off Craigslist. Just plain, small free standing typical looking wood stove. It is really cool looking and I plan to give it a little upgrade with some black paste I bought.
However..........I noticed something the other day and I need to know if it is really a problem and/or if it can (or needs to) be repaired. On the side panel (that appears to be removable if one knew how) there is a 1/4" x 3" gap between the side panel and the back part of the stove. Looks like the edge of the side panel has been broken off leaving the 1/4" x 3" gap right at the seam of the two pieces. Is this a problem for actual use in a workshop and can it be welded or filled somehow??
Any information would be helpful.
Thanks
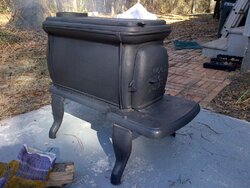
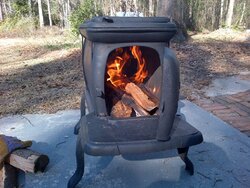
My name is Jeff and I am new here and to wood stoves. I just bought one on a whim to put in my future workshop in my future North Georgia log cabin.
So I bought an Atlanta Stove Company wood box #125 off Craigslist. Just plain, small free standing typical looking wood stove. It is really cool looking and I plan to give it a little upgrade with some black paste I bought.
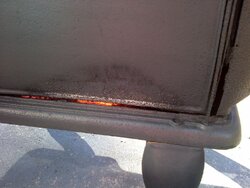
However..........I noticed something the other day and I need to know if it is really a problem and/or if it can (or needs to) be repaired. On the side panel (that appears to be removable if one knew how) there is a 1/4" x 3" gap between the side panel and the back part of the stove. Looks like the edge of the side panel has been broken off leaving the 1/4" x 3" gap right at the seam of the two pieces. Is this a problem for actual use in a workshop and can it be welded or filled somehow??
Any information would be helpful.
Thanks