<b>Radiation shield install</b>

  • Active since 1995, Hearth.com is THE place on the internet for free information and advice about wood stoves, pellet stoves and other energy saving equipment.

    We strive to provide opinions, articles, discussions and history related to Hearth Products and in a more general sense, energy issues.

    We promote the EFFICIENT, RESPONSIBLE, CLEAN and SAFE use of all fuels, whether renewable or fossil.
Status
Not open for further replies.

Rickster

Member
Jul 19, 2008
49
CT
Hi guys,

Finally have all the parts to install my MT Vernon with excel vent pipe,
straight up install through a cathedral ceiling with an extreme (13/12) pitch.
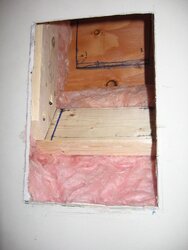
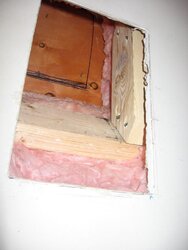
I have the hole cut, framed and marked for the final cut through to the roof outside, which I plan to do tomorrow.
I am just concerned about insulation. Does this look o.k.? I don't want to remove it completely, since there is quite a draft without it. Right now, as you can see from the pictures, the insulation is well outside the 2X4rs I have used to box the area where the metal shield will go.
Is it safe?
 

Attachments

  • Rshield1.jpg
    Rshield1.jpg
    77 KB · Views: 258
  • Rshield2.jpg
    Rshield2.jpg
    72.5 KB · Views: 247
As long as your square ceiling support box goes all the way to the underside of your roof sheathing, & is cut to the roof pitch, your installation is correct. If it doesn't, you have to use the extension to keep the insulation from getting inside the box. The bottom of your support box has to extend a MINIMUM of three inches below the lowest part of the ceiling...
Looking at the layout lines on your sheathing, it looks like you're gonna cut a square hole thru the roof from the underside?
It can be elliptical & if you lay it out on TOP of the shingles, it will be easier to cut with a sawzall.
'Course you'll need some bracing or a harness to keep you SAFELY on the roof...
I can give you further details on the layout if you'd like...
 
Thanks for the quick replies.
Daksy,
Yes, the box will go all the way to the roof. I extended it so that it will be tall enough that I will have an inch or so to fold over and nail/caulk it to the roof.
So yes, I plan on keeping the hole square. I figure I will drill a pilot hole at each corner then go outside, chisel away the shingles and cut it from above. Because of the steep pitch, the flashing will then go partially under the top half of the shingles, the bottom above.
As for the interior, the instructions said it was only necessary to have 1/4 inches of the box extend below the ceiling, you say three?
 
Rickster said:
Thanks for the quick replies.
Daksy,
Yes, the box will go all the way to the roof. I extended it so that it will be tall enough that I will have an inch or so to fold over and nail/caulk it to the roof.
So yes, I plan on keeping the hole square. I figure I will drill a pilot hole at each corner then go outside, chisel away the shingles and cut it from above. Because of the steep pitch, the flashing will then go partially under the top half of the shingles, the bottom above.
As for the interior, the instructions said it was only necessary to have 1/4 inches of the box extend below the ceiling, you say three?

Your flashing will have a better seal (IMHO) if you cut an elliptical hole instead of a square one
If you drill up thru the center of where you want the vent to exit, use a LONG pilot bit, 1/4 - 3/8" dia. x 12" long. & leave it sticking thru the roof. Take your flashing & a yellow or red crayon up on the roof & use a magnetic torpedo level on the bit to get it plumb. Center your flashing to the top of the pilot drill. Witht he crayon, trace the bottom of the flashing cone on your shingles, & mark the 4 corners, also.
Remove the flashing & you'll see an ellipse to guide your saw. I generally cut about 1" OUTSIDE the layout line from the 6 o'clock to the 9 o'clock positions...
From those positions, I cut straight down to about 1" past the bottom of the layout line.
I then cut striaght across to join the ends of the vertical lines...The final result is an upside down U-shaped hole.
With the corner layout lines as guides, I know where my flashing will be located & I can remove the shingle nails with a flat bar.
You can the slide the flashing up under the shingles & the ellipse gives you a nice finished look where your flashing sits.
If your manual says to extend 1/4" below, that's what you need. I didn't realize you were in the Pellet forum when I clicked on you link on the Home Page...The 3" applies to the wood vent ceiling support...
 
Status
Not open for further replies.