Baffle and Shield Questions

  • Active since 1995, Hearth.com is THE place on the internet for free information and advice about wood stoves, pellet stoves and other energy saving equipment.

    We strive to provide opinions, articles, discussions and history related to Hearth Products and in a more general sense, energy issues.

    We promote the EFFICIENT, RESPONSIBLE, CLEAN and SAFE use of all fuels, whether renewable or fossil.

WV Cabin

New Member
Jan 11, 2018
26
Northern Virginia
Question, local fab shop had 3/8” or 1/4” , I got a scrap of each to possibly cut down for a baffle. I know 5/16” is the optimum thickness but which of what I have would be best in a Mama Bear? Also the ledge under my stoves flue out let (rear) is welded to the bottom of the flue so I’m thinking just notch the baffle to rest on the shelf and fit back to the rear wall? I have to use the Grinder to fit any way so it’s just a couple more “tedious” cuts with a slicer wheel.
 
1/4
Notch a piece of cardboard and set on supports so you get the front edge right where you want it.
 
Thanks, got the template done today. Thinking of adding heat shield under and behind the stove with the thought of possibility adding secondary air later. Was wondering how the original heat shields attached? I have looked and read through the threads and just see either 16 or 20 gauge and a 1.5” measurement. I was thinking of attaching them to stand offs but was wondering if I did so and then was to use this heated void for the secondary air piping would there be enough heat transfer to be efficient for secondary burn or do I need to rethink and consider running through the fire box?
 
Original shield was a bolt on added to one of the first drawing revisions making them a II.
Later shields were welded on stoves without angle iron legs. (The UL listed III in Fireplace Series and VI in the Bear Series)
Goldilocks has a double shield that passed for 12 inch clearance to the rear in mobile home installations. There is about 1/4 inch clearance between sheets.

You can bolt (machine screw) it onto the angle iron and it only takes a washer or two. You will need to thread the upper holes or drill completely through to nut them on the inside.

Make the bottom shield about an inch larger all the way around that would fit within the angle iron corners under the stove. Then bend the edges downward on a 90* angle for strength, like a metal shelf is designed. You can drill the legs or I put small clamps on the legs for the shield to sit on.
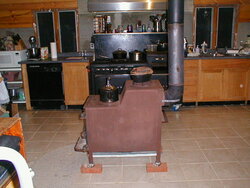
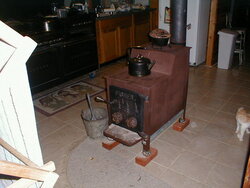
Here is a picture of a Mama Bear with added shield. This was in my kitchen which is a plywood floor with single layer of cement board and tile. This is just below the required floor protection. The tile became uncomfortably hot to keep my hand on it in the center., and with the shield it stayed cold.
Air space to the rear shield is not critical as long as it doesn't touch. 1/8 inch is almost as good as 1 inch. An example is holding your finger 1/8 inch away from a hot surface like a pan on a range when cooking. The air between your finger and hot surface prevents burning. Touch the surface for an instant and you burn your finger.

Brown Mama in kitchen 2011.JPG Brown Mama Bear in kitchen 2011 2.JPG

I glued felt to the bottom of the bricks to prevent scratching tile floor. This is the area under chimney I tested all the stove models on the same chimney. So I needed to be careful with the tile changing out stoves. This one with baffle heated my 1850 square foot home for an entire winter. It was the only heat source for space heating in the home. We were more comfortable with longer duration fires with a Papa.
 
Coaly, thanks for the info and reference pictures. Made my template for baffle and heat shields, hopefully have done in a week or so. Noticed the baffle size varies (previous posts) so am hoping I have left enough adjustment in to it as I put a 2.75” notch in the back center for the flue, figure that gives me some room to adjust forward on the factory installed small shelf under the flue after I get the stove in place.
 
Coaly, Was wondering what is the best height for the flue dampener to be installed? I am reworking what we have in WV so want to make it right and most efficient.
Thanks in advance.
 
It doesn't matter. Wherever it is comfortable to reach.
It adds resistance to the exhaust system like a water valve in a water line. So it doesn't matter where it is.
 
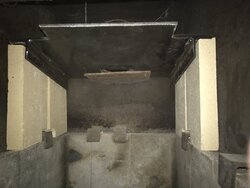
Just got my baffle fitted and bricks cut, I notched the back for the flue so in the picture it looks strange but from under the plate it is covered. I am not to worried as I have a bit of single wall inside the cabin before it gets to the 20’ or so of double wall outside.
I have some adjustment in the baffle if I need to adjust the opening by sliding it on the bricks.
I added the angle iron on the sides to help catch the fire bricks supporting the smoke shelf. FF597ED3-755A-45EF-8360-01D6B3B83C9C.jpeg
 
I tried what you're doing, documented temps and observed smoke from start up to coal stage...... What I posted on the baffle thread worked best. Different chimney, different fuel, your results may vary. Looks like you've got the cigar burn going; we'll call it the Fisher 207. ;)