Basement Wall Foam Board Idea

  • Active since 1995, Hearth.com is THE place on the internet for free information and advice about wood stoves, pellet stoves and other energy saving equipment.

    We strive to provide opinions, articles, discussions and history related to Hearth Products and in a more general sense, energy issues.

    We promote the EFFICIENT, RESPONSIBLE, CLEAN and SAFE use of all fuels, whether renewable or fossil.
Status
Not open for further replies.

velvetfoot

Minister of Fire
Dec 5, 2005
10,202
Sand Lake, NY
I've been really slowly insulating the rim joist area but thought I'd post a picture or two here on my basement wall idea, and put future updates here.

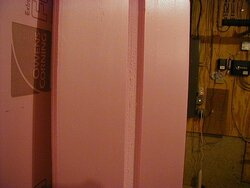
I first strapped 2" of foam to the wall using 1x3's.
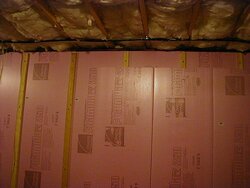
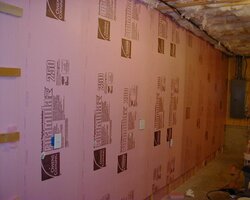
My idea to put another layer of foam was to mill grooves in more 2" foam boards.
I am using a router with a guide on it. A little slow, but could be worse.
I've tacked some in place using a hot glue gun.
I'll put Densarmor drywall over it.
 

Attachments

  • foam groove.jpg
    foam groove.jpg
    26.8 KB · Views: 1,173
  • foam 2 layers.jpg
    foam 2 layers.jpg
    29.1 KB · Views: 1,464
I did this in December and it helped a little bit. I figure you will warm your basement up about 3 degrees.
 
ihookem said:
I did this in December and it helped a little bit. I figure you will warm your basement up about 3 degrees.


How the heck can you figure he'll warm his basement 3 degrees by looking at a picture?
 
i have almost the same thing going in this spring, im only putting 2in foam over the part of the foundation that is above grade and going to seal the joists while im there.
 
j00fek said:
i have almost the same thing going in this spring, im only putting 2in foam over the part of the foundation that is above grade and going to seal the joists while im there.


The frost line here is down about 30" so I'm thinking I'll use 4x8 sheets turned the long way.
 
The tough parts will be the stuff next to the wall, like well pump tank, furnace (don't want to get too close to that, for sure), breaker panel, the occasional panel. There'll be some spots I just won't be able to do.
 
area above foam, between joists & sill is critical!

You can't see it in the pic, but there are four thicknesses of 2" foam starting from the rim joist. It meets the foam on the wall.
That is what I am doing now. What a slow process. Spray in foam would have been easier, but more costly I imagine.
 
kenny chaos said:
j00fek said:
i have almost the same thing going in this spring, im only putting 2in foam over the part of the foundation that is above grade and going to seal the joists while im there.


The frost line here is down about 30" so I'm thinking I'll use 4x8 sheets turned the long way.

exactly what ill be doing, i have 12 4x8 sheets now ill have to grab more i bet.

ill be using the spray foam above this and in between the sill and floor once it gets warmer! (getting a tank system that looks like propane tanks)
 
I did mine this summer, and got good results as far as heat goes, but the air sealing is very difficult. We used spray foam in the joist cavities, but still have air infiltration from bewhen we ran the blower tests.

Here is why I think we still have leakage- we ran the foam board as high as possible, and this covered the joint where the mud sill touches the concrete foundation wall, and then we sprayed foam into the cavity. When we ran the blower tests, air was being pulled behind the walls and out the bottom plate of the wall, where we could not get a perfect seal due to uneven floor. I suspect the air is being pulled beneath the mud sill, which did not get sealed by the foam. I would recommend not installing the foam board all the way up - cut it off an inch or so below the first possible air leakage point, then use spray foam to seal the entire joist space and the mud sill/foundation joint.

My 2 cents
 
air infiltration
BUT LEMME THINX=
if vapor in warm air can only migrate thru the pores of the joists, might that result in accelerated decay? have fun.

Thanks for your contributions to the thread.
 
velvetfoot said:
air infiltration
BUT LEMME THINX=
if vapor in warm air can only migrate thru the pores of the joists, might that result in accelerated decay? have fun.

Thanks for your contributions to the thread.


I think the moisture concerns are valid - does that foam allow moisture through. I don't have any links to support but i do no that some of the foam board is designed to let moisture through.
 
Now that I finished the rim joist area I can get back to this.
Instead of using the router to make the wide slot, I am going to try a wobble dado blade on the table saw.
They are cheap, but I made the mistake of buying one at HD that didn't fit the arbor length (anybody want to buy it - unused - had to tear up the packaging to open it up).
I ordered another one made to fit the smaller arbor length, 1 3/8.
 
Here is a pic of part of a wall.
The routing of the groove to fit the furring strip is a little tedious, but the dado works ok.
The electrical also is a little tedious but not too bad.

Other stuff to do outside now though.
 

Attachments

  • P1010123.JPG
    P1010123.JPG
    130.9 KB · Views: 897
So how you putting drywall over that? Just asking because I am pondering the same setup but was going to do the furrings for attachment points.

Ok I looked back and some furrings (sp?) on previous photos. I need a coffee.
 
Here's hoping the drywall looks okay.
It'll be a solid wall; you could bounce off it and not break the drywall I bet.
 
I don't think I mentioned it, but I used polyurethane Gorilla Glue to glue the foam sheets together.
I hold the top layer on til the glue cures with wood strips screwed into the furring strips.
 
Looks like an excellent job. You're going to be way more comfortable next winter.
 
Well, I finally hung my first sheet of drywall tonight, lol.
It will be a solid wall, I believe.
 
Anyone else doing something similar might use XPS boards already prepped for 1x3s:

http://www.homedepot.com/webapp/wcs...&productId=100320293&R=100320293#.UCzq70QtM7A

Overall, looks like a great job...XPS (pink closed cell) is the right material, low thermal bridging by the 1x3s.

Timeline looks comprable to my DIY projects :)

I'm gearing up to do something similar and was planning on taping the joints with red housewrap tape. Opinions?
 
I'm not sure if I said it, but I taped the first layer of 2" foam with Tyvek tape, as found in the HD. I figured that was good enough, and that the second foam layer didn't need any more.
 
  • Like
Reactions: daveswoodhauler
I'm not sure if I said it, but I taped the first layer of 2" foam with Tyvek tape, as found in the HD. I figured that was good enough, and that the second foam layer didn't need any more.
Did the same on my basement walls....the tyvek tape works well.
Using in IR Gun in the winter, there was about a 6-8 degree temp difference on the insulated wall vs the bare concrete. (Room was not heated)
You should notice some good results this winter....lookd good
 
This winter? My previous post was from 2009, lol. But yes, it's been warmer down there in the winter and less stinky in the summer.
 
I want to do this but my walls get wet after heavy rains,so im dealing with that first.
 
Status
Not open for further replies.