BK First fire test....No good.

  • Active since 1995, Hearth.com is THE place on the internet for free information and advice about wood stoves, pellet stoves and other energy saving equipment.

    We strive to provide opinions, articles, discussions and history related to Hearth Products and in a more general sense, energy issues.

    We promote the EFFICIENT, RESPONSIBLE, CLEAN and SAFE use of all fuels, whether renewable or fossil.
Status
Not open for further replies.

Mr. Jones

Feeling the Heat
Oct 25, 2012
265
Kennewick, Washington
Still not cold enough yet for fires, but I wanted to test it out for exactly this reason. First off, It's an all new old stove to me. Princess insert. Brand new liner I installed. First problem....Smoking from what I think is caulk/silicone mix I used to seal up the block off plate, and around the liner. Just started smoking bad and stinking. Definitely wasn't wood smoke. I used this because I seen people posting here that they used that without a problem. I was leary, and went ahead and tried it anyways. So, I guess I'll rip her all out, and redo it, at least around the liner itself where it gets the hottest with high temp stuff.

Second problem. Cat didn't act like it was working correctly. I never seen it glow. I was using cut up 2x4, so I know it was dry enough. Again, cat gauge was half way up to max, way pass the engage area. There was also all kinds of smoke coming out of the chimney smoking up my new liner. Didn't change a whole lot from engaged to not engaged. I may have to order a new one. Not sure if I need a new gasket as well that fits the door that comes down? Not the one around the cat, but there's another gasket up there for the by pass.

Third problem. There's something wrong with the flap that's attached to the chain that's attached to the t'stat. When in the full closed position, there's plenty of slack in the chain to allow this flap to close all the way. The problem is that it doesn't close all the way straight without me nudging it back to square, and push down on it to get it to close all the way. It's like I need to glue a finger or guide for it to close straight instead of cock eyed, leaving a hole open in the corner, and then somehow get it to close all the way on it's own. Again, there's plenty of slack in the chain, it just doesn't want to guide itself down all the way, and straight.

All in all, not an impressive first start, but at least I know what's up now while I still have a few weeks to a month before it's really time to keep a fire going full time.
 
Hopefully there's no need to remove the block off plate. Try to cut away all the silicone around the liner. There should be none there.

Sent from my SAMSUNG-SM-G890A using Tapatalk
 
Get rid of the silicone around the liner at the block off plate. Depending on the gap, if larger than 1/8" try stuffing either stove door glass gasket or thin diameter stove door gasket in the gap. Silicone if fine on the outer perimeter of the block off plate, no good around the liner though.

I can't help with the Princess operation questions, there are plenty here that can.
 
How well established was the fire? Most cat stoves want a hot burn at the beginning to bring the stove body up to temperature. It might be a challenging first burn if you don't have an ash and coal bed.
 
The smoking could be do to the dryness of your wood. You should get your stove up to temp before engaging the cat. My stove takes a good 30 mins before I'm at the temp I need to engage the cat. For my stove it usually has to be around 500 before I engage the cat. I recommend a small stove thermometer with a magnet Rutland brand. Once you are at the desired temp engage the cat and you should see the cat probe start climbing. My probe usually gets to 1000 before I start closing it down. Then my stove temp will come down a bit but my cat probe will stay at 1000+- for about 4 hours then gradually start falling. This is just my experience. Youur combustor might need to be replaced. They are expensive.

Sent from my SM-G900V using Tapatalk
 
I think my cat was kinda working, as it was putting out some heat near the glass, but it never glowed, and still lots of smoke coming out of the chimney using 2x4 wood pieces. It did however cool the flue down enough to stop the silicone from smoking around the liner when engaged. I ordered a new cat last night. Gonna pull the stove back out and hopefully easily get the caulk silicone off the liner easily. I have some other high temp stuff I used around the connection of the liner to the back of the stove on that adapter deal. It didn't smoke. I'll try that on the block off plate.
 
Sometimes the cat wont glow, if the cat is engaged and you turn the t-stat down but the cat prob stays at noon or so the cat will be working, as far as the slack in the chains I'm not sure, I do know that the t-stat wont fully close though at room temp, its designed like that, also a semi warm fire box next to a cooler masonry will keep that stat open calling for more air to make more heat.
 
I think my cat was kinda working, as it was putting out some heat near the glass, but it never glowed, and still lots of smoke coming out of the chimney using 2x4 wood pieces. It did however cool the flue down enough to stop the silicone from smoking around the liner when engaged. I ordered a new cat last night. Gonna pull the stove back out and hopefully easily get the caulk silicone off the liner easily. I have some other high temp stuff I used around the connection of the liner to the back of the stove on that adapter deal. It didn't smoke. I'll try that on the block off plate.
I would not put any compound around the liner itself. Follow Hogwildz's suggestion if the gap is large.
 
Last edited:
I don't see any reason to pull the stove back out. Just scrape off as much of the silicone as you can with the top panel removed. The only product that will hold up to the temps the liner will reach is furnace cement. Then it will fall off after a very short time due to expansion and contraction. Use some gasket material instead, or leave it be..
 
Rutland seal it right direct vent appliance sealant is what I was going to replace the caulk with. Says it remains flexible and won't crack up to 800 degrees. I'll have to get the caulk, silicone off first, and see how big the gap is. I like the idea of having it totally sealed up.
 
The liner may at times exceed 900º for a short period during startup. Use door gasket material if the gap is large.
 
I'm gonna go ahead and order an elbow for the liner, since I'm gonna have to wait for the new cat to arrive anyways. Don't like the way I have it currently not in all the way to the adapter. I have it half way in on both sides of the liner to stove adapter, and I don't like that. Would suck to have that pop out in the middle of a fire. I have the option of a 15 degree, and a 30 degree. Anyone know the slope degree of the princess in the back, since it's not a rear, or exactly top vent?
 
I'm gonna go ahead and order an elbow for the liner, since I'm gonna have to wait for the new cat to arrive anyways. Don't like the way I have it currently not in all the way to the adapter. I have it half way in on both sides of the liner to stove adapter, and I don't like that. Would suck to have that pop out in the middle of a fire. I have the option of a 15 degree, and a 30 degree. Anyone know the slope degree of the princess in the back, since it's not a rear, or exactly top vent?
A 30 degree elbow brings it back to vertical.
 
Your stoves behavior may change in cooler weather. 60 degrees outside temp would make establishing draft challenging.

You can check the bypass damper seal with a dollar bill in the same way you would check the loading door. The bypass damper has an adjustment bolt for tension if it fails the dollar bill test. You would need to pull the insert or at least the cat to get to the bolt that adjusts tension on the damper plate. If you plan to pull the insert that would be the time to check the damper plate seal since everything will be easily visible from the top and you can actually watch the movement as you work the lever to learn exactly how it works.You can also open the damper, with the stove cold;) and feel for any buildup around the bypass gasket that could be causing problems, for future reference.
If you do change the cat be sure the new one comes with a gasket or order a gasket. You WILL need it!
Had no idea about a bolt and dollar bill test to that damper. Thanks. The reason I didn't get a steelcat is the fiasco going on with another member who didn't get a gasket, since they're saying he doesn't need one, and the bkvp is saying different. This one says it comes with one.
 
Had no idea about a bolt and dollar bill test to that damper. Thanks. The reason I didn't get a steelcat is the fiasco going on with another member who didn't get a gasket, since they're saying he doesn't need one, and the bkvp is saying different. This one says it comes with one.

That member was me, small world lol! The problem was not with the cat material (steel or ceramic) though but the company I did business with. I got a gasket coming but I needed to try it without just to satisfy my own curiousity.

You can do the dollar bill test without pulling the insert or cat. Just locate the bypass damper, insert dollar bill in various places closing the damper to the click and try to pull the bill out. If you can pull the dollar bill out with little resistance it's time to adjust.
 
What about the gasket itself? Is that something I can order from a dealer that's special size, and cut to length? Or can I just get some gasket material myself, and cut to length? Does it need the gasket cement, or can I just lay it in there?
 
What about the gasket itself? Is that something I can order from a dealer that's special size, and cut to length? Or can I just get some gasket material myself, and cut to length? Does it need the gasket cement, or can I just lay it in there?
I just replaced my own gaskets. You can buy the kit on amazon for 12 bucks. It's easy to pull off and replace. The kit comes with cement.

Sent from my SM-G900V using Tapatalk
 
The cat gasket needs no cement. You wrap the it around the cat and tape it on. Masking tape simply burns off when you build a fire.
If I remember right it's 1/8" interim gasket.

The bypass gasket will need cemented in. Your dealer should have it in stock.
 
Pulled the stove out. Grrrr. Pulled out the caulk around the liner, and on the outside of the block off plate that's within about 5 inches of the liner, just in case. Will fill the outside of the liner with high temp silicone. I'm thinking about using the cement around the liner, and then some high temp silicone around that, up to about 1/16 of an inch from actually touching the liner. This way when the cement drys and cracks, maybe the silicone will help hold it in place from just falling down, but keep it far enough away from contact to the liner to keep the silicone from smoking again. It's pretty tight, except for one side is about 1/4 inch gap, so I guess I didn't cut the hole exactly round with my grinder. Can't really stuff gasket up in there.
 
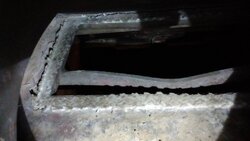
Oh, yea. I did come across a problem. Not sure how big of a problem it is, but when looking at the gasket around the bypass, I noticed there's a crack in the steel close to the middle, and it's actually sagging just a hair there. Not sure how that happened, either previous owner over fired it, or they lifted the stove up through there to get it out of a pickup truck with a rope through there. No idea. The gasket is pretty flat, and old looking. I'm thinking of replacing the gasket, and when I add the cement in there, building it up a little thicker where it is cracked, and sagging slightly, in order to make it totally level for the bypass damper to sit on. We're talking 1/8 to 1/16 sag. Wish I could post pics here without having to upload to a third party first. Maybe I'll make a youtube vid.
 
Status
Not open for further replies.