It turns out that door gaskets are very important on blaze kings, responsible for 95% of the small number of early catalytic converter failures. I've been using this original door gasket for the last 3.5 years and decided to replace it and document it for anybody that wants to see how to do it themselves.
So remove the door and pull out the old gasket. Easy enough, mine was glued in place well with black silicone from BK. Not too much silicone but plenty to glue it in place. Scrape out the old silicone with screwdrivers, wire wheel, whatever you have since new silicone doesn't stick to old silicone.
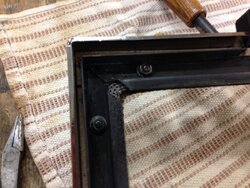
Now for the interesting part. All those nuts hold down a series of brackets that squeeze the glass in place and also provides the door gasket channel. An odd design for sure since the door gasket covers the nuts and the studs protrude way up into the gasket which limits the effective crush of the gasket but whatever. Check the door glass for tightness. It shouldn't wiggle left to right or in and out. Mine wiggled in and out, as in away from the door frame. The glass was actually flexing more than moving. I checked the tightness of the 3/8" nuts and found all of them at least slightly loose and snugged them up. Didn't fix the problem and one of the brackets would rock even though the nut was tight. I removed that bracket and found a big old chunk of slag/plating/crap under it which prevented that bracket from ever squeezing the glass. With that rock gone, the glass is now snug and back to the door gasket.
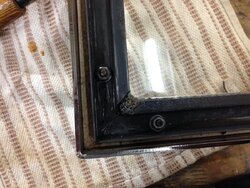
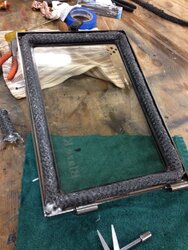
I then bought the ultra copper permatex RTV that is rated for 800 degrees. Same 7.50$ price as the black RTV that is only rated for 600 degrees. "Sensor safe". Notice the rather heavy application of RTV. I was shooting for 3/8" bead and it took almost 2 tubes of the stuff. In a pinch, you could probably get away with a single tube and a smaller bead. None of that spooged out so I'm glad I went heavy. Might regret it next time when I have to clean it out.
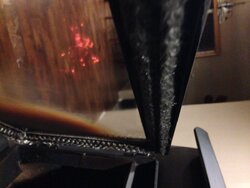
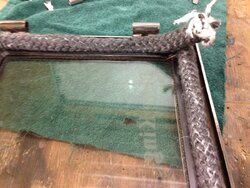
I tried my best not to twist the gasket but you can see that last section I got a small twist. Word of warning, don't cut it too short or too long. The amount of gasket on the hinge side of the door seal is the most important since it is not affected by the adjustment at the latch side(so you can't fix it if you cut it too short) and since shutting the door is difficult if you cut it too long and have to bunch it up which makes the door feel tight but really you are just smashing the gasket at the hinge.
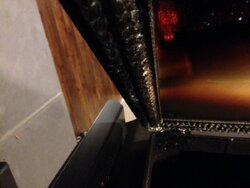
The new gasket shows a defined groove where the door frame knife edge digs in. My old gasket was very much shot to heck. I'm not even sure if it was ever as thick as this new BK gasket.
Oh and get an OEM gasket from BK. They are not expensive at 35$ delivered, and they are special.
So remove the door and pull out the old gasket. Easy enough, mine was glued in place well with black silicone from BK. Not too much silicone but plenty to glue it in place. Scrape out the old silicone with screwdrivers, wire wheel, whatever you have since new silicone doesn't stick to old silicone.
Now for the interesting part. All those nuts hold down a series of brackets that squeeze the glass in place and also provides the door gasket channel. An odd design for sure since the door gasket covers the nuts and the studs protrude way up into the gasket which limits the effective crush of the gasket but whatever. Check the door glass for tightness. It shouldn't wiggle left to right or in and out. Mine wiggled in and out, as in away from the door frame. The glass was actually flexing more than moving. I checked the tightness of the 3/8" nuts and found all of them at least slightly loose and snugged them up. Didn't fix the problem and one of the brackets would rock even though the nut was tight. I removed that bracket and found a big old chunk of slag/plating/crap under it which prevented that bracket from ever squeezing the glass. With that rock gone, the glass is now snug and back to the door gasket.
I then bought the ultra copper permatex RTV that is rated for 800 degrees. Same 7.50$ price as the black RTV that is only rated for 600 degrees. "Sensor safe". Notice the rather heavy application of RTV. I was shooting for 3/8" bead and it took almost 2 tubes of the stuff. In a pinch, you could probably get away with a single tube and a smaller bead. None of that spooged out so I'm glad I went heavy. Might regret it next time when I have to clean it out.
I tried my best not to twist the gasket but you can see that last section I got a small twist. Word of warning, don't cut it too short or too long. The amount of gasket on the hinge side of the door seal is the most important since it is not affected by the adjustment at the latch side(so you can't fix it if you cut it too short) and since shutting the door is difficult if you cut it too long and have to bunch it up which makes the door feel tight but really you are just smashing the gasket at the hinge.
The new gasket shows a defined groove where the door frame knife edge digs in. My old gasket was very much shot to heck. I'm not even sure if it was ever as thick as this new BK gasket.
Oh and get an OEM gasket from BK. They are not expensive at 35$ delivered, and they are special.


")