Boiler install and removal pics

  • Active since 1995, Hearth.com is THE place on the internet for free information and advice about wood stoves, pellet stoves and other energy saving equipment.

    We strive to provide opinions, articles, discussions and history related to Hearth Products and in a more general sense, energy issues.

    We promote the EFFICIENT, RESPONSIBLE, CLEAN and SAFE use of all fuels, whether renewable or fossil.
Status
Not open for further replies.

Dave T

New Member
Mar 28, 2008
299
Dansville NY
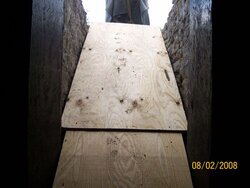
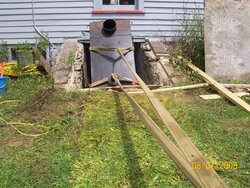
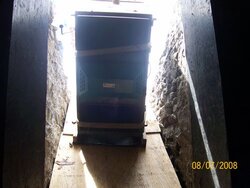
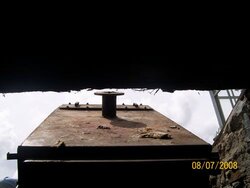
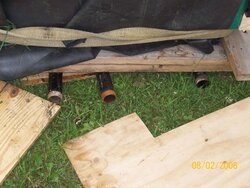
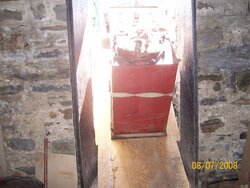
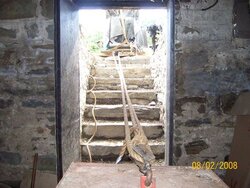
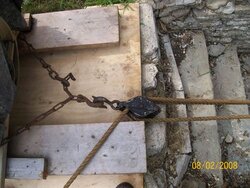
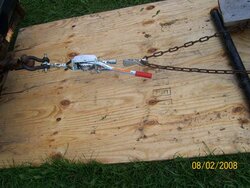
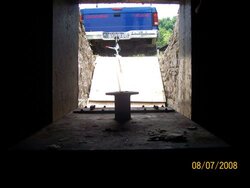
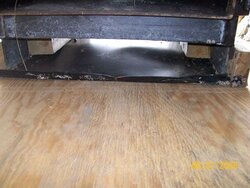
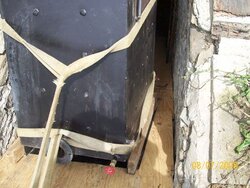
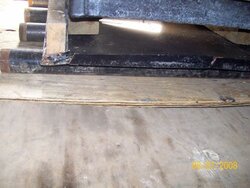
Alright my backhoe guy fell through so It was old school grunt work to remove the Tarm from the basement and install the EKO 60 We used a truck,some straps, a comealong,floor jacks,and lots of lumber..The EKO was delivered on 2"x12"x5' the only problem was I did not have enough head clearence to fit the EKO and the lumber under it..So improvisions were made but in all a rewarding adventure, although my cell phone did not finish it as it got rolled over by one of the pipes.. Here's some pics not in any order but EKO at the top of the basement stairs..EKO on it's way down..I call the next one EKO from the heavens..The head room issue is shown in one and the chewed up lookin stuff on top is the door caseing after 30 years of supplying wood to the Tarm..I used 2"pipes on plywood to roll the Tarm and EKO on top of..I left the Tarm in the basement incase the EKO did not slide good enough on the plywood It was not needed..The last pic shows the Tarm on it's way out..Any and all comments welcome I have more pics if anybody is interested PM me..
Dave
 

Attachments

  • EKO-at-the-top.jpg
    EKO-at-the-top.jpg
    27.5 KB · Views: 534
  • EKO-started-down.jpg
    EKO-started-down.jpg
    64.5 KB · Views: 544
  • EKO-from-the-heavens.jpg
    EKO-from-the-heavens.jpg
    29.4 KB · Views: 544
  • EKO-head-clearence.jpg
    EKO-head-clearence.jpg
    20 KB · Views: 537
  • EKO-on-pipes.jpg
    EKO-on-pipes.jpg
    39.1 KB · Views: 556
  • Tarm-outa-here.jpg
    Tarm-outa-here.jpg
    38.7 KB · Views: 532
Dave, thanks for sharing your pics. I will be attempting something similar shortly with my new Tarm.

I've got a couple questions for you.

Are your bulkhead stairs wooden or concrete?

Did you remove the bulkhead door? Assuming you had one.

What did you fasten the come-a-long to? the truck? a tree?

I think I am probably going to have to remove the bulk head door (hopefully not the full frame) when I try getting my boiler into the house.

Fortunately my father in law was a professional mover and is going to help me with the endeavor but any info ahead of time I can learn is great.

thanks, Aaron
 
Aaron,
The stairs are stone like the foundation, that being said they are up and down and not level so the 5/8 plywood screwed together planed them out nicley..The plywood was notched around the door and touching the floor at the bottom,the doors and caseing was left in place,I have no door at the top of the stairs just a couple sheets of plywood..The comealong was hooked to my dads truck a Dodge Dakota because he has a hitch and it is automatic..Honestly we did more slow backing,and creeping forward using the gas and brakes at the same time literally letting off the brake to move in the desired direction any problems and your foot is already on the brake ..Before any movement we maxed the comealong out in that direction all the way out or all the way in then used the truck..If you can use lumber on the bottom of the legs do it,but if you see an area where sliding is going to be an issue SAND can be used to allow less friction especally if you have nothing to rig to on bottom..Hope this helps
 

Attachments

  • bulk-head-1.jpg
    bulk-head-1.jpg
    44.5 KB · Views: 410
  • bulk-head-2.jpg
    bulk-head-2.jpg
    44.3 KB · Views: 397
  • come-along-to-truck.jpg
    come-along-to-truck.jpg
    42.1 KB · Views: 384
Great post! When I was contemplating where to put my EKO the best scenario I could come up with for a basement install was basically what you did. In the end I was too scared with the rigging and built a 20'*24' shed to install it in. Nice job on your part. I bet the beer you had that night tasted especially good while you gazed at the new EKO sitting so nicely in the basement. Just think you won't have to do that job again for another 30 years.
 
I think thats the same way they built Stonehenge.
 
Thanks guys,
It was a little sketchy to plan out but once she went over the edge (It was all down hill from there)I must say the EKO out weighed the 30 year old Tarm by a long shot I have seen a couple of different numbers on the weight of the EKO 60 one says 910# and another manual shows 1808#..I would say the 1808# is a lot closer,but myself and my 74 year old father installed it and removed the Tarm within 10 hours I threw a couple more pics up for the hell of it..First one is for you good ole dodge boys,the second one shows the dogcage pan under the EKO and the 4"x4" lumber between the feet so it would not bend in the middle,they are fastened by the 2"x4" on the outsides of the legs..This configuration took longer to figure out than the actual move as I've been scheaming all summer lol..# 3 is the EKO rear,#4 is EKO bottom with dog pan going over 2" pipe,#5 is EKO in position after taking time to level it out and shim it up using plates of various thickneses,and my boy relaxing after tuckering himself out watching grandpa and his old man move a couple of boilers around..
 

Attachments

  • pic-4-dodge-boys.jpg
    pic-4-dodge-boys.jpg
    22 KB · Views: 336
  • 0-clearence.jpg
    0-clearence.jpg
    36.5 KB · Views: 346
  • EKO-rear-no-skin.jpg
    EKO-rear-no-skin.jpg
    43.5 KB · Views: 376
  • 0-clearence-on-pipes.jpg
    0-clearence-on-pipes.jpg
    33.5 KB · Views: 352
  • EKO-final-and-chad.jpg
    EKO-final-and-chad.jpg
    37.5 KB · Views: 323
Status
Not open for further replies.