Bought a new Summers Heat Wood Stove to use with a 116 year old chimney but...

  • Active since 1995, Hearth.com is THE place on the internet for free information and advice about wood stoves, pellet stoves and other energy saving equipment.

    We strive to provide opinions, articles, discussions and history related to Hearth Products and in a more general sense, energy issues.

    We promote the EFFICIENT, RESPONSIBLE, CLEAN and SAFE use of all fuels, whether renewable or fossil.
Status
Not open for further replies.

Steven&Erika

New Member
Jan 13, 2010
12
Martinsburg, WV
we're putting it in ourselves and aren't sure exactly what we NEED. We are looking at 6"x50' flex liner kits and they are running between $690 to over $1k. However, it appears we should also have an insulation kit which would be another few hundred dollars. We'd like to know what the insulation provides and if we absolutely need it. A description listed it as providing better drafting & less condensation but we're not sure what it means by drafting. Is it really worth it to insulate? We only plan to live in this house for 5 years so we don't care if it lasts 10 years vs. 30 years but we're trying to save money where we can.

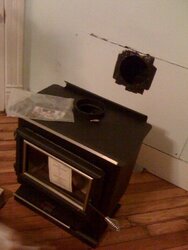
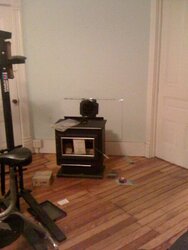
The Chimney has a hole in the wall cut for a 6' pipe but it's lower than the vent on the top of the stove, but just barely. We're unsure of where everything is supposed to go. Does the tee pipe hook to the stove? And will we need something to make a curve so that we can fix it to the hole provided in the chimney since it is lower? Sorry if this sounds really dumb. We're complete idiots about this stuff an could really use the help. Thanks so much for your time.

http://www.chimneylinerdepot.com/store/comersus_viewItem.asp?idProduct=251 This is the liner kit we were looking at. However, the insulation kit the company provides only goes up to 35'... So we're not even sure what to do with that.

I've provided a pic of the stove/wall. The hole had duct tape over it because our lovely cat decided to jump inside of it and the tape pulled off the paint...
 

Attachments

  • stovewall.jpg
    stovewall.jpg
    58.1 KB · Views: 445
Draft is the suction caused by the gas going up the chimney. This suction pulls the fresh air in to fuel the fire. This suction is influenced by the temperature of the gas going up it. The insulation keeps the gasses hot and moving. When they cool down, they move slower and allow water and combustion byproducts to condense on the walls (Creosote).

You may want to have a professional take a look at your setup. Why I say this is you will have to move the thimble up. Smoke will not go down. And you want to make sure the thimble is installed correctly. You are dealing with fire. You will also want to find out what shape the chimney is in. Much can happen in 116 years and it may not be safe. It's best to find out now rather than later that the chimney needs work. It looks like you will need a hearth or hearth pad too.

I hate to say it, but you may want to look at the economics of installing the stove if you will only be there for 5 years. There may be a good amount of work to get everything right.

Matt
 
EatenByLimestone said:
Draft is the suction caused by the gas going up the chimney. This suction pulls the fresh air in to fuel the fire. This suction is influenced by the temperature of the gas going up it. The insulation keeps the gasses hot and moving. When they cool down, they move slower and allow water and combustion byproducts to condense on the walls (Creosote).

You may want to have a professional take a look at your setup. Why I say this is you will have to move the thimble up. Smoke will not go down. And you want to make sure the thimble is installed correctly. You are dealing with fire. You will also want to find out what shape the chimney is in. Much can happen in 116 years and it may not be safe. It's best to find out now rather than later that the chimney needs work. It looks like you will need a hearth or hearth pad too.

I hate to say it, but you may want to look at the economics of installing the stove if you will only be there for 5 years. There may be a good amount of work to get everything right.

Matt

Thanks for the quick response. I'm a little confused, though. I thought that the chimney liner was used because the chimney was old. I talked to a guy at a local hearth place that told me that the chimney would need a liner because of its age. We initially thought we'd get a chimney pipe. What's the point of the chimney liner or a chimney pipe if the condition of the chimney is the problem? There are still ashes at the bottom of the chimney, so I assumed it had been used fairly recently but we bought the house foreclosed so we don't know the history.
 
Well, not only that, but the stove as shown is sitting on a wood floor. There's gonna have to be a hearth of some sort beneath the stove, which is going to make the height of the thimble a bigger discrepancy. Read the manual that came with the stove. Carefully. Seems to me the cart's squarely before the horse here. Not sayin' you can't pull it off, but there's a lot to it. And no matter how long you intend to occupy the premises, I'd suggest that when it comes to installing a solid fuel-burning appliance in a living space (be it yours or someone elses) it's something that conscience (let alone codes) demands be done correctly. Welcome to the forums! Rick
 
You can get a 6" leg kit for it which will reduce the height by about 3". But the other gentlemen are right, safety first. And you will need the required floor protection.
 
Hogwildz said:
You can get a 6" leg kit for it which will reduce the height by about 3". But the other gentlemen are right, safety first. And you will need the required floor protection.

You mean legs as opposed to the pedestal? The stove came with legs, but the pedestal is mobile home approved so I figured it would be safer...
 
There are a couple things to look at with an old chimney. It's age is mostly a warning sign to look for other things. Just because the prior owner used it doesn't mean it's safe. It's the same thing with the thimble that is currently installed a little low... How do you know the installer knew what they were doing and installed it correctly?

First thing I would look at would be the condition of the chimney itself. Is it physically in good shape?

Are there bricks missing?

How does the mortar look, does it need to be repointed? Repointing is replacing the mortar between the bricks. Has creosote seeped into the mortar where it could cause a fire in the future?

Has it been relined? Newer masonry chimneys are lined with terra cotta. Like a clay flower pot.


What size is the chimney. The stove you are venting has a 6" flue collar. A 6" flue has an area of just over 28" square. Many fireplaces have a much larger flue. The larger the flue the harder it is to get up to temperature and drafting well.


I'm not sure what you mean by a chimney pipe. Are you talking about installing a rigid chimney inside the existing one? That would be heavy if you are trying to hold 50 feet of it while each section is fitted on. Your liner will be pretty heavy as it is. Mine was 30 feet and was heavy.

"What’s the point of the chimney liner or a chimney pipe if the condition of the chimney is the problem?"

I'd first want to make sure there is a chimney problem. If there is a minor problem, the liner may be a safe, and inexpensive way to fix it so you can still use the chimney to exhaust gasses.

A quality sweep can lower a camera down the chimney to make sure it is safe.

Matt
 
Steven&Erika; said:
Hogwildz said:
You can get a 6" leg kit for it which will reduce the height by about 3". But the other gentlemen are right, safety first. And you will need the required floor protection.

You mean legs as opposed to the pedestal? The stove came with legs, but the pedestal is mobile home approved so I figured it would be safer...

Yes, the legs that came with it are 9", they do sell a kit of 6" legs. IMO the legs look better.
Unless your installing in a mobile home, you don't have to stick with the pedestal.
If need be, you can also remove the flooring in the stove area, and start your floor protection from the tops of the floor joists so you don't lose the height reduction you need to get an upward flow for the piping.
With some patient research & planning, I think you can still do the install. Safety is the main priority. Don't rush it, trying to get heat this year. Taking your time, will save you mega headaches and regrets, as well as cash.
I wish I lived closer, I would be glad to help.
Write everything down, read the manual, know what your floor protection requirements are from the manual. Englander (the maker of this stove) has top notch support, and although they are probably swamped with calls, will be a great help when you can get to them with your questions. Mike there is a member here also. Maybe he will chime in if he is around.
Ask all the questions you need, and members here will do their best to help.
Right now, you need to figure your floor protection requirement, how you will reach it, and keep the stove as low as possible, then the next step would be figuring how to go from stove to the old chimney, making sure you have an upward slope in the piping. If need be, you may have to go higher into the existing chimney, higher up the wall. Closing off the lower how properly. How far down does the existing chimney go? And is there a clean out in it somewhere?
 
A bit confused here. Why does the condition of the chimney matter when the smoke will be going up a seamless flex liner? Is the liner going to get so hot that it will catch something in the chimney on fire? It's just not making sense to me. Not trying to be difficult.

Pretty sure the chimney is in bad shape. We're told there was a chimney fire at one point which caught the roof on fire some 20 years ago.

I plan to get a 1" millboard floor protector but I can't seem to find one... I googled it and can't find anything offhand.
 
Hogwildz said:
Steven&Erika; said:
Hogwildz said:
You can get a 6" leg kit for it which will reduce the height by about 3". But the other gentlemen are right, safety first. And you will need the required floor protection.

You mean legs as opposed to the pedestal? The stove came with legs, but the pedestal is mobile home approved so I figured it would be safer...

Yes, the legs that came with it are 9", they do sell a kit of 6" legs. IMO the legs look better.
Unless your installing in a mobile home, you don't have to stick with the pedestal.
If need be, you can also remove the flooring in the stove area, and start your floor protection from the tops of the floor joists so you don't lose the height reduction you need to get an upward flow for the piping.
With some patient research & planning, I think you can still do the install. Safety is the main priority. Don't rush it, trying to get heat this year. Taking your time, will save you mega headaches and regrets, as well as cash.
I wish I lived closer, I would be glad to help.
Write everything down, read the manual, know what your floor protection requirements are from the manual. Englander (the maker of this stove) has top notch support, and although they are probably swamped with calls, will be a great help when you can get to them with your questions. Mike there is a member here also. Maybe he will chime in if he is around.
Ask all the questions you need, and members here will do their best to help.
Right now, you need to figure your floor protection requirement, how you will reach it, and keep the stove as low as possible, then the next step would be figuring how to go from stove to the old chimney, making sure you have an upward slope in the piping. If need be, you may have to go higher into the existing chimney, higher up the wall. Closing off the lower how properly. How far down does the existing chimney go? And is there a clean out in it somewhere?

It's funny, we just drove 4 hours to & from Berwick, PA to buy the stove.

The bottom of the chimney seems to line up with the floor. There is a pile of ash there. I'm getting frustrated because I was told by the guy at the local hearth place that the chimney liner would go in because of the chimney being old, else, why wouldn't we just use the chimney itself? We thought the liner would replace the "chimney" but the existing chimney would be the path up to the end of the exhaust. I don't know that we'll be able to remove the flooring. Being that the house is so hold, there's nothing but a few beams underneath I believe... Old houses are very open under the flooring to allow for air circulation... which cuts down on moisture buildup that destroys homes.
 
Steven&Erika; said:
Hogwildz said:
Steven&Erika; said:
Hogwildz said:
You can get a 6" leg kit for it which will reduce the height by about 3". But the other gentlemen are right, safety first. And you will need the required floor protection.

You mean legs as opposed to the pedestal? The stove came with legs, but the pedestal is mobile home approved so I figured it would be safer...

Yes, the legs that came with it are 9", they do sell a kit of 6" legs. IMO the legs look better.
Unless your installing in a mobile home, you don't have to stick with the pedestal.
If need be, you can also remove the flooring in the stove area, and start your floor protection from the tops of the floor joists so you don't lose the height reduction you need to get an upward flow for the piping.
With some patient research & planning, I think you can still do the install. Safety is the main priority. Don't rush it, trying to get heat this year. Taking your time, will save you mega headaches and regrets, as well as cash.
I wish I lived closer, I would be glad to help.
Write everything down, read the manual, know what your floor protection requirements are from the manual. Englander (the maker of this stove) has top notch support, and although they are probably swamped with calls, will be a great help when you can get to them with your questions. Mike there is a member here also. Maybe he will chime in if he is around.
Ask all the questions you need, and members here will do their best to help.
Right now, you need to figure your floor protection requirement, how you will reach it, and keep the stove as low as possible, then the next step would be figuring how to go from stove to the old chimney, making sure you have an upward slope in the piping. If need be, you may have to go higher into the existing chimney, higher up the wall. Closing off the lower how properly. How far down does the existing chimney go? And is there a clean out in it somewhere?

It's funny, we just drove 4 hours to & from Berwick, PA to buy the stove.

The bottom of the chimney seems to line up with the floor. There is a pile of ash there. I'm getting frustrated because I was told by the guy at the local hearth place that the chimney liner would go in because of the chimney being old, else, why wouldn't we just use the chimney itself? We thought the liner would replace the "chimney" but the existing chimney would be the path up to the end of the exhaust. I don't know that we'll be able to remove the flooring. Being that the house is so hold, there's nothing but a few beams underneath I believe... Old houses are very open under the flooring to allow for air circulation... which cuts down on moisture buildup that destroys homes.

Well hell, I'd have bought ya a couple drinks. Ya should have hollered.
The new code required the liner to be able to withstand 2100 degrees for a certain amount of time in the event of a chimney fire.
If the old chimney is not lined with tile liner, its not up to any code. If its lined and damaged, its still not up to code. May be why you need the liner?
If the existing chimney is not sound, then the liner must be insulated to meet the code requirement. Other line it to help keep it heated better and that helps it draft better, which helps the stove burn cleaner & better.
The other issue could be, depending on the existing chimney size, it may have too large a cross section, which will make draft poor, and the stove will not operate optimally. Leading to back puffing, poor performance etc.
You can always take the flooring up. And place Durock (prolly minimal 2 layers) and tile etc on top. Trim the perimeter to meet with the existing flooring etc. For even more R value protection, you could also put some micore between the layers of Durock. There is almost always a way. Just take your time, have a plan, make drawings & notes and it will not be as hard as it could be by rushing into it.
 
Welcome! You guys are ahead of a lot of folks just by being on the forum - please don't let a bunch of answers telling you all the things you need to do pursuade you to change your mind. All of us started out much more clueless than you, some as recently as last year, two years ago, and some have been burning wood for over 30 years. A couple basics I think might help-
1. You bought a stove based on a salesman, who's job it is to sell stoves. Sounds like he was helpful, and knowledgeable enough to equip you with a liner for the chimney, so yhou're off to a good start.
2. Spend a little $ (maybe $100 or so?) on a chimney sweep (don't let the name fool you, they don't jst sweep chimneys, they also often install stoves and know the codes quite well, it's not just a dude with a brush and a 5th grade diploma... Think of it like a plumber or electrician for heating...)
3. You have a 116 year old chimney - even thought the liner will handle the smoke, you want to make sure the chimney is structurally sound enough to use with the liner. If pieces are falling off, it's plugged, or there's a hazardous condition that even with the liner poses a hazard, you want to know this now before trying to pull a 30' long noodle through a ridgid pipe and maybe dislodging more stuff. If you have a big problem with the chimney, it may be a lot cheaper and faster to install a new one anywhere in the house you want. A triple-wall chimney can be put into a standard 1-story home for about $600-700, and about a half day's work. Then you have a new, safe, and easy-to-access chimney wherever you want. Obviously the liner will work fine too, but not the end of the world if it doesn't. Not even a huge cost increase. And it's usually easier to do a job starting from scratch where you can get to everything to put it in. Also solves your height problem with the opening...
4. As mentioned, the economics of wood heat for a stove for 5 years is questionable. On the other hand, it's not just about economics for most of us, it's about the warm cozy feeling, and the self-sufficient reward of heating your own home. $700 for a stove, plus $700 for a chimney, plus about $100 for a good hearth add up to about $300/yr in costs, plus your wood costs if any.

We ended up with about $1800-$2000 in the stove, chimney, tile hearth, etc. but I did mine a little overkill and we had a more expensive stove than yours. Took about 1.5 days all together, plus the time for wood chopping and splitting. However, we also had the house at 90 degrees in a blizzard with no help from the propane man. Please enjoy the info here, and if this is something you want to do go for it - just make sure to be careful as with any project on your house. Learn the codes and the rules, and it's info you'll always have. Never a bad thing to learn something new, and the more you learn on your own home the more pride you have in the job.
 
Hogwildz said:
Well hell, I'd have bought ya a couple drinks. Ya should have hollered.
The new code required the liner to be able to withstand 2100 degrees for a certain amount of time in the event of a chimney fire.
If the old chimney is not lined with tile liner, its not up to any code. If its lined and damaged, its still not up to code. May be why you need the liner?
If the existing chimney is not sound, then the liner must be insulated to meet the code requirement. Other line it to help keep it heated better and that helps it draft better, which helps the stove burn cleaner & better.
The other issue could be, depending on the existing chimney size, it may have too large a cross section, which will make draft poor, and the stove will not operate optimally. Leading to back puffing, poor performance etc.
You can always take the flooring up. And place Durock (prolly minimal 2 layers) and tile etc on top. Trim the perimeter to meet with the existing flooring etc. For even more R value protection, you could also put some micore between the layers of Durock. There is almost always a way. Just take your time, have a plan, make drawings & notes and it will not be as hard as it could be by rushing into it.

So, if we insulate the liner, it doesn't matter if the chimney is up to code? We are assuming it is not. Am I reading that right?
 
So, if we insulate the liner, it doesn’t matter if the chimney is up to code? We are assuming it is not. Am I reading that right?
Yes that is correct. As long, as Moostrek stated, that the original chimney is in solid condition, and not falling apart.
He does bring up a good point. You may also have the option of forgoing using the old chimney and running straight up off the stove with stove pipe & class A piping.
That would eliminate the added work & expense of trying to deal with the height problem to the existing chimney. It is something you may want to seriously think about.
The stack will cost more, but is also pre insulated and would make for an easier install maybe.
 
moosetrek said:
Welcome! You guys are ahead of a lot of folks just by being on the forum - please don't let a bunch of answers telling you all the things you need to do pursuade you to change your mind. All of us started out much more clueless than you, some as recently as last year, two years ago, and some have been burning wood for over 30 years. A couple basics I think might help-
1. You bought a stove based on a salesman, who's job it is to sell stoves. Sounds like he was helpful, and knowledgeable enough to equip you with a liner for the chimney, so yhou're off to a good start.
2. Spend a little $ (maybe $100 or so?) on a chimney sweep (don't let the name fool you, they don't jst sweep chimneys, they also often install stoves and know the codes quite well, it's not just a dude with a brush and a 5th grade diploma... Think of it like a plumber or electrician for heating...)
3. You have a 116 year old chimney - even thought the liner will handle the smoke, you want to make sure the chimney is structurally sound enough to use with the liner. If pieces are falling off, it's plugged, or there's a hazardous condition that even with the liner poses a hazard, you want to know this now before trying to pull a 30' long noodle through a ridgid pipe and maybe dislodging more stuff. If you have a big problem with the chimney, it may be a lot cheaper and faster to install a new one anywhere in the house you want. A triple-wall chimney can be put into a standard 1-story home for about $600-700, and about a half day's work. Then you have a new, safe, and easy-to-access chimney wherever you want. Obviously the liner will work fine too, but not the end of the world if it doesn't. Not even a huge cost increase. And it's usually easier to do a job starting from scratch where you can get to everything to put it in. Also solves your height problem with the opening...
4. As mentioned, the economics of wood heat for a stove for 5 years is questionable. On the other hand, it's not just about economics for most of us, it's about the warm cozy feeling, and the self-sufficient reward of heating your own home. $700 for a stove, plus $700 for a chimney, plus about $100 for a good hearth add up to about $300/yr in costs, plus your wood costs if any.

We ended up with about $1800-$2000 in the stove, chimney, tile hearth, etc. but I did mine a little overkill and we had a more expensive stove than yours. Took about 1.5 days all together, plus the time for wood chopping and splitting. However, we also had the house at 90 degrees in a blizzard with no help from the propane man. Please enjoy the info here, and if this is something you want to do go for it - just make sure to be careful as with any project on your house. Learn the codes and the rules, and it's info you'll always have. Never a bad thing to learn something new, and the more you learn on your own home the more pride you have in the job.

We don't have the liner yet. It's a 3 story home, so it's not so simple to replace the chimney... We planned on getting a 50' liner. The stove is only used to heat 1800 sq feet, but our house is about 3800 sq ft. We'd like to use it in addition to our current furnace which is just NOT heating the downstairs past 60 degrees these days. Realized the hold in the wall is about 9'.... but if we had a 90 degree pipe, it would not need to swoop down. It would match up... however, with the floor protector being an inch,that throws us off again. I'm afraid to rip up the floor and realize I just have a big gaping hole with a couple of support boards underneath...

I might cry... (PS, this is all Erika typing btw... lol... not Steven, so excuse my ignorance! I'll blame it on being a girl & not knowing these manly things... )
 
I'm not the expert here by any means, (and I know fossil is) but I don't see why you couldn't get a stove board for $50 and put it on top of the wood floor. My sister has a house older than yours and they do that. I'm pretty sure it is copacetic in their case.
I don't know too much about your liner setup except what I have heard which is that the insulation makes for a safer install. Good luck with the install I hope it all comes together for you. 50' is a tall house!
 
Some additional pics of the room from farther back than the one provided, and more info about just how the house is put together might help here. There's more than one way to install a wood stove. Rick
 
fossil said:
Some additional pics of the room from farther back than the one provided, and more info about just how the house is put together might help here. There's more than one way to install a wood stove. Rick

There are 3 chimneys but the one we plan to use is just about in the dead center of the house. I honestly am not even sure where the other chimneys are... as they have been covered up with drywall...

You can see the chimney in the top center of the house...
 

Attachments

  • BE6898956_1.jpg
    BE6898956_1.jpg
    21 KB · Views: 320
fossil said:
Some additional pics of the room from farther back than the one provided, and more info about just how the house is put together might help here. There's more than one way to install a wood stove. Rick

Further back pic... ignore the junk around it. It's all being moved...
 

Attachments

  • stove.jpg
    stove.jpg
    58.6 KB · Views: 302
Erika,
you don't have to tear up the floor. It was merely an option.
Now that you think a 90 degree elbow will get you there, with a hearth board on the floor & the 6" legs you may have more than enough rise and no issue at all as far as getting to the thinble that will go into the existing chimney.
The 6" legs might be a must have though, to get that 3" reduction in the stove height to give you an up slope to the chimney.
 
Erika,
Is there a fireplace behind that drywall? If so, if it is a bigger one, you may be able to cut the drywall out, and set the stove into the fireplace or even partially and run straight up the old chimney with the liner, thus negating the elbow, horizontal pipe & thimble all together. The liner might be able to come down right into the stove outlet.
 
Hogwildz said:
Erika,
Is there a fireplace behind that drywall? If so, if it is a bigger one, you may be able to cut the drywall out, and set the stove into the fireplace or even partially and run straight up the old chimney with the liner, thus negating the elbow, horizontal pipe & thimble all together. The liner might be able to come down right into the stove outlet.

That's a good point... I am not sure exactly what's behind that panel other than what I can see from the hole... I guess we might have to take it off & check it out... See now, why can't I think outside of the box like that? lol
 
So the height from the ceiling of the room the stove is in to the roof is about 50'? If it's a 3-story, and you're including the attic, I'd guess no more than 30', of which 9' (ceiling height in large old house?) is stove plus stovepipe. You're looking at 20-28' of chimney from the first floor ceiling out the roof to the shimney cap, plus 6-7' of stove pipe from the stove to the ceiling on the first floor, am I close? If so, figure $90 per 3', or about $630 for 28' of chimney. Still about $8-900 for a new chimney so I wouldn't rule it out if the floor plans in the upper rooms offer a layout that allows you to run a 14" square opening all the way out the roof. 14" is the 6" diameter chimney, but triple wall is 10" on the outside, and there's a 2" space required around the outside of that. Alternatively, it's not ideal but can you run it out an exterior wall and up the side of the house? With that much height, you're have a heck of a draft once it gets going no matter what you do. I can't imagine that the pain in the but trying to pull a 30' liner all the way up 3 stories to save a hundred bucks or so would be worth the extra time it might take, but if you're set on using the existing chimney then the easiest way is the liner plus getting a slight slope into the opening. A shorter leg kit, plus a little wiggling, might get you a working setup on a 1" hearth pad.
 
moosetrek said:
So the height from the ceiling of the room the stove is in to the roof is about 50'? If it's a 3-story, and you're including the attic, I'd guess no more than 30', of which 9' (ceiling height in large old house?) is stove plus stovepipe. You're looking at 20-28' of chimney from the first floor ceiling out the roof to the shimney cap, plus 6-7' of stove pipe from the stove to the ceiling on the first floor, am I close? If so, figure $90 per 3', or about $630 for 28' of chimney. Still about $8-900 for a new chimney so I wouldn't rule it out if the floor plans in the upper rooms offer a layout that allows you to run a 14" square opening all the way out the roof. 14" is the 6" diameter chimney, but triple wall is 10" on the outside, and there's a 2" space required around the outside of that. Alternatively, it's not ideal but can you run it out an exterior wall and up the side of the house? With that much height, you're have a heck of a draft once it gets going no matter what you do. I can't imagine that the pain in the but trying to pull a 30' liner all the way up 3 stories to save a hundred bucks or so would be worth the extra time it might take, but if you're set on using the existing chimney then the easiest way is the liner plus getting a slight slope into the opening. A shorter leg kit, plus a little wiggling, might get you a working setup on a 1" hearth pad.

I have a 38' ladder that reaches just past the gutters, I think... The "attic" has tall ceilings, and is pretty much finished, save for new flooring. Yeah, I'd say we have 9' ceilings.

I'm guestimating the 50'... I know it's not 50', but I wanted to get too much rather than too little... We have not measured it yet, but we will.
 
Status
Not open for further replies.