Brushing results after first year using dampers

  • Active since 1995, Hearth.com is THE place on the internet for free information and advice about wood stoves, pellet stoves and other energy saving equipment.

    We strive to provide opinions, articles, discussions and history related to Hearth Products and in a more general sense, energy issues.

    We promote the EFFICIENT, RESPONSIBLE, CLEAN and SAFE use of all fuels, whether renewable or fossil.
Status
Not open for further replies.

Smoked

Feeling the Heat
Feb 19, 2015
368
Roanoke VA
Last weekend I brushed my liners form the top and this weekend I cleaned everything up from the bottom. I was curios if my soot production last year was going to be higher after using in dampers in the tee snouts. It was also sort of a mostly mild winter with many cold starts and really not much 24x7 burning so Ii figured that may add to it too...

Primary stove had 2 quarts of dark brown powder with a good number of stink bugs mixed in. The basement stove that I really only burned when it was too cold for the primary to keep up had almost nothing. I guess because that one is the older of the 2 (leaky) and was run in a higher draft environment, that is why it was so clean.

All in all, i am very happy. 4 cords burned and 2 quarts of dust I think is awesome.

Conclusion: dampers helped keep draft under control but did not lead to dangerous creosote accumulation.

P.S. Break-in fire tonight :cool:
 
Sounds good. Were you seeing an overdraft before the dampers?
 
Sounds good. Were you seeing an overdraft before the dampers?

On cold dry nights I had a very difficult time holding them back. I sort of managed by using very large splits but this is much better. It added another layer to operation and remembering to open it before loading was sometimes a challenge;lol
 
  • Like
Reactions: pen
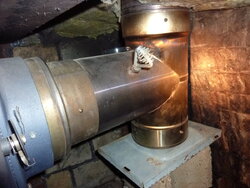
I'll try to get a photo but they are rear vent stoves and the damper is in the horizontal section of the tee. I have to reach around the back of the stiove so that is not the greatest but it added control and security for me. And I was pleased that in a winter full of shoulder season type weather, I did not have a bunch of dangerous sote.
 
I put a damper in the tee but with only 16' of stack, I didn't end up using it. I have a flue meter lying on top of the tee. You can also see, lower left, a cat meter. Doesn't actually reach the cat so it only tells me the temp around the flue exit. I've got a bent paper clip marking 1000* so I don't have to look at the dial to see about where the temp is. I've got a longer probe that will reach the cat but haven't installed it yet. I got about 1.5 qts. of dust, and a bit of flaky stuff from near the top of the stack where the exterior masonry chimney is exposed to the wind.
P1030605.JPG
 
No need for me to take the photo now because Woody took care of it. Mine are 22' and 31' so in the right weather, draft is very strong.
 
No need for me to take the photo now because Woody took care of it.
I hope you didn't mind me coming in your house while you were gone...;lol
 
  • Like
Reactions: Smoked
Do you think it's possible to install a damper like that in a regular 1 piece single wall tee? If not what is the shortest horizontal section you can get for a snout?
 
Do you think it's possible to install a damper like that in a regular 1 piece single wall tee? If not what is the shortest horizontal section you can get for a snout?


Both of mine are 2 part single wall. You really only need a few inches on either side of the center line so you can have full range of motion. Mine have the hose clamp type connectors inside that secure the snout to the vertical part of the tee. That can definitely get in the way. I would think you could get away with as little as 6 inches for a one piece without the hardware on the inside ???
 
Status
Not open for further replies.