Building a sawbuck

  • Active since 1995, Hearth.com is THE place on the internet for free information and advice about wood stoves, pellet stoves and other energy saving equipment.

    We strive to provide opinions, articles, discussions and history related to Hearth Products and in a more general sense, energy issues.

    We promote the EFFICIENT, RESPONSIBLE, CLEAN and SAFE use of all fuels, whether renewable or fossil.
Status
Not open for further replies.

Jay H

New Member
Nov 20, 2006
659
NJ
Now I found the right name for this...

SB1500_L.jpg


Any tips to build one?

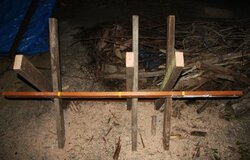
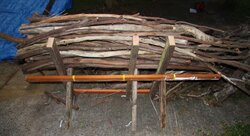
I split a bunch of log ends last year (when you don't plan on the bucking and wind up with longer than 18" splits :) ) that are just too big for my wood stove, even when loaded diagonally so I am going to have to cut them again... And I figure I'd like to build a saw buck with 2x4s, similar to the steel design above, however, I like to have the length adjustable, just in case. Do you think I would be better off making an adjustable one or just make two?? I figure if I use a 2x4 as the length supports but make holes in them at various lengths I could make it adjustable (to a point), at the expensive of some stability. I could use long bolts and nuts and washers to move the ends closer or farther based on the length.

Or do you think it would be easy enough just to make two sawbucks that I could use on longer lengths? and just one for the long splits that I need to cut again... ??

Thanks for the suggestions!

Jay "the thinker" H
 
I bought a metal one from Northern Tools for about $30 on sale. Did not think I could build one for that price and it folds flat for storage. If you build one, making it adjustable would be harder to make.
 
Well, I think building two is going to be more stable and simpler than building an adjustable one. Plus, I don't know if I'll ever need to buck long logs (that I can lift myself) so I think I'll just build one static one now and if I think I'll need to do longer logs, build another one. (I cut wood by myself so I'm kind of limited in what I can lift w/o fancy levers and hoists).

Jay
 
baileys or amicks has one that grabs the log by the end and cantilevers it out for trimming. Looks good for stuff under maybe 6 inch diameter x 6 ft long. seems to be added complexity for my applications, but might be what you need.
I thik sawbucks were more common in the hand saw days when it took more time and better support to cut wood.

Personally, I usually cut/cut/cut, then roll over and finish all the cuts. Anything smaller than about 4 inches use the top handle saw.
 
http://www.ericsprojects.com/?page_id=373

I saw the above, looks like it is portable as it can be folded up. Better yet, I think I have enough spare wood and stuff to build it without buying anything. I don't have a drill press so I have to see if I can borrow one from somewhere or just use C-clamps to get a straight hole as possible.

Jay
 
I built on out of pt 2x4 from a plan I found on mother earth news. Folds up for storage and two of the inside support "dogs" are adjustable (everything is connected by the center axis 1 1/4" dowel rod). So far it has done what I need .
Hank
 
I built one out of 2x4's. my next will probably be something sturdier. I had to attach chains to keep it from collapsing under the constant pounding. I guess it's a trade off - portability for sturdiness.
 
I found spare 2x4s and even a spare 1x6 and I have wood glue, wood screws, even have some old closet hanger rods that I can cut and use as dowels, but I don't have the drill bit. d'oh!!! So i'm going out to buy a new wood bit set at lunch today... then by the weekend, hopefully, this mini-project will be done.

Jay
 
I finished my build of the portable sawbuck as listed above. I had to get a drill bit set cause I have some closet wood rods that I used as dowels but only had a 1 3/8" wood bit and it needed 1 1/4" so since I had all the wood and wood screws and stuff, it cost me a $14 drill bit set and it looks nice. I'm waiting for the glue to dry and then I can try it out on some of the splits I need to shorten. :)

Jay
 
I've never used a sawbuck. Just cut them almost all the way through and roll and finish the cut.
Why lift stuff onto a sawbuck when you don't need too. Just making more work for yourself, as far as i'm concerned.
 
Caz said:
I've never used a sawbuck. Just cut them almost all the way through and roll and finish the cut.
Why lift stuff onto a sawbuck when you don't need too. Just making more work for yourself, as far as i'm concerned.

Not really made for bucking logs, but occasionally I get the split that is too long and I need to cut it without it moving around on me. It is a fun project that is cheap enough for me to make anyway. If I had small logs to buck into rounds, it might work but not at the moment, I typically just cut from the woodpile and work my way down from the top.

Jay
 
Big stuff I use a timber jack to get it off the ground if possible. For 6-8 inches and smaller, i toss them up on the saw buck. saves my back and the chain.
 
What I do for the slightly over-length rounds is let them pile up until I have a bunch. I have a vertical frame that I've made from scrap wood, about 16" wide, and 3' tall, and just a little less than stove length deep, and with a solid back. Think a box on it's side...

I take a lot of the over length rounds and fill up the frame, making sure to push them up against the backstop, packing them in as tight as I can. I then take the saw and buzz down the front of the frame and trim the whole bunch of probably 20-30 peices at one time.

I came up with this when I got my current stove, which has a 20" maximum log length, and had to cut down the 2-3 cords of 24" that I had cut for the old stove - it was the fastest approach I found.

Gooserider
 
Gooserider said:
I take a lot of the over length rounds and fill up the frame, making sure to push them up against the backstop, packing them in as tight as I can. I then take the saw and buzz down the front of the frame and trim the whole bunch of probably 20-30 peices at one time.

Nice solution, seems a lot more efficient than my chop saw approach. Do you think this would work for small splits or would they be too unstable and be a safety concern when cutting?
 
Caz said:
I've never used a sawbuck. Just cut them almost all the way through and roll and finish the cut.
Why lift stuff onto a sawbuck when you don't need too. Just making more work for yourself, as far as i'm concerned.

The reason a sawbuck is good is not for cutting up the main trunk of the tree but it works great on the small limbs, say, from 6" down. When my wife is helping we found that works fantastically.

I first limb the tree and cut off the limbs that are small but yet big enough to save for firewood. While she is piling brush and putting those small buzz lengths on the sawbuck I am cutting the main trunk. By the time I'm done she is ready. We put as many as a dozen small buzz lengths on the sawbuck each time and I can stand there and buzz many pieces with no bending. Saves the back a lot and actually is faster in the long run.
 
SolarAndWood said:
Gooserider said:
I take a lot of the over length rounds and fill up the frame, making sure to push them up against the backstop, packing them in as tight as I can. I then take the saw and buzz down the front of the frame and trim the whole bunch of probably 20-30 peices at one time.

Nice solution, seems a lot more efficient than my chop saw approach. Do you think this would work for small splits or would they be too unstable and be a safety concern when cutting?

I did a lot of my cutting with splits, and found it worked fine, splits are actually somewhat MORE stable than rounds if they are stacked carefully (think Tetris...)

That said, one improvement that I've considered is to put a screw-eye on each side of the frame and run a cargo strap or bungie cord across the top of the pile to help hold it down while cutting.

Gooserider
 
I built a sawbuck today using some of the ideas from this forum, this thread and others. As usual, thanks for the tips!

I did something similar to Some Like it Hot in this thread:

I built it assymetrically so when I cut through the branches or logs, they would fall away (down) and there wouldn't be any need to upcut, or danger of pinching the bar.

I tried it out tonight and I'm stoked with the results. As Gooserider posted, I might add one small improvement, a bungee cord over the log or branches between the 2 close legs (middle and right leg in the pic below), to hold the branches from tipping (my design of allowing the branches to fall away works, but there is one particular cut when the balance point is close to tipping).

I place all the branches or logs on to line up with the left end of the top horizontal brace as per pic #2 below. I then cut from the far right side, until I get to the yellow marker just outside the right leg. Then I cut just inside the left leg, so all the lengths fall away to the left, the inside part lifting up so no saw pinch. then I work to the right. So far it works well, but as I said above, the last cut leaves a close to tipping balance point on the right 2 legs, so I reckon roping or bungee cording the branches or logs between those legs will solve that.

I made the legs 1.2m long (~4 foot) using old fence 2" x 4" timbers I had lying around for the X's or legs, and put a cross bolt to hinge them on (gal, countersunk with washer and nut) slightly lower than halfway, so the top V in the X is larger than the lower V. I used a bit of scrap 3" x 1.5" pine for the bottom leg brace and the middle brace, and extended it to use as a guide for cutting branches longer than the sawbuck. I wrapped some yellow tape around 20" lengths so I can judge my saw cuts accurately. Works great and folds away for better storage.
 

Attachments

  • sawbuck_1.jpg
    sawbuck_1.jpg
    91.4 KB · Views: 440
  • sawbuck_loaded_1.jpg
    sawbuck_loaded_1.jpg
    89.7 KB · Views: 510
Nice... I think my crossbars are going to be expendable, mine being small, it's sometimes tricky not to put a cut in the crossbar running lengthwise but that's the beauty of the thing, they are fixable with spare wood...

Jay
 
That's a great idea making it asymmetric but I don't really have much of a problem with binding. Might be the 65cc saw can just power through it.

If you put the crossbars on the lower side of the X instead of the upper side, it would be farther from the chain and not get hit as much. Also, the cross piece at the base, if put on the inside gives more toe room. I see you left it off altogether on the working side.
 
Status
Not open for further replies.