I plan on picking up some metal tomorrow... want to get the rest of my supplies in that trip too. What do you all recommend for a welding rod for the 3/16th angle I'll be getting? I just have a dinky welder, 100A max, low duty cycle, hopefully it will last through the project.
Building a small wood wagon for the garden tractor
- Thread starter OhioBurner©
- Start date
-
Active since 1995, Hearth.com is THE place on the internet for free information and advice about wood stoves, pellet stoves and other energy saving equipment.
We strive to provide opinions, articles, discussions and history related to Hearth Products and in a more general sense, energy issues.
We promote the EFFICIENT, RESPONSIBLE, CLEAN and SAFE use of all fuels, whether renewable or fossil.
You are using an out of date browser. It may not display this or other websites correctly.
You should upgrade or use an alternative browser.
You should upgrade or use an alternative browser.
- Status
- Not open for further replies.
N
nate379
Guest
6011 or 7018, 1/8" rod, 90-100 amps usually though it's been years since I have welded with a buzzbox, I use MIG almost always nowadays.
6013 would also be a goto rod for me on that stuff. It will lay a nice, clean bead on your clean steel. I personally would be welding that at about 140 amps, but your buzz box isn't rated that high. For the short duration welds you are doing, crank the box up and lay some beads.
O
oldspark
Guest
+1 if the metal is clean 6013 is a user friendly rod, I use 6011 a lot on the dirty or galvanized stuff and I think it works better for vertical or overhead.Jags said:6013 would also be a goto rod for me on that stuff. It will lay a nice, clean bead on your clean steel. I personally would be welding that at about 140 amps, but your buzz box isn't rated that high. For the short duration welds you are doing, crank the box up and lay some beads.
Alright got the piece of 1.5 3/16 angle scrap I had laying around and did a few practice beads. Had e6011 3/32 already but went ahead and picked up the same in 1/8. Now I am just a novice welder, a few days of welding in shop class in high school (and I was actually pretty good then) but in the 15 years since I have probably welded a handfull of times usually just a small bracket or fixing a broken handle or something like that. So I go to practice a few beads... and well I can't get the 1/8 to work at all. That welder might be a bit overrated at 100A. Put the 3/32 rod in and at least were moving now. I dont know, I might be asking too much of this welder, it wasnt to pretty, and I'm not sure if I am getting quite the penetration I need. When I end the bead it did look like it was half way through the metal, but I'm not seeing much discoloration on the backside.
I'll post a pic. What do you all think? Now its been at least 4 years since I put a bead down, so I may need to go a do just a few more practice beads. But this is what I got for now:
http://i903.photobucket.com/albums/ac235/kc2ebm/misc/IMG_0635.jpg
I probably should clean the rust off it a bit better, and maybe slow down a bit.
N
nate379
Guest
You need to slow down and have more angle on the rod. Think 45 degree. You may also want to stick with the smaller rod diameter due to the lack of amperage. That welder should get the job done. 3/16th steel is not taxing it too much.
Ok so I practiced a few more welds this morning (I didnt see your reply Jags, I'll try to be more conscious of the angle next time), and well this is what I got. This isnt a road trailer or anything, think this is good enough?
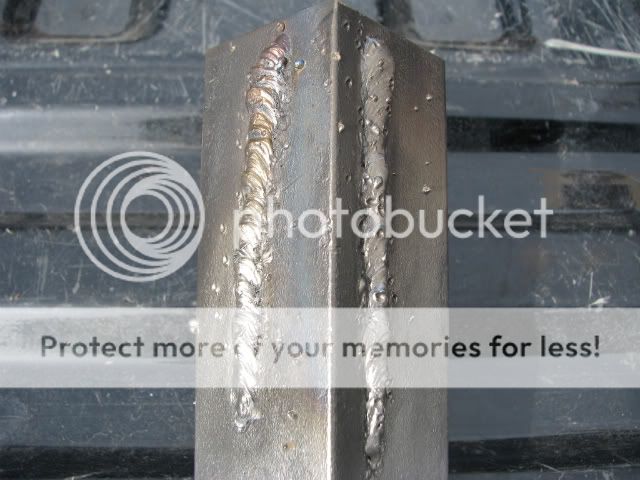
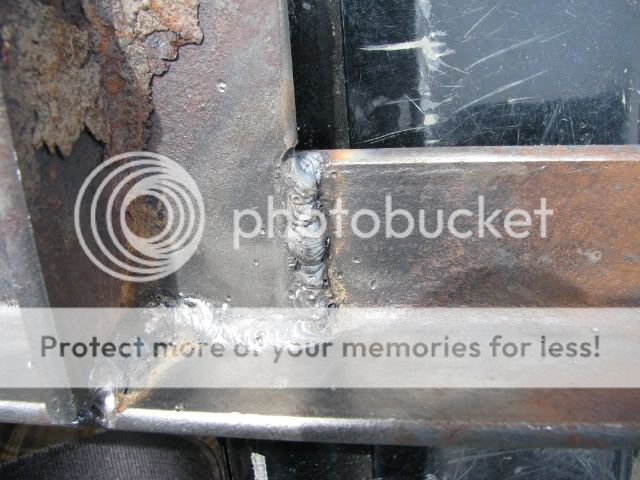
Sorry on the bottom pic on the left part of the bead I couldnt get the wire brush in there good to clean off the weld to see it better.


Sorry on the bottom pic on the left part of the bead I couldnt get the wire brush in there good to clean off the weld to see it better.
That will stick a trailer together.
Now if you want me to nit pick....
You are still traveling too fast. You need a steady drag. Remember with the rod you are using, it is considered drag rod. On the corner weld, you traveled up the angle instead of staying in the corner. That weld will only be half as strong as it could be.
Now if you want me to nit pick....
You are still traveling too fast. You need a steady drag. Remember with the rod you are using, it is considered drag rod. On the corner weld, you traveled up the angle instead of staying in the corner. That weld will only be half as strong as it could be.
O
oldspark
Guest
A little slow today exactly what do you mean? And remind me to never show you any of my welds.Jags said:On the corner weld, you traveled up the angle instead of staying in the corner. That weld will only be half as strong as it could be.

oldspark said:A little slow today exactly what do you mean? And remind me to never show you any of my welds.Jags said:On the corner weld, you traveled up the angle instead of staying in the corner. That weld will only be half as strong as it could be.
Take a look at the edges of the angle and where the weld was laid. Now follow that weld into the corner, you see it rising above the original (and correct) position. More weld is up on the angle, then there is at the joint.
Sparky, I really am not or try not to be critical of others and their welds. Gawd knows that I have burned in a few bubble gum Joe's myself, and I am a looong ways from a pro. The ONLY reason I even made comment about it is I think him showing his welds was a mild cry for help. (but I could be mistaken on that part, as well.)
O
oldspark
Guest
Hey Jags I understand, you are just helping out, he asked and you gave a honest answer, I used to weld a little better but dont do it enough now to make it look good, at my old job we call it bird sheet.
Yeah thats exactly right, I didnt realize when I did it but when I was posting the picture I could see that my weld in the corner was up higher more on one piece than the other. Probably the awkward angle messing me up since most of my other practice beads were on the flat, that one was the first joint I did. And yeah I do appreciate the advice on the matter, other than way back in high school I have not had anyone that really knows how to weld see any of my welds or give me any advice. But this will be my first bigger job.
OhioBurner© said:And yeah I do appreciate the advice on the matter, other than way back in high school I have not had anyone that really knows how to weld see any of my welds or give me any advice. But this will be my first bigger job.
Nobody is gonna knock ya for practicing and asking questions (or at least they shouldn't).
Flatbedford
Minister of Fire
As I recall from the welding class that I took 22 years ago, you can always go back on lay down another bead over the first one. Like Jags said,slow down a bit and watch those nice little circles form. Also, pull back a bit when you get to the edges and you will be less likely to burn holes.
Next question I have will be on painting it. Any paint in particular? I just want black, and I dont need anything auto-quality finish wise, just need it to keep it from rusting for as long as possible. Do I need to do the three part approach, primer, base coat, clear coat, etc or dey they make a simpler paint for this application. What do you all recommend?
N
nate379
Guest
1/2 a dozen cans of rattle spray, 2-3 coats. Or if you have a spray gun rustoleum, tremclad, etc.
N
nate379
Guest
Yup.
What I do is go over everything with a wire wheel on the grinder and then wipe down with paint thinner or acetone. Seems to work ok.
What I do is go over everything with a wire wheel on the grinder and then wipe down with paint thinner or acetone. Seems to work ok.
Well the project has officially kicked off. Oh and after I ran out of the 3/32 rods I had I went to Lowes and they didnt have the 6011, the only thing they had in 3/32 was 6013 and since Jags mentioned them I went ahead and gave em a shot. I dont know if its the difference with the 13 vs 11 or just maybe my rods were old or something, but man these rods work so much better! Wish I hadnt already welded the base together. My beads got much better too I think.
Here is a comparison shot:
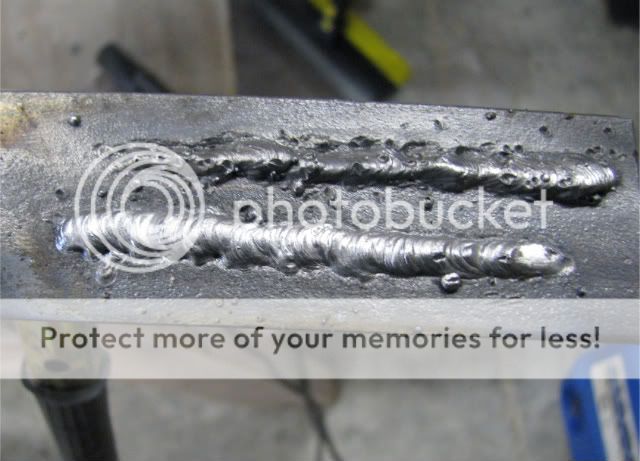
First practice bead with E6013, on bottom, compared to one of my last practice beads with the E6011 rods I had (old), top.
And also a random joint:
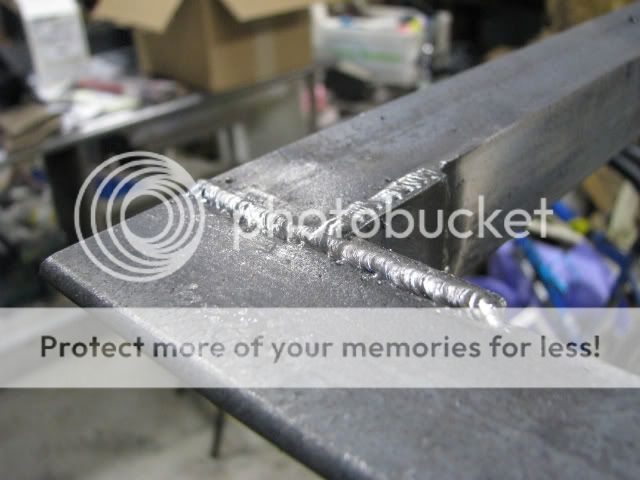
Hopefully these beads are better and will suffice for this trailer.
I've got some more progress pics I need to upload still. I think I may start a new thread since this one is a few pages of debating the pros and cons and deciding what to do. I might start a new one of just the build.
Here is a comparison shot:

First practice bead with E6013, on bottom, compared to one of my last practice beads with the E6011 rods I had (old), top.
And also a random joint:

Hopefully these beads are better and will suffice for this trailer.
I've got some more progress pics I need to upload still. I think I may start a new thread since this one is a few pages of debating the pros and cons and deciding what to do. I might start a new one of just the build.
O
oldspark
Guest
The 6013 is a much smoother rod to use, the 6011 is better for dirty and galvanized metal, to me it looks like you need more heat.
Well I was going to start a new thread but decided I'd just continue this one on. But this will be the start of the actual build. And I want to thank everyone for the advice and help so far.
Here are some of my sketches:
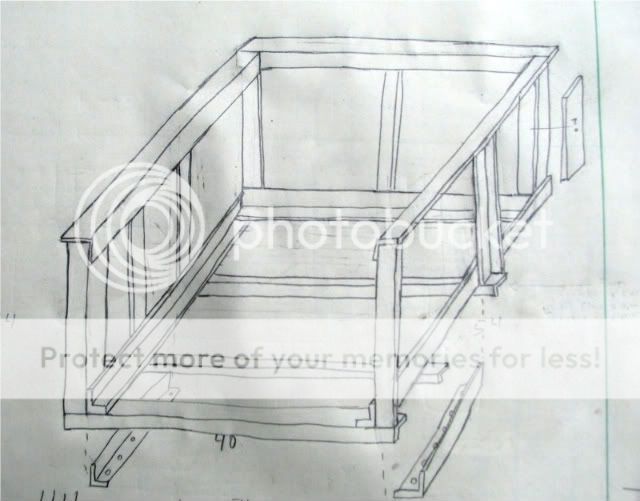
Not exactly to scale, but shows how the pieces will all go together.
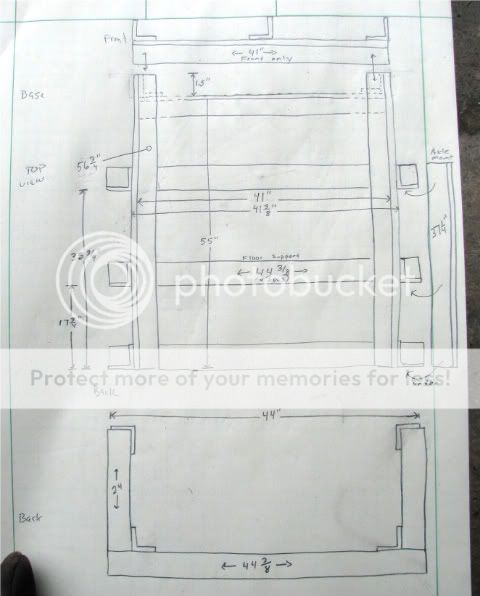
Another showing some measurements.
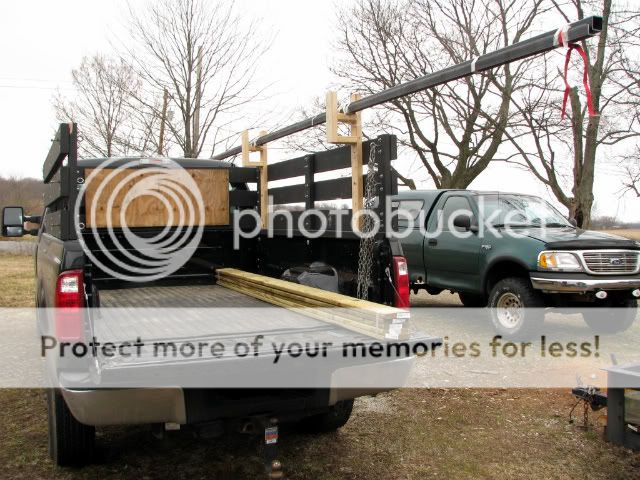
Made a quick carrier to get the 20-footers home. Bolts quickly on to my wood racks. Also the 5/4 decking I decided to use for the floor (thanks Flatbed). I think the sides I'll still use plywood.
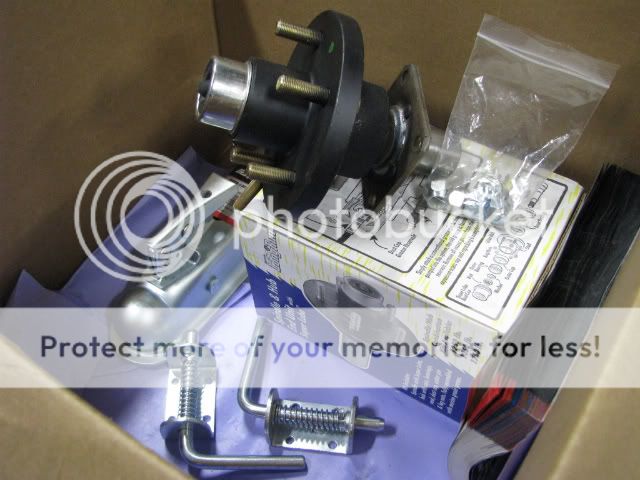
The Goodies. I actually got one size bigger on the hubs than I planned on since the smaller ones were on backorder.
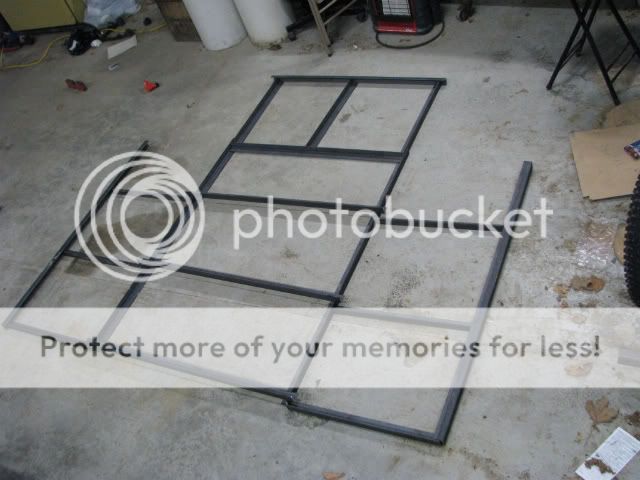
Most all the structure is cut to size, ready to start welding.
Here are some of my sketches:

Not exactly to scale, but shows how the pieces will all go together.

Another showing some measurements.

Made a quick carrier to get the 20-footers home. Bolts quickly on to my wood racks. Also the 5/4 decking I decided to use for the floor (thanks Flatbed). I think the sides I'll still use plywood.

The Goodies. I actually got one size bigger on the hubs than I planned on since the smaller ones were on backorder.

Most all the structure is cut to size, ready to start welding.
Yep, nicer beads, but Sparky is right. Ya need more heat. Your not getting very good penetration. Ya see how the bead "stands up" or sits on top of the steel? You can always make another pass at it.
Looks like this thing is coming together. I likey.
Looks like this thing is coming together. I likey.
Yeah, if I ever do anything like this or bigger again I'll get a bigger welder. But I've already got almost all the welding done. I have gone back over a few welds for another pass.
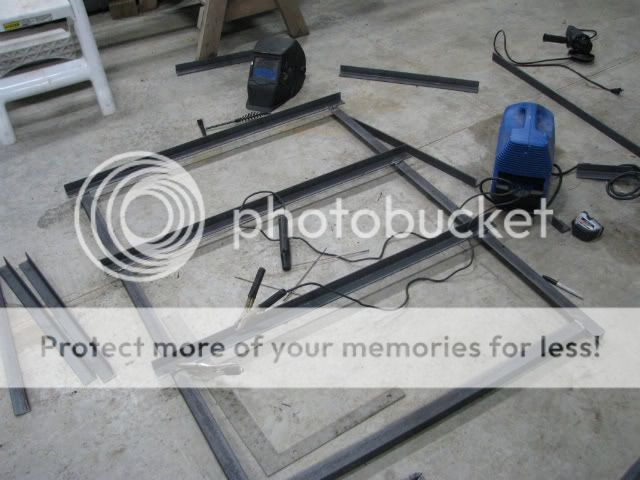
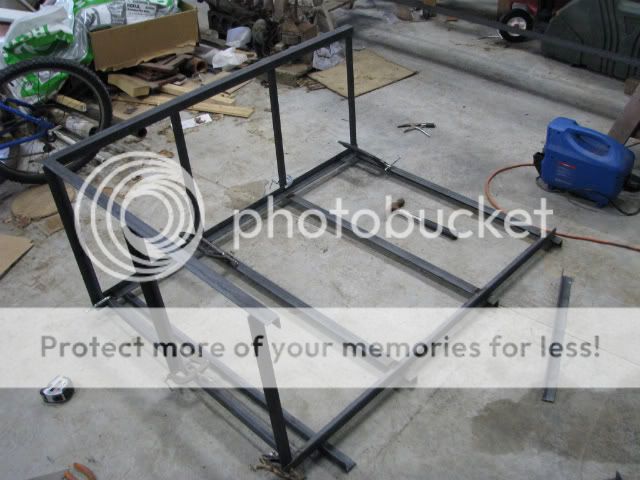
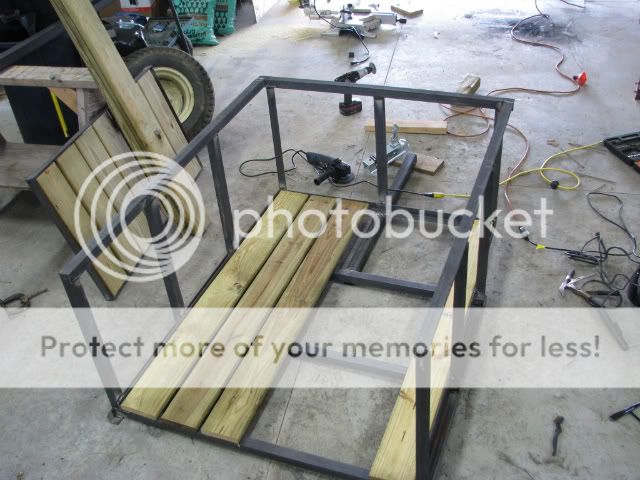
After finishing welding up the main structure, I've welded the tongue on here and started cutting the decking boards to size.
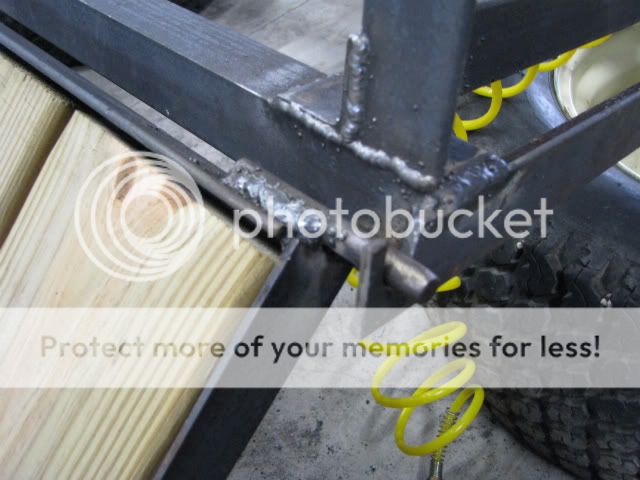
I had just about everything planned out except how I would attach the tailgate. After some quick brainstorming I came up with this idea. The bottom hinge is just some rod and a slot cut into a piece of the frame that extends back a couple inches. So it can be lifted out easily to remove, or allow to pivot.
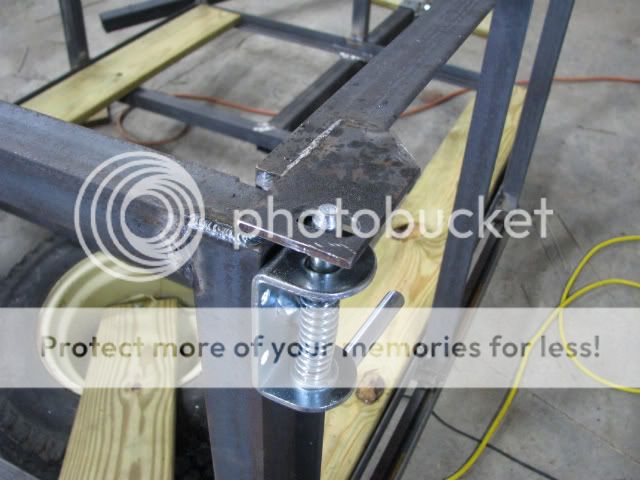
This part of the tailgate could probably have been designed better but it work so I went with it. The hinge was a bit too wide for 1.5" so two of the mounting holes arent used. I think it will be fine.


After finishing welding up the main structure, I've welded the tongue on here and started cutting the decking boards to size.

I had just about everything planned out except how I would attach the tailgate. After some quick brainstorming I came up with this idea. The bottom hinge is just some rod and a slot cut into a piece of the frame that extends back a couple inches. So it can be lifted out easily to remove, or allow to pivot.

This part of the tailgate could probably have been designed better but it work so I went with it. The hinge was a bit too wide for 1.5" so two of the mounting holes arent used. I think it will be fine.
N
nate379
Guest
- Status
- Not open for further replies.
Similar threads
- Replies
- 3
- Views
- 4K
- Replies
- 5
- Views
- 410
- Replies
- 9
- Views
- 3K

