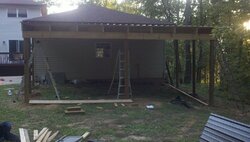
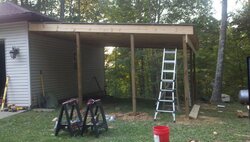
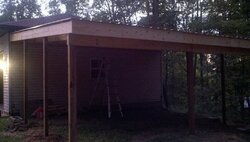
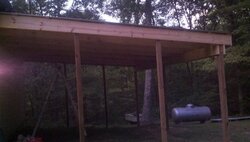
Building a wood shed

  • Active since 1995, Hearth.com is THE place on the internet for free information and advice about wood stoves, pellet stoves and other energy saving equipment.

    We strive to provide opinions, articles, discussions and history related to Hearth Products and in a more general sense, energy issues.

    We promote the EFFICIENT, RESPONSIBLE, CLEAN and SAFE use of all fuels, whether renewable or fossil.
Status
Not open for further replies.
muncybob said:
How did you set the posts? I'm planning to put a base of 6" or so stone in the bottom of the hole, set the post in and add some more stone about 4" or so...then add dirt and begin tamping. Even though the PT posts are ground contact rated I thought this would help to drain water away from the posts.

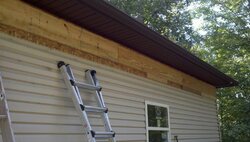
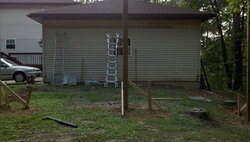
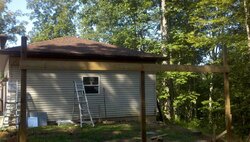
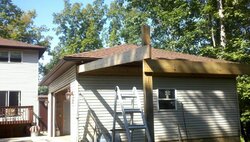
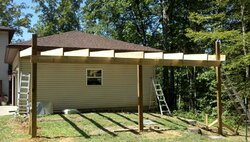
The holes are 36" deep and then I poured 8" of concrete in the bottom of them, set the posts in squared and plumbed them, added about 8" of gravel around the bottom of the post, and them tamped the remaining dirt in around them. It's probably overkill but quikrete is cheap and I already had the gravel. Alot of guys around here just set bricks or something like it in the bottom of the hole and set the post on that so they don't have to wait on the quickrete to set up.
 
Well I have barely gotten anything done this week since I have been working 12-14 hours a day. Here is the progress that has been made so far. It has been a bear setting the post by myself and hanging the 2x12 but progress is being made so I am going to keep plugging away. When I get to putting up the 18' 2x10 I am going to have to find an extra set of hands! I found a few pallets that are 8 feet long and built out of 2x6's that I am going to put down in the shed to stack on. At this construction sit they also had some 3/4" plywood in 3'x8' sheets (I think there were 12) that I haven't decided what to do with yet but figured what the hack maybe I can find a use for them during this construction project.
 

Attachments

  • 2011-08-26_13-52-37_32.jpg
    2011-08-26_13-52-37_32.jpg
    135.7 KB · Views: 569
  • 2011-08-26_14-35-54_408.jpg
    2011-08-26_14-35-54_408.jpg
    100.9 KB · Views: 588
  • 2011-08-26_14-53-32_213.jpg
    2011-08-26_14-53-32_213.jpg
    121.4 KB · Views: 566
  • 2011-08-26_13-29-23_171.jpg
    2011-08-26_13-29-23_171.jpg
    128.2 KB · Views: 588
certified106 said:
Well I have barely gotten anything done this week since I have been working 12-14 hours a day. Here is the progress that has been made so far. It has been a bear setting the post by myself and hanging the 2x12 but progress is being made so I am going to keep plugging away. When I get to putting up the 18' 2x10 I am going to have to find an extra set of hands! I found a few pallets that are 8 feet long and built out of 2x6's that I am going to put down in the shed to stack on. At this construction sit they also had some 3/4" plywood in 3'x8' sheets (I think there were 12) that I haven't decided what to do with yet but figured what the hack maybe I can find a use for them during this construction project.

Lookin' good Jess! Good score on the plywood too!!

Ray
 
Ray are you ready for the hurricane?
 
certified106 said:
Ray are you ready for the hurricane?

I suppose so.. I am never 100% ready for this type of event.. I have picked up many loose ends and hopefully got them all.. My biggest worry is the high winds and some large trees in the wood on the left side of the house.. They could cause some serious damage if they uprooted or snapped.. Time will tell...

Ray
 
Got the last 2x12 up last night and about half my lag bolts in and set the third post for the header.
 

Attachments

  • 2011-08-26_16-49-20_282.jpg
    2011-08-26_16-49-20_282.jpg
    115.1 KB · Views: 532
  • 2011-08-26_17-09-39_590.jpg
    2011-08-26_17-09-39_590.jpg
    124.5 KB · Views: 519
Looks like you are ready to rock. Have fun with the build.
 
SolarAndWood said:
Looks like you are ready to rock. Have fun with the build.

Thanks, I'm really hoping to see some sheetmetal up by the end of today. As soon as I finish this last cup of coffeee I'm headed out. Stay safe with the storms headed your way!
 
Looks like you know what you're doing! You are gonna love having a shelter..

Ray
 
Stopped for a quick bite to eat. Here is the progress so far today.
 

Attachments

  • 2011-08-27_10-33-20_464.jpg
    2011-08-27_10-33-20_464.jpg
    168.5 KB · Views: 487
  • 2011-08-27_10-52-32_71.jpg
    2011-08-27_10-52-32_71.jpg
    173.6 KB · Views: 482
  • 2011-08-27_12-30-48_270.jpg
    2011-08-27_12-30-48_270.jpg
    197.1 KB · Views: 459
raybonz said:
Looks like you know what you're doing! You are gonna love having a shelter..

Ray

Thank goodness looks are deceiving! Thanks though.
 
PapaDave said:
Nice job, despite the work schedule. I didn't realize you were doing a lean-to off the garage.
Looking forward to more pics later today. :coolsmile:
I took the easy way out :cheese:
 
certified106 said:
PapaDave said:
Nice job, despite the work schedule. I didn't realize you were doing a lean-to off the garage.
Looking forward to more pics later today. :coolsmile:
I took the easy way out :cheese:

You took the smart way out and that's gonna be a nice sturdy wood shelter at a reasonable cost!! Good job!

Ray
 
Looks like a good job with a good plan!
Love the pictures, keep them coming.
 
certified106 said:
Stopped for a quick bite to eat. Here is the progress so far today.

certified106, keeps looking better and better, nice job.

zap
 
Well here is the rest of what I accomplished this afternoon. I got the 2x4 layed out across my rafters and fastened down, set my 4x4 side posts, put up the sheetmetal and fastened it down with 420 screws (man am I glad that is done), put my 1x12 across the front for the guttter and put the back 2x10 header up with 4x6 spacer blocks. I am beat! Sorry the pictures are crappy but the daylight was fading fast at the end. I gotta brag a little bit so I just wanted to let everyone know I was less than 1/16" out of square when I got done :)
 

Attachments

  • 2011-08-27_19-31-03_304.jpg
    2011-08-27_19-31-03_304.jpg
    111.6 KB · Views: 597
  • 2011-08-27_19-31-26_184.jpg
    2011-08-27_19-31-26_184.jpg
    125.8 KB · Views: 612
  • 2011-08-27_20-17-31_159.jpg
    2011-08-27_20-17-31_159.jpg
    103 KB · Views: 596
  • 2011-08-27_20-17-54_531.jpg
    2011-08-27_20-17-54_531.jpg
    94.6 KB · Views: 589
Great job Jesse!! You really went to town on that project! Now you gotts fill it with dry wood :)

Ray
 
Impressive. Both the shed and only being out by a 1/16th. Nice!
 
raybonz said:
Great job Jesse!! You really went to town on that project! Now you gotts fill it with dry wood :)

Ray

Thanks Ray, I still have a bunch to do though. I need to get the facia up on the sides and end hang the gutters, and put down some wood on the left side as your facing it so I can backfill and level up the ground just a tad. I also want to build a nice way to stack in there so it doenst get to out of hand. I was thinking about using the pallets but I am ope to suggestions if anyone has better ideas. I kind of like those rack building brackets they were talking about on Solars thread yesterday.......
 
jeeper said:
Impressive. Both the shed and only being out by a 1/16th. Nice!

Thanks, I was fairly confident it was pretty square as everything was coming out good measurement wise and it sure mad putting that roof on super easy.
 
zapny said:
certified106 said:
Stopped for a quick bite to eat. Here is the progress so far today.

certified106, keeps looking better and better, nice job.

zap

Thanks zap, I have been wanting to do this for awhile.
 
No, no, no, no......1/16th is unacceptable. The industry wide standard for rough construction is at least 1/4". %-P

Seriously, that's looking great. Being that close makes everything else just kind of fall into place, as you noticed putting on the roof.
I'm curious how you end up leveling that ground. Maybe build a floor like Jake and others have?
Did you notice any bowing/twisting of the 4x6's after they went in the ground? Mine did when I built the pole barn, AND the shed. PITB.
 
That was a big day...nice work!
 
Status
Not open for further replies.