Building Hearth for my new Englander!

  • Active since 1995, Hearth.com is THE place on the internet for free information and advice about wood stoves, pellet stoves and other energy saving equipment.

    We strive to provide opinions, articles, discussions and history related to Hearth Products and in a more general sense, energy issues.

    We promote the EFFICIENT, RESPONSIBLE, CLEAN and SAFE use of all fuels, whether renewable or fossil.
Status
Not open for further replies.

SlyFerret

Minister of Fire
Feb 12, 2007
1,537
Delaware, Ohio
Hi guys,

I'm starting to put together my plans for building the hearth pad for my new 30-NC. I called the county to inquire about codes. They instructed me to install the stove acording to the manufacturers specs. They confirmed that they do not have any codes that override the instructions.

I want to make sure that I am understanding the instructions correctly. The stove will be a corner installation. The way I understand it, I must measure perpendicular from the wall to the corner of the stove at least 15" away. If I stay at least 15" perpendicular from the walls, I do not need to install anyting over the existing drywall. The stove pipe from the stove to the connector at the ceiling needs to be 20.5" minimum away from the walls.

What do you guys suggest from the stove to the ceiling connector? Single wall or double wall? Will the draft be easier to start with a single wall pipe (closer to the room temp when starting the stove)? Will I reclaim any extra heat with single wall? Is single wall less safe than double wall for this purpose?

On the hearth wiki, I noticed that the rule has changed from 16" to 18" of hearth extending in front of the stove. Where do I measure from? From the front face of the stove? From the front face of the door? From the edge of the lip that protrudes under the door?

As far as how the pad hearth pad itself is built, I really liked what I saw in another thread this past week. Using closely spaced metal studs mated together to add strength for the framing with durock and tile over top is the way I'm going to go. The hearth wiki says that dead air space of 1" has an R value of .97. If I use metal studs, I will have approxmately 3.5" of dead air space. What is the R value of 3.5" of dead air space?

The manual says that the floor protection needs to have an R value of 1.5. Acording to the hearth wiki, I can achieve that as follows (using the R value for 1" of dead air since I don't know the R value for 3.5"):

Dead air @ R .97
Two layers 1/2" durock board @ R .26 each
One layer of 1/4" ceramic tile @ R .01
Total R value comes to R 1.5

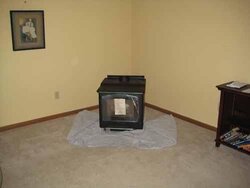
We set the stove down in the corner where we are going to install it. I took some towels and layed them on the floor to aproximate the footprint of the hearth pad so that my wife and I could get a feel for how it will look (the hearth pad will go all the way back to the corner). The photo looks very flat (almost no depth perception) but everything is sitting according to the clearances as I understood them to be.

-SF
 

Attachments

  • stove1.JPG
    stove1.JPG
    10.1 KB · Views: 1,343
That all sounds good to me. But I would add a layer of 26 ga sheet metal below or between the Duroc just to be on the safe side and Id push out the 18" a few if you can, stuff does fly. Also measure from the glass.
I prefer the double wall, allows for closer clearance and added safty but some like the heat from single. Either way as long as you make clearance.
 
I'm not sure of the R value (check the Wiki) But it does help to disipate the heat so there arnt hot spots under the tile and is one additional fire barrier and doesnt cost much.
 
Fair enough. Conducting the heat that is there away from the center does make sense as a way to help reduce hot spots.

-SF
 
Essentially the R-values just add up - so if 1" of air has an R-value of 0.97, 3.5" would have an R-value of around 3.4 or so... The sheet metal doesn't add any extra "R", but it is a "good practice". I would also reccomend 3 sheets of Durock rather than 2, all bonded together with thinset and screwed down - not so much for the R-value as for the added strength and stiffness. Durock isn't really designed or rated to be used as a floor without any underlayment, so it's a question of how to build the thickness up to get the strength to hold the stove and so forth.

For the 18", measure it from the same place the manufacturer told you to measure the 16" from, and treat it as a minimum measurement, more won't hurt you any. I actually suggest marking out the minimum size, and then laying out your final floor treatment (tile or whatever) and sizing the pad to the next larger size that will fit your tiles with a minimum of cutting... I.E. if the instructions work out to needing 45" and you are using a 6" tile, build to 48" - looks better and less work to install the tiles...

Gooserider
 
I'll be using some 12" ceramic floor tiles that my dad has offered to me. They're left over from his new sun room that he built this summer. Best of all, they're free! I'm going to do as many full tiles as I can, but he has a wet saw, so cutting them won't be a problem as I get back into the corner.

I'll plan for three layers of the durock.

-SF
 
Instead of dead air space in mine, I used un-faced fiberglass batts. Cost $10 from Home Depot, and it prevents the air from starting convection in there anyway. Advertised R-Value of that was 6 ... Just a thought.
 
I just got off the phone with the building department. They told me what I need to do in order to get a permit. Total cost of the permit will be about $75. The application fee is $25, and the permit fee is $50.

They want two copies of the stove manual, two copies of the chimney kit installation manual, two copies of drawings of my hearth pad design, and two copies of drawings of any framing that I need to do in the attic.

Looks like I'm going to be spending some time taking measurements and drawing up plans.

-SF
 
SlyFerret said:
I want to check to make sure that this through the roof kit is the appropriate one to use with my 30-NC.

-SF

Looks about right, depends a little on the details of your setup - what sort of ceiling do you have? What are you passing through? What pitch is your roof, etc. It does look like the proper idea for sure. You might try calling ESW and talking to Mike for specific advice, I think he mentioned that they sell the stove pipe for their stoves so he'll have a good idea on what you will need.

Gooserider
 
I'm going through the ceiling directly above the stove into a very small attic space, and then straight up out the roof above. It should be a pretty easy run. The roof pitch is not steep. I have felt pretty comfortable walking on it before when I was working on my TV antenna, so working up there won't be too bad. One of the things I'm going to need to do is try and take some sort of measurement of the pitch just to make sure. I also need to figure out where my rafters are to make sure that my stove will work there where I want it. I'm keeping my fingers crossed.

-SF
 
SlyFerret said:
I'm going through the ceiling directly above the stove into a very small attic space, and then straight up out the roof above. It should be a pretty easy run. The roof pitch is not steep. I have felt pretty comfortable walking on it before when I was working on my TV antenna, so working up there won't be too bad. One of the things I'm going to need to do is try and take some sort of measurement of the pitch just to make sure. I also need to figure out where my rafters are to make sure that my stove will work there where I want it. I'm keeping my fingers crossed.

-SF

Sounds reasonable - I assume it's a flat ceiling from your comments - angled ceilings need a different support box... That kit does look like what you want, but I'm not an expert on which kits do what - we've got a masonry chimney so I've never had to go there.

Figuring out rafters can be a challenge, and is an additional reason for building the hearth oversize - it gives room to move the stove in order to line things up. I would suggest starting by drilling small "probe holes" in the ceiling at your ideal location, then going into the attic and seeing how everything lines up. I have found a good "probe drill" is to use a straight peice of coat hanger wire - low cost, makes a small hole that is easy to patch if you need to, but is longer than "jobber length bits" so you can actually get through the construction, and because it's relatively blunt will tend to not penetrate or push aside "expensive" things like electrical wires or plumbing...

Once you find the ceiling penetration point, you can then use a plumb bob to find the matching spot in the roof, and shift as needed, or decide to cut into the structure as needed (w/ proper attention to bracing, etc.)

The parts can get expensive, but I have seen people using offsets in either the Class A or the connector pipe to get where they need to be, although IMHO it is usually better to move the stove a few inches instead.

Gooserider
 
SlyFerret said:
I want to check to make sure that this through the roof kit is the appropriate one to use with my 30-NC.

-SF

thats a standard simpson "dura-plus" kit hop into www.duravent.com for the entire catalog and see if this kit matchs your ceiliing style and roof pitch, there are different kits for steep pitch as well as cathedral ceilings, i cant see from the picture what you have there so i'd look them up. by the way they have an excellent engineering staff on hand to help with the occasional question as well , feel free to drop my name as a referrence (just tell em mike from ESW sent ya)

also , if you need spare copies of the manual , download em from our website at http://www.englanderstoves.com/manuals/30-NC.pdf

above all, give ,me a yell if you have any questions , thats why im here
 
Ahh, the ceiling isn't flat. It's a vaulted, and the highest point is just above right side wall in the pic that I posted earlier. I wanted to run the chimney up through as close to the peak of the roof as I could in that room.

When I measure the distance from the back corners of the stove to the walls, do I need to measure from the corners of the stove itself? Or do I measure from the corners of the heat shield?

-SF
 
Well, I crawled up into the attic. It's pretty cramped up there. The stove is sitting pretty darn close to where it needs to be (within a quarter inch or so). I made a plumb bob with some fishing line and a socket from my socket set. It's approximate, but for my purposes tonight it worked. My coat hanger is 4-5 inches from the rafter. That's my best guess from as close as I could estimate quickly.

Can I put my support box directly against that rafter? It will put my stove pipe almost exactly where it needs to be. Close enough that the stove won't look out of whack when it's lined up with the chimney.

-SF
 
You need to check the Duraplus technical docs for installation clearances and such. I THINK you can put the support box up against a joist, but I'm not sure...

You might also want to check, but I think the ceiling kit you were showing earlier may be the wrong one, as there are different kits for flat ceilings and sloped ones. The support boxes are different because the clearance requirements change.

Gooserider
 
Gooserider said:
You need to check the Duraplus technical docs for installation clearances and such. I THINK you can put the support box up against a joist, but I'm not sure...

I printed up the catalog off of their website. I'll see what I can find. Every picture I've seen shows framing supports right up against the box to secure it. I'll investigate a little more.

Gooserider said:
You might also want to check, but I think the ceiling kit you were showing earlier may be the wrong one, as there are different kits for flat ceilings and sloped ones. The support boxes are different because the clearance requirements change.

I think you're right. I'll double check. Maybe TSC has the kit with the other part too.

-SF

BTW... thanks everybody. I really appreciate your help and your patience with all my questions.
 
TSC didn't have the right kit in stock. I happened to be at Lowes tonight and checked to see what they had. They didn't stock the right kit for vaulted ceilings either. I went ahead and ordered the kit from Lowes while I was there.

I found the PDF of the manual online, so I can at least print it up and get started on my permit application before the kit actually arrives.

I'm getting antsy to start building something. I have to keep telling myself to be patient. Hopefully I can get my permit application done on Monday morning.

-SF
 
I stopped at the Delaware County Building Department on the way in to work this morning to apply for my permit.

To be honest, they didn't have any idea what to do with me and my wood burning stove. The gal at the desk went to find somebody else to ask.

At one point I asked them "So, I guess most people don't bother to pull a permit for these things?"

Their response was "yeah, most folks just go ahead and install them"

I couldn't believe it! The gentleman that she brought over looked over my drawings and asked a few questions and decided that I only needed to get a "mechanical" permit for the stove, as I wasn't really doing any framing work that needed a building permit. He said that since my pad was so simple, it wasn't necessary. The building permits are for people who are building a chimney chase.

They got it figured out, but I was pretty shocked that so few people get permits for their stoves that the building department wasn't very familiar with the process for them!

-SF
 
I got a mechanical permit for my stove also. I applied online and just had the owner's manual onsite at the inspection. 50$ or so for mine too and now the insurance company can say an "expert" verified the installation as proper.

The support box for my chimney is directly screwed to a rafter and to other framing attached to the rafters. What else would you propose? From the centerline of your hanger hole you need like 6" to a rafter, 4" for the pipe and two more for the support box which is sized to provide the required two inches of clearance between the class A and the rafter. My installer couldn't get everything perfect and I ended up needing to move the stove around on my hearth slightly to get a vertical stove pipe in the room. This is apparent when looking at the grout lines in the tile but is more pleasing to my eye than a crooked pipe.

Make your hearth a little bigger than it needs to be to allow for such imprefection.
 
The way I look at it, if the stove is slightly off center on my hearth, I'll just make sure I put the tools on the correct side to help fill the space and balance out the way it looks. Not a big deal.

You're right, it will certainly look better than a crooked pipe. I thought about using a couple 45's to help adjust and keep the stove centered, but I think keeping the chimney straight is more important to me than having the stove perfectly centered on the grout lines.

-SF
 
My install came out with the pipe dead center on a truss and there was no moving the stove enuf to get between the truss so I had to offset a bit. wasnt too happy but once it was done doesnt look bad and drafts just fine,
 

Attachments

  • IMG_0300_1_1.JPG
    IMG_0300_1_1.JPG
    31.6 KB · Views: 635
I'll keep that in mind as an option if I end up having to move it too far from where ideally want to place it. If it's only a couple inches, I won't worry. If it's 4-6 inches, I'll probably try and make some sort of adjustment in the stove pipe to make it line up.

-SF

BTW... I love the look of the pine paneling.
 
Status
Not open for further replies.