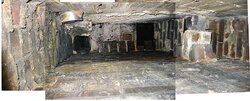
Here's a pic looking up inside my chimney (built in 1965, split-entry house), taken from the basement cleanout.
First, a brief description of the pic: On the left, you'll see the shiny metal flue pipe of the oil-fired boiler poking in (about 5' above the basement floor). Higher up, there's the begining of the clay liner for the boiler flue. To the right is the underside of the fireplace hearth. The small rusty metal square is the former ash-dump for the fireplace (the rusty piece is formwork below a cement plug in the hearth that closes the dump hole). I think the large black square farther over is some sort of metal plate supporting some of the hearth floor construction. Far to the right is a lame corbel supporting the outside wall of the chimney above. Then, this giant ash dump widens to the right for no apparent purpose (the base of the chimney is 4'-9" across, outside dimension). The only access into this giant ash dump is a 7X9 interior cleanout door located on the far left, below the boiler flue area. Obviously not visible is the fireplace flue.
I've had many WTF moments with this chimney, going back to 1992 when I bought this house.
I wish I could find the clown that built this thing or the inspector that allowed it. GRRRRRRRRRRR.
When we bought the house, the very diligent home inspector never noticed any problems. We were lucky we didn't die in our sleep. I woke up one morning to discover that the loose piece of sheet metal lying across the ash dump had moved. Stupid me didn't figure it out and shoved it back over the hole. We were lucky to live through another night. When I found the ash dump open again, I got smarter. Down to the basement I went and opened up the metal ash dump door. WTF! $%@#!. There were some pieces of CMU block obstructing the opening. Apparently, the mason used these as a "temporary" aid to hold up the end of the block above while building the wall. I got a hammer and bashed them out in anger. Had the previous owner in 25+ years never opened the cleanout? Why didn't I look when buying the house? WTF!
I shined my flashlight into the opening. What the h#$#@ is that? Brownish tan? Angled? I shoved a hand in and pushed. It moved. Why on earth is there a big piece of clay flue liner sitting loose in my ash dump? Why is my ash dump so freaking big? I shoved the liner to the side and held my mirror and light inside the opening. I began mumbling curse words endlessly. I had discovered the first problem. The boiler was exhausting into a big space, and then up one flue and also into the house through the fireplace ash dump (the fireplace was without glass doors and had a metal damper closing the flue above). Crap. I got some cement and permantly blocked the fireplace ash dump so we wouldn't die from carbon monoxide poisoning.
Apparently the loose piece of flue liner I found had fallen from the boiler flue. It presumably had been held up by nails at the height where the metal boiler flue enters the chimney. As you can see in the picture, there's no corbeling to support the piece of boiler flue that fell.
Scared, I decided to investigate the fireplace flue up on the first floor. Looking up at the top of the smoke chamber, I saw rusty nails supporting the fireplace flue, with an air gap all around. So, if I were to use the fireplace, smoke would travel up the flue and the air gap! WTF! $&#@! I put some refractory cement on the end of a long stick and repeatedly plugged around the bottom of the clay liner. Hopefully it'd be enough to keep the clay liner anchored in place and the air gap blocked off. I also noticed that there was no parging on the smoke chamber walls. Arrrrgh. Also, the space between the brick veneer lintel and the metal damper seat was never sealed, possibly allowing hot gases up behind the veneer. More work.
I reached up and felt around behind the metal damper on the smoke shelf. #$@#$@! A giant mound of sand. Apparently the many years of no chimney cap had allowed water to wash decaying mortar....sand....onto the smoke shelf. Maybe it was the remains of non-refractory parging? I scooped out all of the sand. UGGGGH! A mummified bird ! Another good reason to have a chimney cap!
Next stop, the roof. I see a square flue for the boiler and a rectangular flue for the fireplace. Ummmmmmm, why is there no wythe of brick between the two flues??? WTF? #@$. Maybe that was the norm in 1965, but based on the crappy masonry I'd seen so far, probably not. I look down the fireplace flue. Hey good news, it all seems to be there and is reasonably aligned. Can't see any damage.
I look down the boiler flue. What on earth is that? #$@#%! The second to last piece of flue liner is missing. Had it broken and fallen out? Was it the one in the basment? No, no. Apparently the mason cheated. Realizing he was short a piece of flue liner, he decided to use a couple of concrete bricks turned on end to make up the height of the missing piece of liner. He then installed the last piece of liner on those, so that at first glance the top of the chimney looks fine. The concrete bricks are now very decayed lumps of pebbly sand. Man, if I could get my hands on the clown that built this! More work.
So, where do I stand today? The fireplace flue now houses a metal woodstove flue inside the clay liners. However, based on what I've recently learned about NFPA 211 and UL 1777, that flue ought to be fully insulated. The boiler, which probably needs to be replaced in the next year or two, still vents as shown---which is far from ideal.
continued....
First, a brief description of the pic: On the left, you'll see the shiny metal flue pipe of the oil-fired boiler poking in (about 5' above the basement floor). Higher up, there's the begining of the clay liner for the boiler flue. To the right is the underside of the fireplace hearth. The small rusty metal square is the former ash-dump for the fireplace (the rusty piece is formwork below a cement plug in the hearth that closes the dump hole). I think the large black square farther over is some sort of metal plate supporting some of the hearth floor construction. Far to the right is a lame corbel supporting the outside wall of the chimney above. Then, this giant ash dump widens to the right for no apparent purpose (the base of the chimney is 4'-9" across, outside dimension). The only access into this giant ash dump is a 7X9 interior cleanout door located on the far left, below the boiler flue area. Obviously not visible is the fireplace flue.
I've had many WTF moments with this chimney, going back to 1992 when I bought this house.
I wish I could find the clown that built this thing or the inspector that allowed it. GRRRRRRRRRRR.
When we bought the house, the very diligent home inspector never noticed any problems. We were lucky we didn't die in our sleep. I woke up one morning to discover that the loose piece of sheet metal lying across the ash dump had moved. Stupid me didn't figure it out and shoved it back over the hole. We were lucky to live through another night. When I found the ash dump open again, I got smarter. Down to the basement I went and opened up the metal ash dump door. WTF! $%@#!. There were some pieces of CMU block obstructing the opening. Apparently, the mason used these as a "temporary" aid to hold up the end of the block above while building the wall. I got a hammer and bashed them out in anger. Had the previous owner in 25+ years never opened the cleanout? Why didn't I look when buying the house? WTF!
I shined my flashlight into the opening. What the h#$#@ is that? Brownish tan? Angled? I shoved a hand in and pushed. It moved. Why on earth is there a big piece of clay flue liner sitting loose in my ash dump? Why is my ash dump so freaking big? I shoved the liner to the side and held my mirror and light inside the opening. I began mumbling curse words endlessly. I had discovered the first problem. The boiler was exhausting into a big space, and then up one flue and also into the house through the fireplace ash dump (the fireplace was without glass doors and had a metal damper closing the flue above). Crap. I got some cement and permantly blocked the fireplace ash dump so we wouldn't die from carbon monoxide poisoning.
Apparently the loose piece of flue liner I found had fallen from the boiler flue. It presumably had been held up by nails at the height where the metal boiler flue enters the chimney. As you can see in the picture, there's no corbeling to support the piece of boiler flue that fell.
Scared, I decided to investigate the fireplace flue up on the first floor. Looking up at the top of the smoke chamber, I saw rusty nails supporting the fireplace flue, with an air gap all around. So, if I were to use the fireplace, smoke would travel up the flue and the air gap! WTF! $&#@! I put some refractory cement on the end of a long stick and repeatedly plugged around the bottom of the clay liner. Hopefully it'd be enough to keep the clay liner anchored in place and the air gap blocked off. I also noticed that there was no parging on the smoke chamber walls. Arrrrgh. Also, the space between the brick veneer lintel and the metal damper seat was never sealed, possibly allowing hot gases up behind the veneer. More work.
I reached up and felt around behind the metal damper on the smoke shelf. #$@#$@! A giant mound of sand. Apparently the many years of no chimney cap had allowed water to wash decaying mortar....sand....onto the smoke shelf. Maybe it was the remains of non-refractory parging? I scooped out all of the sand. UGGGGH! A mummified bird
! Another good reason to have a chimney cap!Next stop, the roof. I see a square flue for the boiler and a rectangular flue for the fireplace. Ummmmmmm, why is there no wythe of brick between the two flues??? WTF?
#@$. Maybe that was the norm in 1965, but based on the crappy masonry I'd seen so far, probably not. I look down the fireplace flue. Hey good news, it all seems to be there and is reasonably aligned. Can't see any damage.I look down the boiler flue. What on earth is that?
#$@#%! The second to last piece of flue liner is missing. Had it broken and fallen out? Was it the one in the basment? No, no. Apparently the mason cheated. Realizing he was short a piece of flue liner, he decided to use a couple of concrete bricks turned on end to make up the height of the missing piece of liner. He then installed the last piece of liner on those, so that at first glance the top of the chimney looks fine. The concrete bricks are now very decayed lumps of pebbly sand. Man, if I could get my hands on the clown that built this! More work.So, where do I stand today? The fireplace flue now houses a metal woodstove flue inside the clay liners. However, based on what I've recently learned about NFPA 211 and UL 1777, that flue ought to be fully insulated. The boiler, which probably needs to be replaced in the next year or two, still vents as shown---which is far from ideal.
continued....