Can fiberglass insulation or Roxul dry once it gets wet??

  • Active since 1995, Hearth.com is THE place on the internet for free information and advice about wood stoves, pellet stoves and other energy saving equipment.

    We strive to provide opinions, articles, discussions and history related to Hearth Products and in a more general sense, energy issues.

    We promote the EFFICIENT, RESPONSIBLE, CLEAN and SAFE use of all fuels, whether renewable or fossil.
Status
Not open for further replies.

Swedishchef

Minister of Fire
Jan 17, 2010
3,275
Inuvik, Northwest Territories
Hey guys

2 years ago I built myself a garage with a friend. Everything went well. Then I noticed that at the back of my garage, condensation formed under my VB. It is the ONLY part of the garage that has this issue. So I just slit it open, let ie dry out. Then 2 weeks ago I taped it up (the slashes I had made) and within 24 hours, more condensation. SO, 3 days ago I tore the VB down and pulled the insulation (thinking there could be a water infiltration issue) and everything was bone dry.

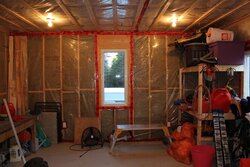
So yesterday I put everything back, VB up, taped the seams, etc. Guess what?! This afternoon there is condensation again

So I am now thinking that perhaps some of the batts got wet during install (I remember it was raining outside and my buddy may have put some under a tarp...). Do these things dry?

Anyway, plan B is to go buy some cheap fiberglass insulation ($30 for 97 sq feet, Roxul is $51 for a bag of the comforttbatt!!!) and see what it does. But I gotta move everything in the garage, rip out the VB and insulation in the back wall...AGAIN. Sigh.
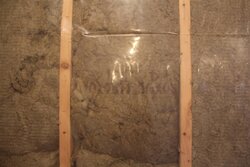
 
If you have a VB on the inside, it dries to the outside....what is the sheathing and exterior like?
 
The wall has to be able to dry to the inside or outside. With the Tyvek and the interior VB, you are trapping the moisture in the walls. Skip the interior VB.
 
But that is how houses are built around here. That is how all houses are built around here....ack. I still need to know where the water is coming from. I am pulling it all off and replacing it to see if it is t he wool.
 
Tyvek is not a VB. It is a vapor permeable barrier to air and liquid water, and allows drying to the outside. And in Quebec, a VB on the interior is reasonable.
 
Last edited:
If the insulation is wet you will be able to feel the moisture in your hand when you squeeze it. If it is either wet or has been wet & dried out the batts will lose their bounce back when compressed, in one case from the moisture in the second from the minerals left behind on the fibre glass when the water evaporates.

I doubt that is/was wet batts as unless you are in a very high atmospheric MC area, as the batts would need to be wringing wet for the wood frame not to be able to absorb the moisture and basically balance the situation.

Far more likely that it's one or two old culprits. Vinyl siding is notorious for leaks at all penetrations (doors/windows) it's the vinyl trim that sucks, this was a buddy build & I would look there first. For what it's worth when a customer wants vinyl we always use metal/aluminum trim, vinyl shrinks over time as well making even a good install problematic in the future.

Seals at contact points to the foundation, whether it's a slab on grade or a grade beam, the seal at the base where the wall meets the foundation needs to be flashed & sealed properly, otherwise it (water) simply runs in & finds a nice dry wall cavity to live in hence the condensation.

Edit: re-read & this was two years ago so no way on wet batts, even if they were ringing wet they dried a long time ago. Also you said that you could see the condensation on the VB. I take this to mean that the interior is not finished as of yet. CGSB poly (standard VB here) does not have any UV stabilizer in it as it was never intended to see the sun. It may have begun to breakdown in areas exposed to the sun even periodically & it only takes a pinhole to allow moisture in. Also when you have tracked this down don't forget to check all the seams to be certain you have a good seal between pieces & do put a good bead of sealant at the join between the bottom plate & the floor/foundation prior to placing the VB in that area, then wall paneling, trim excess VB at floor, then trim/baseboard (makes sweeping the joint easier). If the VB has begun to break down it will become brittle & is easily broken, also the sun yellows it (first sign of trouble).

So in summary three areas to check, vinyl trim around penetrations, seal & flashing at base of wall on exterior, integrity of VB.
 
Well said FC, how good is the VB taping on the interior side?
 
This Effing sucks. I don't want all this work. Agh.

It is the ONLY wall that shows condensation on the VB inside the garage. When I last removed the insulation, I saw NO signs of water whatsoever anywhere. And yesterday the VB was getting some condensation on the inside and it was sunny outside. The back wall faces south so perhaps there is something going on with the siding. I guess I will likely have to pull off the entire back wall of siding which is not something I had anticipated.

Yesterday I did find a sheet of OSB sheething that seemed to drop about 1/4 inch below the vinyl siding on that wall. Something tells me that if this gets wet (which it would do since the water runs down the siding and perhaps comes in touch with the OSB) , it sponges some water and transfers it to the wall cavities which in turn creates my condensation. I am 99% certain this has to be my problem. I wasn't there for that back wall sheathing (had to work that day) and I don't think either of the other walls have this issue. I will trim it off and perhaps look at sealing with...????? If the siding starter is a little higher I am guessing I should just seal it temporarily until next spring when I can pull the entire thing off and re-do it? Any latex/rubber spray or brushable suggestions?

Mind you, I did have a piece of crumbly roxul I was dealing with. 90% of the wall is Roxul and 10% is FG batts. I found the crumbly piece to be suspicious..and I mean crumbly. All the other pieces were rigid (as roxul is) but this one was falling apart all over me.

I will take pictures later today and post for your input.

Thanks for the help!!!! Truly appreciated.

Andrew
 
So I just went outside to see what is going on. There is no condensation on my VB this AM.

There is no water reaching my OSB when it rains. The Tyvek hands over it (even the overhamging part of the OSB).

I will wait and see if it was just a temporary problem yesterday. I remember when I had taken the insulation out of the wall cavities, the outside of the insulation)( OSB side ) was certainly warm to touch (that wall sits directly in the sun). But the inside was cool. That worked. My question: is it possible that R14 simply isn't enough insulation? Sounds possible to me. I built the walls with 2X4s (no intentions on insulating) but then decided to insulate. And this wall is the ONLY wall that has condensed (directly in the sun). I took some pictures and will upload in a bit...kids are going nuclear at the moment.

Andrew
 
Here are some pictures. I forgot to mention that the base plate of the wall is wrapped in a tar type of paper to prevent it from getting wet (water on the floor, etc).

You can see that maybe some moisture/humidity could from from under the outside of the OSB as it is not level...could this be the root of my problem?

Damn it all

Andrew
 

Attachments

  • IMG_5059 (Large).JPG
    IMG_5059 (Large).JPG
    77.2 KB · Views: 662
  • IMG_5056 (Large).JPG
    IMG_5056 (Large).JPG
    83.2 KB · Views: 648
  • IMG_5057 (Large).JPG
    IMG_5057 (Large).JPG
    54.3 KB · Views: 632
  • IMG_5058 (Large).JPG
    IMG_5058 (Large).JPG
    102.7 KB · Views: 579
Sounds to me like a flashing issue, is the tyvek taped and lapped correctly, any windows near the area?

The condensation on the VB when the sun is shining outside is called 'vapor drive', evaporating the moisture in the OSB (?) and having it condense on the coldest surface.
 
So then is this little bit of moisture normal/acceptable (OSB is the abbreviation for Oriented Strand Board or whatever you wanna call it - Chipboard, Aspenite, etc). I will wait and see if there is condensation again this PM, it is supposed to be sunny.

I am presuming the tyvek is taped at the seam. I always do. However my buddy did the back part for me (he usually knows what he is doing).

You can see there is a window in the middle of the back wall. However, there seems to be NO moisture coming in from anywhere....I may caulk the corners where the drip cap meets the J moulding (never know...) alongside the top of the window.

I just read about vapour drive and it makes sense.

Tyvek has a high Perm rating (permeable) and VB has a perm rating of about 1. I think I may know what is going on. I didn't strap my walls before installing the siding. Could this be the problem?

What can I do to prevent this from happening?

Andrew
 
Last edited:
SS. Your problem is at the base of the wall pic 3 of 4. No flashing or sealant visible where the wall joins the foundation in that photo. So as it stands any moisture collecting on the siding can run down & then enter the wall cavity at that join, or for that matter wick up from the ground & get in that way. Easily fixed.

Get a zip tool for vinyl siding (any hardware store) use the zip tool to remove/undo the lock of the bottom piece with the starter strip that should be behind it. Once you figure out how to unzip joints it's easy so be patient if you have not done this before. Ok bottom is unzipped & you can lift it up somewhat, a little trick is to use a few scraps of wood to hold it about 90* to the wall so you have room to work, better in warm weather. You will need to first use sealant on the join between the wall & foundation, apply a good bead & use a putty knife if you have to to get it covered well, don't worry it wont show. Now apply Tuck Tape over that bead of sealant so it does not contaminate you, your tools & materials. Now use a (colour matched) if you prefer piece of flashing to cover the transition from wall to foundation, 4" wide & centred on the transition, so 2" up behind siding & 2" below join. Ok if the starter strip was used the nails that holds the starter strip should be 2.5" up the wall so no need to remove nails just slide flashing under starter strip & nail in place centred on join. Note all flashings should be under the tyvek if you can manage it so any water entering later will simply run down & out between the siding & tyvek. If you wish you can use a wider piece of flashing & bury the bottom 2" or so in the ground for a more finished look. Wider flashing will tend to wave though so it will take a little more care & time, I always roll the bottom edge of the flashing, when doing one like this to make the flashing more ridged, just makes the job easier. There you are ready to re-zip the siding, use the zip tool or your fingers to roll the locking edge of the siding down so you can get it into the starter strip, once it starts it should zip back up with some pressure on your part, again better, easier in warm weather. I couldn't make it out in the photo's but every siding manufacturer states the need for sealant at all penetrations, so if you haven't done so get some colour matched caulking & seal joints between windows & the vinyl trim, the good stuff is a butyl or mastic product & will be about 2X the price of others (silicone) for example. 1-2 tubes will do the exterior. Hope this helps.

You, sir, are a God.
I have my work cutout for me but I will get it done. My problem is that I didn't put the outer sheathing flush with the floor. So it hangs over the slab by 1/2 inch. So my flashing will be 1/2 inch away as well, right?

Just curious; NONE of my other walls have this flashing nor do they have condensation....why is that?
 
Last edited:
Prevailing wind makes one wall wetter then the others, due to wind driven rain?
 
Yes. That back wall faces the south and it was blowing 50MPH++ over the past couple of days coupled with an inch of rain or so.

I just checked and there is barely any (maybe 4 square inches) of condensation under the VB. yay.

All that to say, time to get some good sealant and do it up. I love this forum! Now if only my knowledge can help others the way you guys have helped me...

Thanks again

Andrew
 
My problem is that I didn't put the outer sheathing flush with the floor. So it hangs over the slab by 1/2 inch. So my flashing will be 1/2 inch away as well, right?

Yes, however you can accommodate this by having the flashing bent to match this 1/2" offset, sort of a lazy Z shape. Not sure about where you are but Home Depot & other big box stores offer this service here, or a sheet metal shop can put it through a brake for you. This will have the added benefit of increasing the rigidity of the flashing. Other option is to install flat but put a 1/2" - 5/8" foam backer rod behind the flashing to prevent water/insect entry.


Just curious; NONE of my other walls have this flashing nor do they have condensation....why is that?

WG is right... very likely site specific conditions, however do flash the entire building, as over time it will only take a rain with wind from a different direction to expose other walls to the same conditions, likely with the same result.

No, not God (well maybe I could pretend to be Zeus that would be fun) just an old dog that has been to the rodeo a few thousand times. Enjoy the garage BTW it looks to be just the right size for a vintage Mustang. ;) Oh and of course a beer fridge. Must not forget the beer.:cool:
 
Last edited:
haha. I will do.

Sorry, no mustang. 2 strollers, 6 tonkas from the 1980s (used to be mine) and toys, decorations, blah blah blah. However, my next house will have a 2 car garage.
:)
 
Status
Not open for further replies.