Cathedral support box 'leaking'

  • Active since 1995, Hearth.com is THE place on the internet for free information and advice about wood stoves, pellet stoves and other energy saving equipment.

    We strive to provide opinions, articles, discussions and history related to Hearth Products and in a more general sense, energy issues.

    We promote the EFFICIENT, RESPONSIBLE, CLEAN and SAFE use of all fuels, whether renewable or fossil.
Status
Not open for further replies.

jeffee

New Member
Nov 1, 2007
143
Western Ma
Season's greetings, gang!
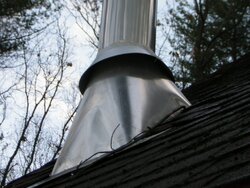
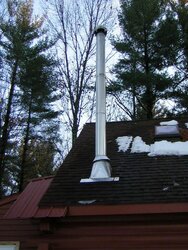
My install is less than a month old. New stove, new prefab ss chimney. My cathedral support box leaked out maybe a quarter of a cup of water this morning when I fired up my Jotul. It came from a corner of the box, inside the box, down, onto a rear corner of the hot (450 degrees) stove. Luckily I was there to rig up something to catch the water in. The chimney comes straight down through a little 1 or 2 feet high box enclosure in a 'corner' of my loft bedroom, into the cathedral support box, into the first floor with the stove. My roof is 12/12 steep.

Hopefully I can get the installer to come this week. Do you folks think that it is the storm collar? The installer put silicone caulk around the base of it, but I've heard that these can leak sometimes. I'm really hoping that it isn't a flashing problem.

Thanks again, and happy holidays!
 
Anybody have any experience with this happening? Any ideas? Thanks --
 
Could be either the boot or the flashing under/over your shingles. It could even be leaking at the opposite end of the flashing where it is coming into the home.

With the cold weather it is difficult for the shingles to lay down properly, so it will be a difficult repair without tons of caulk.
 
Thanks for the suggestions, Jim. Is the boot the storm collar?
 
OK, here goes ....
 

Attachments

  • DSCN0134.JPG
    DSCN0134.JPG
    114.8 KB · Views: 427
  • DSCN0135.JPG
    DSCN0135.JPG
    161.4 KB · Views: 468
Jeffie, I hade to fix a couple of leaky vents and a pipe on my roof. I used roofing cement and a trowl. It's black, soft with an oil base. It comes in a Qt, 1 Gal, or 5 Gallon size buckets at most hardware stores. I used to supervisor a roofing crew years ago out in Colorado. Lots of snow melt throughout the winter and spring. We never had to return to the same pipe twice. I would raise the collar up a few inchs, put a bead around the pipe roughly 1" to 2" wide and about 1/4" to 1/2" thick, lower the collar down into the cement and then put another layer around the outside of the collar. The flashing, if installed correctly, (the picture looks good, I'm refering to the shingles at the top of the flashing). If you can you need to easly lift up on the shingles at the top of the flashing and check to see if a layer of cement was put down across the top. Also check the small 3/8 " gap between each shingle making sure they are below the top edge of the flashing. If not a small layer of cement should be spread under it, then the shingles pressed down into the cement. Any cement that squeezes out should be smoothed out.
Make sure there is no exposed nails. If there is put a small amount of cement spread over the top of them. Then place cement on the top side and the left and right side. Top, I would start in the center of the flashing, work my way out to both sides and then on down to the bottom corners making sure the gap is completly filled. Make sure the cement at the top center of the flashing is a little thicker then the sides so water wont rest anywere in the cement. Then smooth the cement around both sides to the bottom corners.

Note: I'm new to this stove stuff which means I don't know the outside temp of a chimney. I'm guessing it gets no hotter then it would on a hot summer day with the sun beating down on it. If this is the case then your good to go with the roofing cement. If it gets really hot then you would eather have to find a high temp roofing cement or contact a Pro installer. Hope this helps.
 
How much attic space? In other words I am thinking the pipe could have condensated in the attic..or even frosted.. and melted when you fired it up. To me the install looks pretty good from what I can see. storm collar is proper. and the shingle cuts look good.
 
Ericjeeper, I didn't think about condensation on the pipe. Does this always happen? Is there a way to prevent it? I'll be putting in my chimney in 3 or 4 weeks.
 
bowhunter3714 said:
Ericjeeper, I didn't think about condensation on the pipe. Does this always happen? Is there a way to prevent it? I'll be putting in my chimney in 3 or 4 weeks.
I am not sure if it did happen in his case. But I read it to say that he had just lit it.. so pipe would have been cold a ways down into the house.
 
Thanks a lot for the help. I don't have an attic, the pipe goes through my bedroom loft, and there's only about 4 feet of pipe from the top of the living room to where it penetrates the roof. The person who built the 'box' in my bedroom also insulated the lower part of the flashing and inside the roof area with mineral wool (following the building inspectors advice). He did put in a vapor barrier on the inside walls of the 'box' in my bedroom loft. The dealer did come by (I wasn't home) to apply more silicone, I'm sure mainly to the storm collar. I don't think they used any type of cement or sealer on the shingles.

Thanks again!!
 
Hi again Jeffe,

With that amount of exposed pipe and being in western Mass. I hope the installer is going to or has added upper support against wind and snow load.
 
Hi Jim,
Yeah I never would have let them put that up without it! It's 12 feet above roof give or take, and there's a roof guys kit installed, it is a bit hard to see in the picture. Thanks again for the help!
 
12' requires two pipe braces. There should be no more than 5 ft of pipe without a support. How far is it from the peak to the pipe?
 
Thanks for your post BeGreen. It is very deceiving from the picture! Actually, it is possible they could have used a 3' section at the top, but it was very close, so they decided to go with the 4. I have also read that there should be a brace kit for every 5' of chimney above roof, from some Superpro instructions I found online. Alas, they only put 1 kit on.

Thanks again, I really appreciate all of the advice, suggestions, information, guidance and support you all have been giving me!!
 
If the pipe is 12', put one at 4' and leave the one at 8'. But by the photo, it looks like that is a 4' on top, then it appears there is a 3' below it. If that's the case, I'm guessing that this is more like 10ft of exposed pipe?
 
Yes, it's a 4' section on top, and a 3' section underneath that. It may be more like 11 feet above roofline -- I'm not sure where to start the measurement, at the lowest part of the pipe or the highest, or in the middle, where it exits out of the plane of the roofline. But you've got the right idea. Thanks again!
 
No problem. The last thing you want to be worrying about with a raging storm and a hot stove is that pipe. The second brace is cheap insurance.
 
Status
Not open for further replies.