Cement board hearth pad question (previously was "Foolish question")

  • Active since 1995, Hearth.com is THE place on the internet for free information and advice about wood stoves, pellet stoves and other energy saving equipment.

    We strive to provide opinions, articles, discussions and history related to Hearth Products and in a more general sense, energy issues.

    We promote the EFFICIENT, RESPONSIBLE, CLEAN and SAFE use of all fuels, whether renewable or fossil.
Status
Not open for further replies.
Hi all,
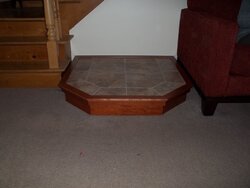
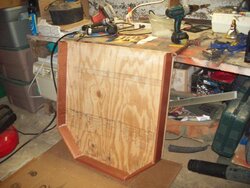
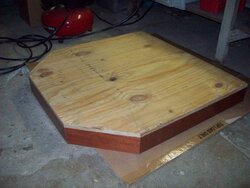
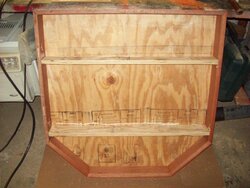
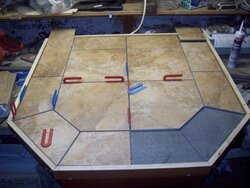
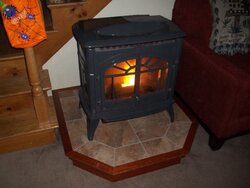
I've got a really foolish question. My hearth is starting to come together nicely - 1/2" plywood bottom, 2x4" frame, 3/4" plywood layer on top, 1/2" hardiebacker cement board and then porcelain tile. Question I have is - does it really make a difference what I use to attach the hardiebacker? Nails, screws? Do I need to pre-drill holes if I use screws? I'm wondering if whatever I use will transmit heat into the wood.

This is my first time and I want to do it correctly. There are a lot of posts about cement board but I haven't found anything that refers to what it is attached with.

Thanks all.
 
First, make certain that your hearth will meet the requirements the stove and code where you are requires, not all stoves have the same requirements and some codes are stricter.

Second, there is a assortment of thin set mortars out there that will bond the cement board to the plywood, there may also be some high temperature adhesives as well, this eliminates any need to put screws or nails through the cement board.
 
SmokeyTheBear said:
First, make certain that your hearth will meet the requirements the stove and code where you are requires, not all stoves have the same requirements and some codes are stricter.

Second, there is a assortment of thin set mortars out there that will bond the cement board to the plywood, there may also be some high temperature adhesives as well, this eliminates any need to put screws or nails through the cement board.

As my furry friend said, check your owners manual for hearth protection. Each stove needs something different. Better to have to much protection than not enough.

Eric
 
The wood pellet stove is a John Deere Wood Pellet Stove (HR-WPS02) and for all intents and purposes it's REALLY a St. Croix Prescott EXP. It came with the same manual and looks just like it. It also requires the same distances from combustibles. For floor protection it says:

"The stove must be installed on a non-combustible protective pad. May be placed directly on a non-combustible hearth. (68-0486 square) (68-0487 corner). Floor protection is required for the area directly under the stove and extending six (6) inches beyond the front of the stove."

My corner hearth is about 4.5ft x 4.5ft so it certainly extends beyond the front of the stove and it sits about 6inches high, made as I indicated above. I'm feeling pretty confident that it is non-combustible but was kind of curious about the cement board as I have NO experience with it.

Thanks again.
 
There should be and "R" factor for the pad.

Eric
 
Most of the cement board applications I have seen have been attached with scews. They have a special scew for the stuff that has a much different head on it and also it is protected from rusting. It is bigger in diameter and flat. I have never pre-drilled the board when I've installed it. A slight raised edge, or lip will be covered up by the tile mastic. I've never tried a drywall screw as I think the head on them wouldn't hold very well and nails I would think you would run the risk of breaking the cement board by hammering on it. Don't know if that is whay you were asking but there it is.
 
kinsman stoves [email said:
[email protected][/email]]There should be and "R" factor for the pad.

Eric

Hi Eric,
there is no "R" factor listed. It just refers to their hearth pad order #'s (presumably because they want you to buy one). I also couldn't find any information about the "R" factors of their hearth pads. Their website sucks when it comes to the pellet stove and it's accessories.
 
SmokeyTheBear said:
First, make certain that your hearth will meet the requirements the stove and code where you are requires, not all stoves have the same requirements and some codes are stricter.

Second, there is a assortment of thin set mortars out there that will bond the cement board to the plywood, there may also be some high temperature adhesives as well, this eliminates any need to put screws or nails through the cement board.

Hi Smoke,
could I use the same thin set mortar that I will be using to install the porcelain tile or must it be something specific?
 
I built a similar hearth pad a few weeks ago. Mine is 3/4 inch plywood, 1/2 inch cement backer board and porcelian tile with the plywood sitting directly on hardwood flooring. I used thinset for the backer board and the same thinset for the tiles. The Backer board manufacturer recommended the special backer board screws or glavanized roof nails. I read somewhere that regular drywall screws were not recommended. I used the nails because the backer board screws were longer than the thickness of materials I was using and I was afraid they would damage the hardwood floor. I wouldn't just use thinset and in your situation would use the backer board screws. Every thing I used was from Home Depot. See my build thread for pictures.
 
Here's some links with the info I based my decision on:

Durock Installation Guide (pdf)

Secure panels while adhesive is
still wet. Space nails or screws
8" o.c. and around perimeter.
Wood framing and countertops:
fasten with 1-1/2" 11-gauge hotdipped galvanized roofing nails,
or Durockâ„¢ tile backer screws
for wood framing or 1-1/4"
Durock tile backer screws
for wood framing or equivalent

How to Install Cement Backerboard for Floor Tile

Once you have the area fully covered with thinset you can lay your backerboards into the bed of thinset and screw it down. DO NOT use drywall screws! Let me repeat that – THAT! Drywall screws are not made, nor are they sturdy enough for your flooring. You will either bust the heads of the screws off or be unable to countersink them into the backerboard. Hard to get a tile to lay flat over the head of a screw.

Granted these are both for full floors and not just for a hearth pad but I figured 'why take any chances'.
 
nancyp said:
kinsman stoves [email said:
[email protected][/email]]There should be and "R" factor for the pad.

Eric

Hi Eric,
there is no "R" factor listed. It just refers to their hearth pad order #'s (presumably because they want you to buy one). I also couldn't find any information about the "R" factors of their hearth pads. They're website sucks when it comes to the pellet stove and it's accessories.

Call them up and ask point blank because you also need to be certain it meets the code where you live.

I always use a mortar or adhesive when maintaining insulation requirements. But that is just me, if you are outside of the footprint of the stove then I'd feel fine using metal fasteners.

These days there are tons of materials that can be used to fasten things together.

There are also many ways to attain the required insulation factor needed, use any that work.

A large sheet of cement board with tile bonded to it isn't about to slip and slide away even if you remove the stove and disco dance on it.
 
I don't think there is such a thing as a foolish question. Not here anyways! I actually thought it was a very good question. I honestly never thought about heat transfer through the build up of the hearth pad components. Thanks for asking so we can follow along and learn something new! :)
 
DonD said:
Here's some links with the info I based my decision on:

Durock Installation Guide (pdf)

Secure panels while adhesive is
still wet. Space nails or screws
8" o.c. and around perimeter.
Wood framing and countertops:
fasten with 1-1/2" 11-gauge hotdipped galvanized roofing nails,
or Durockâ„¢ tile backer screws
for wood framing or 1-1/4"
Durock tile backer screws
for wood framing or equivalent

How to Install Cement Backerboard for Floor Tile

Once you have the area fully covered with thinset you can lay your backerboards into the bed of thinset and screw it down. DO NOT use drywall screws! Let me repeat that – THAT! Drywall screws are not made, nor are they sturdy enough for your flooring. You will either bust the heads of the screws off or be unable to countersink them into the backerboard. Hard to get a tile to lay flat over the head of a screw.

Granted these are both for full floors and not just for a hearth pad but I figured 'why take any chances'.

EXCELLENT LINKS!! Especially the "Floor Elf"!
 
Well, I guess the plan would be:

1 - contact the code guy for my town (much to my disgust!). I didn't want to have to slog through the locals.
2 - I'll use the same thinset I'll be using under my porcelain tiles under the hardiebacker to seal it to the plywood.
3 - Tack the areas down outside the footprint of the stove with hardiebacker screws.


You guys have been great.
 
Sounds like a plan!

I would suggest 2 things. Like Jay said - that was a good question. I'd rename the thread to something appropriate so others can find and utilize it. And 2, what is that they say around here? Oh, yeah... No pics - it didn’t happen. :coolsmile:
 
I wavered a bit about to tell the town when I built mine.
In the end I'm glad I did.
The Inspector came out....Collected his $25.00 fee. And we talked about the stove for 1/2 an hour.
I think he wanted to buy one when we were done. Great Guy.

Good news was that my insurance company did a "surprise" walk through about a year later. They asked about the stove.
I showed them the Fire inspection sheet and they were happy with that.

In my case I built a hearth that you could change out an engine on. Way overkill.
Still only cost me about $100.00

If you read your manual it will tell you clearance to combustibles.
On most pellet stoves all it says is " under stove must be a non-combustible material" Basically a sheet of tin would meet that requirement.
You can dress it up however you like. Most pellet stove manuals I have seen don't specify an "R" value.

Good Luck,
---Nailer---

This is my post about it way back in 2007


[quote author="nailed_nailer" date="1197570923"]I just installed my Enviro EF-2 3 weeks ago on a hearth that we built.

Mine is in a corner location and we wanted a pentagon style hearth.

I cut 3/4" plywood to the size I wanted.
I then put a sheet of 24 gauge sheet metal over that.
Then I put a layer of 1/2" of Dura-Rock over that.
All of this was screwed to the existing floor.
Next we layed out a design in 4"X8" paving stones for a border.
Then we filled the border in with 6"x6" paving stones set in a running bond pattern from the front center.
The pave stones were buttered in with thin set.
For grout I used Polymeric sand http://www.groundtradesxchange.com/pavers/polymeric_sand.htm.
It hardens with water.
I didn't want to use regular grout due to the pave stones being so rough surfaced that I thought the grout would be hard to wash off the faces.

I then wrapped the hearth face in 3" of red oak trim.

We like it.
So far the sand has not moved. Even when vacuumed.
 
Code Shmode ..
 
Hello Nancy,
Just built one myself, first fire today, just in time for the October Noreaster. To fasten cemment board, the most common fastner are screws. They are coated which makes them like an exterior screw. Sheetrock screws are not recommended but they will work. As a commercial carpenter, I've installed it with regular drywall screws, but they snap easily depending on what they are being fastened to. I used zinc wood screws with mine. If they stick out slightly, no big deal, the mortar you'll apply to the top of it will hide any minor bump. I would not use thinset on the plywood and on top of the cemment board, unless you find a code that states it somewhere. My hearth pad is 3/4 inch pyro-guard plywood on top of a 1x4 hard wood base, cemment board screwed down with zinc 1 1/4 screws, thinset mortar, porcelane tyle. The whole thing is wrapped in makore.
https://www.hearth.com/econtent/index.php/forums/viewthread/78438/P110/

Good luck with yours! Post some pics when you're done so we can see your work! :)
 

Attachments

  • 030.jpg
    030.jpg
    47.9 KB · Views: 1,042
VCBurner said:
I would not use thinset on the plywood and on top of the cemment board, unless you find a code that states it somewhere.

Curious as to why you wouldn't use thinset between plywood and cement board.

Your hearth is beautiful. Mine looks like the stage at the NYS Fairgrounds!

Nancy
 
Likely because there are some thinsets that aren't rated for either bonding the materials or the temperature they may be exposed to.
 
nancyp said:
VCBurner said:
I would not use thinset on the plywood and on top of the cemment board, unless you find a code that states it somewhere.

Curious as to why you wouldn't use thinset between plywood and cement board.

Your hearth is beautiful. Mine looks like the stage at the NYS Fairgrounds!

Nancy
:lol:
EDIT: I looked up the hardiebacker manufacturer recommendation, they recommend both thinset under the backer board and fasteners securing it to the underlayment.
http://www.jameshardie.com/homeowner/products_backerboard_halfInch.shtml


As a carpenter I'm used to screwing off this substrate and I think the thinset would be more difficult and not needed, as well as adding to the weight of it. Unless you found that it would add necessary R value to your stove's specifications. I'm sure your will be a great finished product :) , sounds like you're doing you homework at least! I don't think the stove cemment is necessary regular mortar should be fine, but again it's entirely up to the codes in your specific situation. I used 3/4" pyro-guard plywood, which is probably not needed, but it was available and provided an extra added bonus to the fire resistance of the platform. My base is 1x4 hardwood with some 3/4" plywood cross members. i added the plywood rips in the specific spot where the legs would be in order to support the weight of the stove. It also has cemment board over the plywood and thinset mortar under the ceramic tyle. Here are some more pictures of the building of the hearth pad:
 

Attachments

  • 008.jpg
    008.jpg
    85.6 KB · Views: 828
  • 009.jpg
    009.jpg
    69.1 KB · Views: 1,128
  • 010.jpg
    010.jpg
    68.9 KB · Views: 1,006
  • 014.jpg
    014.jpg
    78.3 KB · Views: 799
  • 016.jpg
    016.jpg
    85.4 KB · Views: 828
  • 034.jpg
    034.jpg
    57 KB · Views: 934
VCBurner said:
nancyp said:
VCBurner said:
I would not use thinset on the plywood and on top of the cemment board, unless you find a code that states it somewhere.

Curious as to why you wouldn't use thinset between plywood and cement board.

Your hearth is beautiful. Mine looks like the stage at the NYS Fairgrounds!

Nancy
As a carpenter I'm used to screwing off this substrate and I think the thinset would be more difficult and not needed, as well as adding to the weight of it. Unless you found that it would add necessary R value to your stove's specifications. I'm sure your will be a great finished product, sounds like you're doing you homework at least!

I'm no carpenter but I do know how to google. ;-)

I used thinset between the plywood and backerboard based on this guys recommendation.

How to Install Cement Backerboard for Floor Tile

Beneath the backerboards you need thinset. Just about any thinset will work but you need to have it there. skipping this step virtually eliminates the purpose of preparing your substrate for tile – you may as well go grab that three dollar bag and start setting tile now. You need it – really.

He seems to know what he is doing and seems pretty sure of his recommendation. It made sense to me that a bed of thinset would make a better foundation and I was building in place so weight didn't matter. I'm sure either way would be fine.
 
DonD said:
I'm no carpenter but I do know how to google. ;-)

I used thinset between the plywood and backerboard based on this guys recommendation.

How to Install Cement Backerboard for Floor Tile

Beneath the backerboards you need thinset. Just about any thinset will work but you need to have it there. skipping this step virtually eliminates the purpose of preparing your substrate for tile – you may as well go grab that three dollar bag and start setting tile now. You need it – really.

He seems to know what he is doing and seems pretty sure of his recommendation. It made sense to me that a bed of thinset would make a better foundation and I was building in place so weight didn't matter. I'm sure either way would be fine.

Don, what this guy is talking about is true, you always treat the plywood substrate with thinset before putting down the cemment board. When you're doing a kitchen floor or a wide open area where discrepancies in plywood, especially old construction, can have major height differences at the seam of the plywood substrate. This is a way to eliminate height differences and have a more level surface upon which to lay your flooring tyle. In the case of a small plywood polatform it is way overkill. The plywood should not have any major height differences. Most hearth pads may have just one seam and are built on a perfectly level brand new frame or level floor. My hearth pad is just one piece of plywood no seems. He also mentions that the heads of the screws should not be sticking up, which is true. But minor imperfections on a small hearth pad will disappear under the thinset mortar that will eventually be under the tyle itself. Of course, it is better to be on the safe side and sinking all the screw heads is a better way to go about it, especially if you've never laid tyle flooring before. I've done hundreds of kitchen/bathroom floors and walls with many different types of sustrates and tyles. Herringbone patters, basket weaves and many other patterns with granite, marble, ceramic and porcelane. I have filled in gaps with the thinset as well as used it as a floor leveler, sometimes having to make a cemment floor that is very uneven into a level one. This is common practice in the flooring industry. His technique is great for big floor jobs but unecessary in the case of a small hearth pad. EDIT: Nancy, look up the info from the hardiebacker manufacturer in the end of the thread! They recommend both mortar under the backerboard and fasteners into it to secure it to the underlayment.
 
Here's another quote from Don's tyle link, which is a great one by the way!
The thinset is not meant to ‘stick down’, adhere, or otherwise attach your backerboard to your subfloor. It is simply put in place to eliminate voids beneath your backerboard. Once laid into the thinset bed the floor becomes a solid, fully supported substrate for your tile – that’s what you want.

Once you have the area fully covered with thinset you can lay your backerboards into the bed of thinset and screw it down. DO NOT use drywall screws! Let me repeat that – THAT! Drywall screws are not made, nor are they sturdy enough for your flooring. You will either bust the heads of the screws off or be unable to countersink them into the backerboard. Hard to get a tile to lay flat over the head of a screw.

:cheese:

Cheers,
Chris
 
Status
Not open for further replies.