Cherry busted my splitter

  • Active since 1995, Hearth.com is THE place on the internet for free information and advice about wood stoves, pellet stoves and other energy saving equipment.

    We strive to provide opinions, articles, discussions and history related to Hearth Products and in a more general sense, energy issues.

    We promote the EFFICIENT, RESPONSIBLE, CLEAN and SAFE use of all fuels, whether renewable or fossil.
Status
Not open for further replies.

infinitymike

Minister of Fire
Aug 23, 2011
1,835
Long Island, NY
I bought a used TW-5. It definitely saw a lot of heavy use, considering it came from a firewood processing company.
However alot of it has been replaced. The motor, the pump, the piston and the valve controls are any where from 2 to 4 years old.

Its been doing a lot of splitting since I got. But this piece was just to tough for it. It was bucked about 10 months ago so I don't know if that was the reason.
img0253fz.jpg

img0251gb.jpg

img0249rj.jpg

img0248ql.jpg

img0254xz.jpg

img0254xz.jpg
 
I would say that had to have been stress cracked prior because that cherry doesn't look to be that awful. Of course I wasn't there just making an observation.
 
  • Like
Reactions: ScotO
I spent a lot of time looking over it and the cherry is a piece that had a big limb coming off the side the cut is almost the length of the piece itself, so I 'm sure the grain must have been going in two directions. But I was studying the welds a little more and it looks like the front had been welded once before and not so well either.
 
I spent a lot of time looking over it and the cherry is a piece that had a big limb coming off the side the cut is almost the length of the piece itself, so I 'm sure the grain must have been going in two directions. But I was studying the welds a little more and it looks like the front had been welded once before and not so well either.

Well there you have it.....just hope you can repair it and get it strong enough to do the job you want.
 
Should be an easy fix Mike, no?
 
Yeah not to bad. I did just buy a used Lincoln arc welder. But considering my lack of welding experience and the need for this to be done with the utmost skill, I;ll be bringing this into my friend who owns a welding shop.
 
HEY How the the title of this post get changed?:confused:

The original title was Cherry busted my splitteer. Now it says First use of my splitter. Thats interesting do mods do that normally?
 
And now it says Busted my splitter on cherry.

Oh well you get the point.

Damn cherry. Or should I say damn inferior welding.
 
Sorry Mike, just fiddlin' around with that title gettin' to know the software. If it's not the way you want it now, open private convo with me and tell me what I can do for you. Also moved it to The Gear forum, because I think it belongs here rather than in the Wood Shed. No worries, I'm here to serve. Rick
 
  • Like
Reactions: onetracker
Sorry Mike, just fiddlin' around with that title gettin' to know the software. If it's not the way you want it now, open private convo with me and tell me what I can do for you. Also moved it to The Gear forum, because I think it belongs here rather than in the Wood Shed. No worries, I'm here to serve. Rick


Its all good, no worries. It was just really weird I blinked my eyes and it was gone
 
Well, I shoulda warned you...but I knew I'd have it back to the original in just a minute or two. Hope you can get that splitter fixed. Rick
 
Yah, +1 on having a pro stitch it up. Lots of force at that wedge.
 
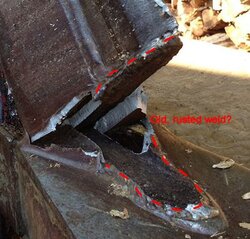
Maybe its the pic? But the front leading edge on the welds, dont look to be fresh (shiny) cracks? They seem to be old and dirty.
Which would indicate previous damage?

Still a Super nice machine and with the help of your buddy, it will be running like a champ in no time. (Unless you wanna trade for a 21 MTD Gold? :))
 
Yeah, the wedge could possible be a high carbon steel. That is 7018 welding rod territory which can be a bugger to work. My bet is that the original repair was done with a rod that could have potentially changed the characteristics of the wedge steel making it susceptible to failure. Looks like it really should have a bunch of prep work done to get the fit correct and then get it welded up. Heck - its just steel.

I don't think you can blame the cherry (poor cherry). There is literally no species that should break your splitter. That is what the pressure relief is for. The splitter should stop before is self destructs. You had a problem before you dropped that round on it.

Side note: the welds do not look to be a deep penetrating weld, nor very well splayed out (width) to begin with. I will bet that your welder buddy can make it stronger than it ever was.
 
  • Like
Reactions: ScotO
why is the wedge only a few inches high and the rest of that wedge plate is flat for what looks like a foot. Seems that if you ram that wedge into the round and it doesn't split you'd then just be playing the mash game between your flat ram and the flat end of your splitter. when that happens and you don't have a pressure relieve something has to give.
 
The pics are giving you an optical illusion, Danno. The rest of that wedge is also a V shape. The splitting wedge is a design used by TW quite a bit. The bottom extended part of the wedge is supposed to get the splitting action going. Being only a couple inches high and closest to the beam gives it a leverage advantage with less stress on the top of the wedge (supposedly).

Edit: I don't believe that they still use this design, but could be wrong.

Double edit: Whoops - I am wrong, you can see the design a bit better here:
http://timberwolfcorp.com/log_splitters/default.asp?id=24
 
Actually the design is that the little wedge in the bottom lines up with the four or six way splitter head that slips over the entire wedge and has a piston in the back to adjust the height.

The pictures are a little deceiving. The way that wedge is built is there is a solid one inch by 12 inch tall piece of steel that is beveled to make the cutting edge. That piece is welded to the frame first then a plate is added to both sides splaying out to make the wedge wider. They are welded to the beam horizontally and vertically to the first piece of solid steel. Then a cap is welded on and then a back plate.
 
Maybe its the pic? But the front leading edge on the welds, dont look to be fresh (shiny) cracks? They seem to be old and dirty.
Which would indicate previous damage?...

Ya, that is the way I call it too. Looks like the whole front half of the weld is cracked and rusted - which means it's been cracked for a long time. The back half is shiny and new which is what just failed. Shouldn't be too hard of a repair...lil grinding, lil welding good as new. I might recommend a little grinding on that wedge, too. Looks pretty blunt in the photos...a sharp edge will help reduce stress on the splitter...especially when knots / cross branches are in the way.
 

Attachments

  • rusted weld.jpg
    rusted weld.jpg
    67.6 KB · Views: 128
Actually the design is that the little wedge in the bottom lines up with the four or six way splitter head that slips over the entire wedge and has a piston in the back to adjust the height.

The pictures are a little deceiving. The way that wedge is built is there is a solid one inch piece steel that is beveled to make the cutting edge. That piece is welded to the frame first then a plate is added to both sides splaying out to make the wedge wider. They are welded to the beam horizontally and vertically to the first piece of solid steel. Then a cap is welded on in a back plate.

Very true when being used with the multi-split wedges. When used as a single wedge, the little bottom piece is the first contact with the wood. I have not spoken to any of their engineers, but would suspect that by design it is intended to take the brunt of the initial load and start to open up the wood. There really is no other reason for it to be there - even if using multi-split wedges on the straighter stuff.
 
Bummer
Looks like the cherry round got up high on the wedge, more stress on the stress cracked welds there.
Cut/grind it all the way off, level & square it up to fit flush on the beam & weld it back on.
Good practice for your welding training ;)
Old school technique: Leave about a 1/16th gap between the wedge & beam so you get good deep penetration with your new welds. 1st pass with a small rod, pretty hot setting, cap that weld with 7018 .
 
The pics are giving you an optical illusion, Danno. The rest of that wedge is also a V shape. The splitting wedge is a design used by TW quite a bit. The bottom extended part of the wedge is supposed to get the splitting action going. Being only a couple inches high and closest to the beam gives it a leverage advantage with less stress on the top of the wedge (supposedly).

Edit: I don't believe that they still use this design, but could be wrong.

Double edit: Whoops - I am wrong, you can see the design a bit better here:
http://timberwolfcorp.com/log_splitters/default.asp?id=24
That 'splains it all. I was hoping I just wasn't seeing things right. didn't make sense that it would have been through commercial use with a design like I was thinking. I learned something new today.
 
my splitter busted the cherry!:cool:
thats what I was hoping for but I guess not.:confused:
Bummer
Looks like the cherry round got up high on the wedge, more stress on the stress cracked welds there.


I laid the piece down wrong. I put the part that had a big limb cut off of it down on the bottom so it was a lot tougher for the wedge to penetrate and it started sliding up on the wedge. And like you said it cause a lot of stress .. Oh well like jags said its, only steel. But its above my welding skills (not that I have any). Been away camping for the week. But spoke to my guy and will bring it in on Monday. pics to follow.
 
Status
Not open for further replies.