For perspective, before I knew about hearth.com 2 years ago, my first notion about a woodstove was to move the pellet stove & just run a wood stove up the same chimney pipe
 I've gone through many iterations of what my stove & hearth would like, all in my head, and the end product is more or less what I first settled on once I was edumucated here on hearth in winter 2014. So today was the day
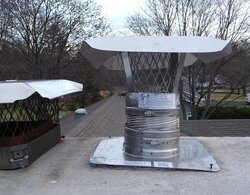
Got myself a helping hand and put the chimney liner in . Bought a 20' liner & tee kit, w/insulation, from Fireside Chimney Supply - called direct so I could get a longer tee snout & shorter insulation kit, since I really only needed 16' of liner. Great service & quick shipping, and the price couldn't be beat.
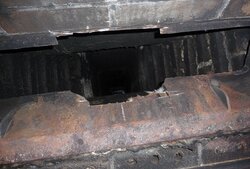
Cut the damper a few weeks ago - angle grinder was the trick. Wicked messy though! Existing chimney is 13x13 clay tile, so the insulated 6" liner went down easy & slide right through the damper.
A couple tap-cons on the top plate to keep things from sliding around on the RTV bead.
Waiting to be lined up!
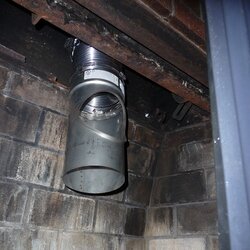
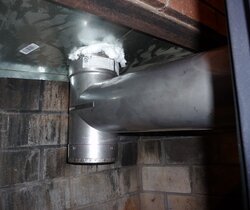
Stuffed the smoke shelf with a full batt of Roxul, slid a one-piece galvanized block-off plate in (after cutting and crimping an oblong hole with tin snips), and then horsed the snout in. Luckily I made a few extra cuts at the back of the block-off plate hole, since I ended up pushing back hard on the liner to squeeze the snout into place, and that extra give in the sheet metal came in handy.
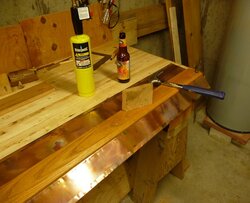
I was in need of a mantel shield, and I've had this sheet copper idea going for at least a year. Got a sheet of 12"x48" real cheap on ebay ($35!!), but it was rolled and real stiff. Learned online about annealing, so bought a MAPP torch and gave it a solid once-over. That softened it up enough to pound the bends in (1/2" crimp on each edge & a 45). No hand-brake, so here's my improvised set-up. Clamped the piece down with an oak board & walked a small block of oak along, tapping on the end-grain with the hammer all the way, adding 5-10 degrees of angle with each pass. Gave it a nice hand-worked look, which went well with the crazy splotchiness of the copper left by the torch. My wife was skeptical about the whole mantel shield idea, but she said "oh, it looks a lot better than I expected." I think that's a compliment ?!
?!
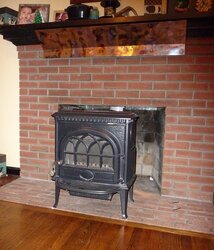
Bought a few copper-plated screws on ebay also (probably paid too much for those), used 5 nuts to get the 1" spacing requirement, and tacked it up onto the brick & mantel. Just have to put the hearth extender in front, seal the joint & I'm ready for the building inspector & my first burn!
And of course, couldn't have done ANY of this without this forum


 I've gone through many iterations of what my stove & hearth would like, all in my head, and the end product is more or less what I first settled on once I was edumucated here on hearth in winter 2014. So today was the day
Got myself a helping hand and put the chimney liner in . Bought a 20' liner & tee kit, w/insulation, from Fireside Chimney Supply - called direct so I could get a longer tee snout & shorter insulation kit, since I really only needed 16' of liner. Great service & quick shipping, and the price couldn't be beat.
Cut the damper a few weeks ago - angle grinder was the trick. Wicked messy though! Existing chimney is 13x13 clay tile, so the insulated 6" liner went down easy & slide right through the damper.

A couple tap-cons on the top plate to keep things from sliding around on the RTV bead.

Waiting to be lined up!

Stuffed the smoke shelf with a full batt of Roxul, slid a one-piece galvanized block-off plate in (after cutting and crimping an oblong hole with tin snips), and then horsed the snout in. Luckily I made a few extra cuts at the back of the block-off plate hole, since I ended up pushing back hard on the liner to squeeze the snout into place, and that extra give in the sheet metal came in handy.

I was in need of a mantel shield, and I've had this sheet copper idea going for at least a year. Got a sheet of 12"x48" real cheap on ebay ($35!!), but it was rolled and real stiff. Learned online about annealing, so bought a MAPP torch and gave it a solid once-over. That softened it up enough to pound the bends in (1/2" crimp on each edge & a 45). No hand-brake, so here's my improvised set-up. Clamped the piece down with an oak board & walked a small block of oak along, tapping on the end-grain with the hammer all the way, adding 5-10 degrees of angle with each pass. Gave it a nice hand-worked look, which went well with the crazy splotchiness of the copper left by the torch. My wife was skeptical about the whole mantel shield idea, but she said "oh, it looks a lot better than I expected." I think that's a compliment
 ?!
?!
Bought a few copper-plated screws on ebay also (probably paid too much for those), used 5 nuts to get the 1" spacing requirement, and tacked it up onto the brick & mantel. Just have to put the hearth extender in front, seal the joint & I'm ready for the building inspector & my first burn!

And of course, couldn't have done ANY of this without this forum


Last edited:

