Chimney restoration project

  • Active since 1995, Hearth.com is THE place on the internet for free information and advice about wood stoves, pellet stoves and other energy saving equipment.

    We strive to provide opinions, articles, discussions and history related to Hearth Products and in a more general sense, energy issues.

    We promote the EFFICIENT, RESPONSIBLE, CLEAN and SAFE use of all fuels, whether renewable or fossil.
Status
Not open for further replies.

Tinsnip

New Member
Jun 11, 2011
25
Central Maine
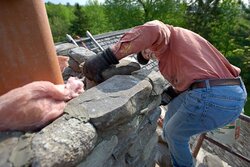
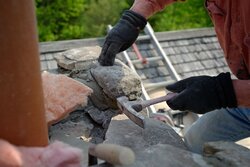
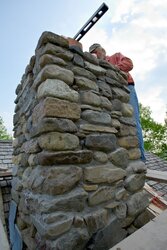
The old field stone chimney on the barn had begun to crumble and rock and mortar was falling off. The rest of the chimney below the roof line was fine. So a friend and I have been rebuilding the chimney and making it better. Here's a few pictures of work in progress. Since I took these, the whole thing is finished, including a poured concrete cap. Unfortunately, it's been raining almost non-stop since we finished and I haven't been back up to photo the finished project. But when the sun comes out, I'll post some more.

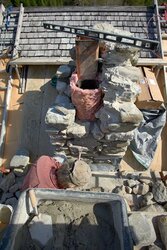
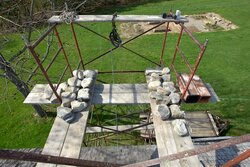
The first shows the tear down of the bad section, the next is the scaffolding arrangement to allow for easy access, and the last is about 2 feet from being finished.

Best,
Tinsnip
 

Attachments

  • BarnChimney4.jpg
    BarnChimney4.jpg
    66.5 KB · Views: 499
  • BarnChimney6.jpg
    BarnChimney6.jpg
    67.9 KB · Views: 502
  • Chimney#3.jpg
    Chimney#3.jpg
    102.5 KB · Views: 491
Wow that Kicks @ss!
 
The original structure was built in 1820 and served as a carriage barn at a roadside inn a few towns over. The previous owner of the property tore the timber frame down and brought it here, then put it back together in the late 70's early 80's.

The chimney has two flues (both clay lined-you can see the tiles in the tear-down photo), one for the first floor workshop's wood stove and one for the second floor mini-apartment's wood stove. It's a cool old building rebuilt using "old" methods. I felt it was worth preserving and maintaining so the extra work seemed justified.

Thanks!
Tinsnip
 
Looks really nice. I always liked the look of the custom stone over brick.
 
Man, I'm sore just thinking about that project. Nice work!
 
Thanks gents! Lots of Bengay helped.

Friday we're washing the stone and tearing down the scaffolding. I'm going to try and get a shot before we remove the top section. Then a bit of work on the stove inside and a test fire. I'm psyched!
 
Tinsnip said:
Thanks gents! Lots of Bengay helped.

Friday we're washing the stone and tearing down the scaffolding. I'm going to try and get a shot before we remove the top section. Then a bit of work on the stove inside and a test fire. I'm psyched!


You should be! Work like that is not done much anymore............ ;-)
 
Thanks!

I have to give most of the credit to my friend Cookie. He's a master when it comes to stone work. Several years ago he redid the stone chimneys on the houses along the carriage trails in Acadia National Park. For that job, every stone had to be marked before removal and replaced in exactly the same place when it was rebuilt. I learned a lot being his "mud man".
 

Attachments

  • Chimney#1.jpg
    Chimney#1.jpg
    112 KB · Views: 374
  • Chimney#2.jpg
    Chimney#2.jpg
    76.1 KB · Views: 375
Cant wait for the final pic with the smoke flying!
 
I love seeing that kind of craftsmanship and dedication to detail. Bravo, and thanks for showing us those pics. More to follow, I hope. Rick
 
What purpose does the fiberglass insulation serve?
 
The fiberglass serves as a barrier between the mud and the clay liners while laying the rock. Once everything has set up and you fire the chimney for the first time, it will probably melt leaving an air gap between the chimney stone and the tiles.
 
Sounds good. That's a nice looking chimney.
 
Here's the last shot of the finished chimney from up on the staging. It'll be a while before I get to get it breathing smoke, still have the stove to finish. Thanks for everyone's interest and comments!

Tinsnip
 

Attachments

  • Chimney-final129.jpg
    Chimney-final129.jpg
    67.2 KB · Views: 267
Damn nice job! How you gonna keep the birds and the bees out? Is there some sort of screen over the flue that can't be seen from the side pic? Rick
 
Thanks! No screens at this point. If birds/bees become a problem, will deal with it at that point. First time the chimney has ever had a cap. One step at a time I guess.
 
Thats awsome! Great job on the re-build. I love the looks of the stone chimneys.
 
Chimney looks great! Love the timeless permanent look of stone myself! A screen placed inside under the cap would not affect the looks and keep out undesirable birds, mice, bees etc..
Just a thought..

Ray
 
Thanks! And you guys are probably right about the screen. I've been so focused on getting the stone done, I hadn't thought about it.

On the other hand, this is a barn. As such, it's anything but critter-proof. The nature of the structure is somewhat "open" in the sense that it's simple board-on-board construction. Mice, bees, flys, etc., are all part of the deal--there are lots of nooks and crannies where they can find an entrance. In the past I've had a bird fly/fall down the chimney and get trapped. It's not fun to think about their plight, but it's pretty rare.

The chimney on the house is a different story though. That's the next project (in the fall) and I'll be putting on a more traditional cap with a wire mesh barrier to prevent critters from entering the building.
 
Tinsnip said:
Here's the last shot of the finished chimney from up on the staging. It'll be a while before I get to get it breathing smoke, still have the stove to finish. Thanks for everyone's interest and comments!

Tinsnip

Awesome looks like its been there all along!
 
Beautiful job, it looks fantastic. Is that lead flashing on the base?
 
Hey thanks! Yes, that's the lead that was part of the original chimney. We tore down the stone to just above it and re-sealed it as a last step.
 
Status
Not open for further replies.