Clearance to Combustibles

  • Active since 1995, Hearth.com is THE place on the internet for free information and advice about wood stoves, pellet stoves and other energy saving equipment.

    We strive to provide opinions, articles, discussions and history related to Hearth Products and in a more general sense, energy issues.

    We promote the EFFICIENT, RESPONSIBLE, CLEAN and SAFE use of all fuels, whether renewable or fossil.
Status
Not open for further replies.

BugDoc

New Member
Oct 5, 2007
11
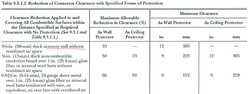
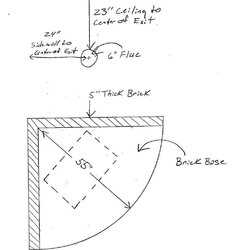
I asked a few questions in this forum on stove installation a couple of weeks ago, all of the responses that I got were great, but unfortunately I still don't have everything straight in my mind. This is primarily due to the fact that the more folks I talk to about stoves the more confused I get!!! What I have is a corner hearth that was existing when we moved in last year. I would like to use this space as is without having to start all over. As you can see from the photo, the hearth is lined with brick, but the brick doesn't have an open air space behind it. Let me rephrase, I believe that it does have an air space as the brick is not tight to the wall, but the space is sealed at the top and bottom with mortar as would be required to reduce clearances. I was at a stove dealer last week and was explaining my set up and the guy there tells me that my clearances will have to be from the front of the brick since the brick will conduct the heat to the wall behind. The first guy told me that I could include the width of the brick as part of my clearance measurement. Who is right??? How is the set up that I have any different then the premade hearth pads that they sell and you throw down over a combustible floor? Any inspectors or professional installers out that can help? When I call the city they tell me whatever the installation instructions for the stove are is what they go by. The city inspector implied over the phone that the width of the brick could be included in the clearance to combustible distance. While this would greatly increase my stove options, I don't want to include it if it is not a safe thing to do. My families safety is my 1st priortiy. Any and all help would be greatly appreciated. Thanks again.
 

Attachments

  • DSCN1898[1].JPG
    DSCN1898[1].JPG
    122.1 KB · Views: 785
The brick doesn't insulate, the air gap does. If you believe that there is an air gap, all that may be required to get it to conform to code would be to strategically remove some grout to allow air flow. The purchased floor protectors provide only minimal protection from falling embers. There do not really provide anything significant in the way of insulation. The stove maker has to design the bottom of the stove and the leg height to achieve the neccersary protection for the floor from radiant heat. Some stove makers do a good job of it and others (Vogelzang) do not. You can pick this up by looking for the requires R vakue of the floor protector in the stove literature. The minimum is 1/2"of millboard with a sheet metal surface, although Morso sells plate steel floor protectors as well as ones made from glass. Thats because they have designed their stoved to reduce radiation toward the floor.

If youre worried about heating the floor, check for availability of a heat shield underneath the stove for the models you are interested in.
 
I dont think his concern at this point is with the floor protection but with the CTC to the walls. As i see it the CTC is to the 1st combustable behind the brick. Look at a Quad 4300, 2" to combustables on a corner install. Floor protection is another mater you may have a problem there
 
Here is the answer I think you are looking for:

1. The dealer is wrong - the inspector is correct - clearances are to the ORIGINAL combustible wall.
2. Even solid brick against the wall reduces clearances by 33% (1/3), although you may not need this with modern stoves, so #1 should help you enough.
 
Webmaster said:
2. Even solid brick against the wall reduces clearances by 33% (1/3), although you may not need this with modern stoves, so #1 should help you enough.

FYI, there is a minimum measurement it can be reduced to. Most modern stoves already are at or below this minimum amount allowed by using wall shields. Just didn't want anyone to get the wrong idea.
 
Part of the question is what does the wall behind the bricks consist of?

By the rules as I understand them...

1. If it's an outside wall made from concrete or other non-combustibles, and there is no combustible material between the brick and the concrete, then the wall is considered non-combustible and you have NO clearance requirements as such (though it is a good idea to have some space to avoid overheating the stove) Downside of this is that the wall will mostly just suck up the heat from the stove and increase your heat requirements.

2. If it's a combustible wall made from wooden studs, sheetrock, etc. w/ a brick veneer over it, OR if there is combustible material between the bricks and the non-combustible outside wall, then you need to look at the details of the wall construction, including the spacing and ventilation.

2A. If you have at least 1" of space between the bricks and the combustibles, AND there are openings top and bottom, then it counts as an NFPA fire protection wall, with all the reduced clearances that gives you. IF you have an NFPA wall, then the reduced clearances are measured from the original combustible wall surface.

2B. If the bricks are touching the original wall, OR the space between the wall and the bricks is less than one inch, OR you don't have ventilation openings top and bottom, then it is NOT an NFPA wall, and the clearances are measured from the outside surface of the bricks - the reason being the inspector doesn't have X-ray vision, and can't see just how far it is to the combustible material, so measurement is to what can be seen.

That said, I believe some inspectors will let the thickness of the bricks not count, and measure to where they assume the combustibles would be if they could see them, but this is up to the inspector.

Also if you think there is at least a one inch gap, then strategically knocking out or drilling holes in the bottom row of bricks, and removing some of the mortar at the top may be enough to give you the NFPA wall status, and the reduced clearances of 2A.... Looking at the picture some more, it might be neatest to drill holes in the bottom row of bricks and the top row just below the "mantel" bricks that stick out.

You will also need to think about your clearances on the stove pipe to the wall above the bricks, and possibly to the ceiling overhead.

Gooserider
 
Goose, where do you get #2B from?

I fear we are confusing the fella. Clearances are usually given to the original combustible wall AND a solid brick wall is clearance reducing as per NFPA enclosed. Note - as said earlier, NFPA usually does not come into play since most modern stoves are listed for closer clearances without wall protection....

Even if it was not, the first instance would still be true and clearances would be to the original combustible wall unless the manual specifically said otherwise....

Please explain.....
 

Attachments

  • nfpawall.jpg
    nfpawall.jpg
    43.7 KB · Views: 676
BugDoc, for peace of mind you could remove a couple bricks at the top and bottom to increase convective airflow behind the brick. It would be a PITA, but can be done.

What stoves are you looking at? There are several fine stoves with good built-in rear shielding, that have good corner clearances and will not compromise your safety or heating needs.
 
Webmaster said:
Goose, where do you get #2B from?

I fear we are confusing the fella. Clearances are usually given to the original combustible wall AND a solid brick wall is clearance reducing as per NFPA enclosed. Note - as said earlier, NFPA usually does not come into play since most modern stoves are listed for closer clearances without wall protection....

Even if it was not, the first instance would still be true and clearances would be to the original combustible wall unless the manual specifically said otherwise....

Please explain.....

This seems to be what Elk keeps saying - also all the stove manuals that I've read talk about the 1" space clearance reduction method, I haven't seen ANY that give credit for any sort of construction other than that, such as bricks w/o space, or the metal over insulating material. Considering that brick has a pretty low R-value, it makes sense to me.

Perhaps if using the NFPA numbers for a stove without other values your brick wall reduction would count, but my understanding is that if the manual gives lower numbers, then only the techniques mentioned in the manual are acceptable.

Gooserider
 
A PE or Napoleon stove with it's close clearances would look just fine on that hearth.
 
Thanks for all of the replies. To be honest, I am still trying to digest all of them. It seems as if even among the experts on the site, that there is a difference of opinion. I am going to go thru each comment more throughly tonight and provide some additional information were needed and hopefully that will lead to a concensus amoung those providing insight. Thanks again!! Denny
 
Bug Doc: Why don't you list the stoves that interest you to begin with ? Many modern stoves already have heat shields built in and so it may not matter what your hearth is made of as long as it is not gasoline... The only time the clearances will really matter to you is if you were a collector and wanted to fit an antique parlor style stove or any other unlisted stove. If this is not what you have in mind, tell us what stoves you like and the hearth dimensions and you can get the answer you really want quicker than you got these responses so far....
 
KeithO said:
Bug Doc: Why don't you list the stoves that interest you to begin with ? Many modern stoves already have heat shields built in and so it may not matter what your hearth is made of as long as it is not gasoline... The only time the clearances will really matter to you is if you were a collector and wanted to fit an antique parlor style stove or any other unlisted stove. If this is not what you have in mind, tell us what stoves you like and the hearth dimensions and you can get the answer you really want quicker than you got these responses so far....

Great idea. I'll measure the dimensions that I have to work with as well as the stoves that I am considering. I'll post what I have in the morning.
 
Below is a rough diagram of the hearth that I have. As close as I can figure to maintain 16 inches in front of the stove and the proper CTC in the corners that I need a stove that is not very deep. The ones that I have looked are the Englander 13 and Endglander 12 stoves. I would prefer to go with the 13, but it has larger clearances for a corner install than a 12. If I have to measure my CTC from the face of the bricks it won't leave enough clearance in the front (it wouldn't be a simple matter to extend the hearth). If I can take my CTC measurement from the drywall behind the bricks a 13 would work. Does anyone know of anyother stoves that are about 14-15 inches deep that I might consider?

Also, there were questions concerning clearances to the side wall and ceiling. I have those measurements on the diagram as well and I think I am O.K. in that department.
 

Attachments

  • Hearth.jpg
    Hearth.jpg
    49.2 KB · Views: 550
Looks like you are OK in terms of clearances for the exit. Possibly you might need to go with double wall pipe instead of single, but probably not, it would depend on just where the flue exit was on the stove you ended up with, and what spec the stove had for pipe clearance. I would be surprised if you had a problem.

Note that per the latest NFPA code, your clearance in front of the loading door should be 18", not 16" - this is a recent change that most of the stove manuals haven't caught up with yet, and there are apparently differences of opinion among inspectors as to whether or not the 18" number overrides the 16" number in the manuals, some use one, some use the other. (IMHO it is safer on general principles to go with the 18" number or better)

Why do you say that it would be a problem to extend the hearth? I agree that it would be difficult to bring the brick work out further, but I just finished building an extension onto the raised brick hearth in our house by cutting out the carpet and subfloor, then putting down a layer of Durock and slate tiles - The result is essentially flush with the floor, and looks really nice. I can't tell for sure what is on your floor in front of the hearth, but from the one little corner of the floor that shows in your original picture, it looks like wood? If it's a basement, I assume there is a slab under it? It should be a fairly simple matter to cut the floorboards back an appropriate amount, and build back up to be flush with the existing floor. It would be a minor but solvable problem to match the curve of the existing hearth - I'd go with slate or other natural stone, or possibly a through colored tile, and cut to fit w/ a tile saw. Extend the hearth out 12 or 18" (IMHO a wide band works better than a narrow one, looks like a "design statement" rather than a hack to meet code :coolgrin: ) and you have no more clearance problems - bring the stove forward as much as you need to get it on the back, and still have plenty of room on the front side.

Gooserider
 
Gooserider said:
Looks like you are OK in terms of clearances for the exit. Possibly you might need to go with double wall pipe instead of single, but probably not, it would depend on just where the flue exit was on the stove you ended up with, and what spec the stove had for pipe clearance. I would be surprised if you had a problem.

Note that per the latest NFPA code, your clearance in front of the loading door should be 18", not 16" - this is a recent change that most of the stove manuals haven't caught up with yet, and there are apparently differences of opinion among inspectors as to whether or not the 18" number overrides the 16" number in the manuals, some use one, some use the other. (IMHO it is safer on general principles to go with the 18" number or better)

Why do you say that it would be a problem to extend the hearth? I agree that it would be difficult to bring the brick work out further, but I just finished building an extension onto the raised brick hearth in our house by cutting out the carpet and subfloor, then putting down a layer of Durock and slate tiles - The result is essentially flush with the floor, and looks really nice. I can't tell for sure what is on your floor in front of the hearth, but from the one little corner of the floor that shows in your original picture, it looks like wood? If it's a basement, I assume there is a slab under it? It should be a fairly simple matter to cut the floorboards back an appropriate amount, and build back up to be flush with the existing floor. It would be a minor but solvable problem to match the curve of the existing hearth - I'd go with slate or other natural stone, or possibly a through colored tile, and cut to fit w/ a tile saw. Extend the hearth out 12 or 18" (IMHO a wide band works better than a narrow one, looks like a "design statement" rather than a hack to meet code :coolgrin: ) and you have no more clearance problems - bring the stove forward as much as you need to get it on the back, and still have plenty of room on the front side.

Gooserider

The hearth is in the basement and the floor that is currently installed in wood laminate flooring. Perhaps you are right that extending the hearth is the best option. A buddy of mine made the same suggestion, but I was hoping to avoid it. The big benefit would be that it would allow me to go with any stove that I wanted!!! Anyone out there try to cut installed laminate flooring in a semi circle?? Perhaps it isn't that difficult, but I don't want to hack it up. Mangled floor=Unhappy wife=Me on the couch!!!
 
Hey BugDoc,

The Pacific Energy Vista, Vista Classic and Alderlea T4 models will all go on a corner hearth with a diagonal corner-to-front-edge measurement of 50", if installed with double wall connector pipe. You'd have 5 inches to spare, even if you measured from your unventilated wall shield (as our local inspectors would all do). More clearance info:

Pacific Vista: http://www.chimneysweeponline.com/cpacvist.htm
Vista Classic: http://www.chimneysweeponline.com/cpacvisc.htm
Alderlea T4: http://www.chimneysweeponline.com/cpacaldert4.htm
 
cut it with a rotozip if you have one or a jig saw with a down cutting blade. Masking tape will help too.
 
thechimneysweep said:
Hey BugDoc,

The Pacific Energy Vista, Vista Classic and Alderlea T4 models will all go on a corner hearth with a diagonal corner-to-front-edge measurement of 50", if installed with double wall connector pipe. You'd have 5 inches to spare, even if you measured from your unventilated wall shield (as our local inspectors would all do). More clearance info:

Pacific Vista: http://www.chimneysweeponline.com/cpacvist.htm
Vista Classic: http://www.chimneysweeponline.com/cpacvisc.htm
Alderlea T4: http://www.chimneysweeponline.com/cpacaldert4.htm

Thanks. I hadn't realized that those stoves have such close corner clearances with double wall pipe. Do they require any additional shielding for those tight CTCs?
 
They are already double jacketed. Most of the heat is radiated out front.
 
BugDoc said:
The hearth is in the basement and the floor that is currently installed in wood laminate flooring. Perhaps you are right that extending the hearth is the best option. A buddy of mine made the same suggestion, but I was hoping to avoid it. The big benefit would be that it would allow me to go with any stove that I wanted!!! Anyone out there try to cut installed laminate flooring in a semi circle?? Perhaps it isn't that difficult, but I don't want to hack it up. Mangled floor=Unhappy wife=Me on the couch!!!

I would agree with idea of using a Rotozip or other equivalent, the big challenge would be cutting deep enough to go through the boards w/o hitting the concrete underneath and doing in the blade. I suspect a Rotozip would do that best. I would probably try to make a guide of some sort to follow in addition to taping the floor boards just to make sure you didn't slip.

The other item that might be a challenge (I don't know as it isn't something I've looked into) is finding the right transition peice to go from the extension to the floating floor. It's easy on a straight edge, but I don't know what the options are for doing a curved transition - you might need to custom make something, or use lots of short peices. Maybe check with the flooring manufacturer to see what they reccomend.

Gooserider
 
Pergo type floors are nasty to cut. They will dull any carbide blade quickly. You will even see sparks due to metallic composition

good news is it still can be cut probably burn out a roto zip tool. I would use a skill saw on any straight cuts with a guide board to ensure a straight cut and set the saw just shy of the blade penetrating the flooring thickness. At that pint I would finish it up with utility knife making multi passes
Remove all straight cut pieces first then elevate the curb cut radius with scrap blocks getting it off the floor and use a carbide tip router and setup a guide to prevent an over cut

There are snap in plastic edges that can clean up the cut. The masking tape suggestion is a good one, it will lessen the top laminate surface from chipping.

Good luck and be patient
 
OK
I have a Question and Hearthstones answer and to try to clear up the debate
Hearthstone Bennington Manual stated to combustible the clearance to Unprotected surfaces are 16" to rear of stove with double wall pipe.

With Protected Surfaced (NFPA211) the clearance to combustible is 9" (just like the charge above shows for air gap Wall)

Does 4" of solid brick on a wall noAir gap count in for Hearthstones (NFPA211) reduced clearance to go as low as 9"?

Jim at Hearthstone told me NO you must have an 1" Air gap or Better to get the 9" reduced clearance.

You can go down to the NFPA211 3 1/2" of masonry Listing of 12" to combustable.
You measure to the combustible that is behind the brick. Deducting the thickness of the non combustible to your overall 12" reduced clearance with 3 1/2" or more of masonry.
 
Status
Not open for further replies.