
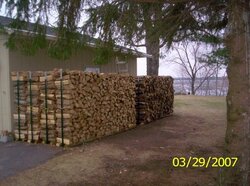
What does everyone do with this? Last year I stacked my wood in two really long rows that were two rows deep. Which equaled about 5 cord. I had them on pallets and covered them with metal roofing. This seems to be standard practice in my area. Others do not cover the wood for the first month and then will cover it..
Covering Firewood
- Thread starter Henz
- Start date
-
Active since 1995, Hearth.com is THE place on the internet for free information and advice about wood stoves, pellet stoves and other energy saving equipment.
We strive to provide opinions, articles, discussions and history related to Hearth Products and in a more general sense, energy issues.
We promote the EFFICIENT, RESPONSIBLE, CLEAN and SAFE use of all fuels, whether renewable or fossil.
You are using an out of date browser. It may not display this or other websites correctly.
You should upgrade or use an alternative browser.
You should upgrade or use an alternative browser.
- Status
- Not open for further replies.
Eric Johnson
Mod Emeritus
I leave it uncovered until late September or early October. I wait for a dry spell, and then put a tarp over the wood. The best approach is to move it indoors, but that's not always practical.
I think you get more drying without a cover early on in the process, but you need to keep the water off the wood for at least a month before you start burning it, in my experience. And that's in the Adirondacks. You can probably push it back a month if you live in a more reasonable climate.
I think you get more drying without a cover early on in the process, but you need to keep the water off the wood for at least a month before you start burning it, in my experience. And that's in the Adirondacks. You can probably push it back a month if you live in a more reasonable climate.
yeah, I may try not covering it this year and see what happends. My wood was pretty dry last year so I am not complaining but I know that sun beating down on it has gotta help. I am alittle behind this year. I ahve about 2-3 cord split and about another 5 cord bucked into rounds and thats as far as I have got. And, I wont be able to get to splitting that until next weekend...
velvetfoot
Minister of Fire
How does that metal roofing work out for you?
I've got a couple of sheets left over.
How do you work the metal roofing when you retrieve wood from it in the winter?
I've got a couple of sheets left over.
How do you work the metal roofing when you retrieve wood from it in the winter?
Turner-n-Burner
Member
Any pictures of that setup? I'm still trying to figure out how to cover. I didn't cover at all last season, and there was a definite difference in the way the wood burned even a couple of weeks after a rain....
velvetfoot
Minister of Fire
Eric Johnson
Mod Emeritus
If you're smart, you'll shovel or otherwise remove the snow from the tarp before going after the wood, but I rarely do. What usually happens is that the snow bridges up and won't collapse until you're directly underneath it, or you have a pile of dry wood lying right in its path. Then you spend the rest of your time brushing off the wood before hauling it into the house.
My goal has always been to have enough wood under a roof (like in the basement or the garage) to get through even the worst winter. I was there for a few years, but then we moved and I'm slowly getting there. The new boiler should get me back on track, hopefully even with a little wood to spare.
My goal has always been to have enough wood under a roof (like in the basement or the garage) to get through even the worst winter. I was there for a few years, but then we moved and I'm slowly getting there. The new boiler should get me back on track, hopefully even with a little wood to spare.
jpl1nh
Minister of Fire
When I have time and or money, I'm building me a WOOD SHED! A nice one, I mean one that even looks nice. Lots of air movin through, room for at least a winters worth of wood, why, maybe even for two years worth. I can see it now, the small building is the house, the LARGE building is the wood shed ") . I always think nicely stacked wood looks really good, but no matter how I cover it, then it just doesn't look so good anymore. The wind blows the friggin tarps off, the snow's a pain in the butt, and I ain't movin south neither! A WOOD SHED, yup that's what I'm gonna do when I get rich and.....
. I always think nicely stacked wood looks really good, but no matter how I cover it, then it just doesn't look so good anymore. The wind blows the friggin tarps off, the snow's a pain in the butt, and I ain't movin south neither! A WOOD SHED, yup that's what I'm gonna do when I get rich and.....
. I always think nicely stacked wood looks really good, but no matter how I cover it, then it just doesn't look so good anymore. The wind blows the friggin tarps off, the snow's a pain in the butt, and I ain't movin south neither! A WOOD SHED, yup that's what I'm gonna do when I get rich and.....northcountry
New Member
Only reason I have a wood shed is my neighbor had an 8 x 8 + lean-to at the edge of a small pasture where the goats would congregate when it rained.
He wanted to get rid of it, so i took it apart, drove it on the back of my pickup to my place, sunk 4 x 4s into the ground at the corners and we lifted the roof on it and attached the sheets of T-111 that made up the three walls.
I built four 8 ft firewood racks 5 ft tall and put them in there and I try to have it loaded by spring for the next winter.
Holds close to two cords (I only ever burn three or so.)
The rest goes behind the shed covered by tarps that are weighed down by pine logs.
I have an iron woodring in the garage (@ 4 ft diameter) that gets loaded about twice weekly during the winter - keeps me moving for those three or four coldest months.
The wife too....
Highbeam
Minister of Fire
I have a problem with a woodshed. If you do your best to cut and split your trees in the early spring and then put that wood in the shed to fill the shed then do you not slow its drying?. Meaning if you put that wood directly into the shed wil it ever dry? Will it just take longer to dry? Must you stack your wood in long skinny rows to dry before restacking in the woodshed for long term storage? I don't mind stacking wood but I certainly want to minimize the number of times I must move each piece. Burning wet wood is no fun.
jpl1nh
Minister of Fire
Great questions! Seems to me that drying wood optimaly and storing wood optimaly are slightly different matters. And like you say, no matter how mauch you like stacking, who wants to do that twice? It seems to me that a well designed wood shed with lots of flow through air, while perhaps not drying as fast as a single row, full sun stack, nonetheless would still dry wood perhaps 75-80% as fast and would certainly keep it dry much better in the long run. Guess that means the ideal shed would hold two years worth. Id' still probably try to leave my wood outside in the sun and wind for the first summer, maybe I wouldn't spend much time stacking it though. Then move it into the shed and stack it for the winter after the upcoming one.Highbeam said:I have a problem with a woodshed. If you do your best to cut and split your trees in the early spring and then put that wood in the shed to fill the shed then do you not slow its drying?. Meaning if you put that wood directly into the shed wil it ever dry? Will it just take longer to dry? Must you stack your wood in long skinny rows to dry before restacking in the woodshed for long term storage? I don't mind stacking wood but I certainly want to minimize the number of times I must move each piece. Burning wet wood is no fun.
Hey, I am glad that I started this post, great questions etc. Well, I get all my wood cut/split/stacked by mid May. It is in a pretty sunny spot and I usually leave it uncovered until mid June and then cover it with 8' sheets of metal roofing. On top of the roofing I place decent sides rocks to keep it from blowing off. Two rows deep of wood I usually use two sheets overlapping and slightly sloped to one side therefore allowing the rain to simply run off. Sometimes I take scrap 2x4's and run it on top of the wood before putting the metal on allowing some distance between the wood and actual metal.
Come mid september, I use my ATV and dump trailer and haul it down to my house (about 500'). I have an attached screen porch/patio (concrete floor) where I stack it full of wood. The patio is directly off my kitchen and from the kitchen its a quick firewood carry with my canvas carrier to my wood ring located next to my stove. IT is really nice to be able to load the ring in my slippers never having to go outside in the elements! I can stack about 4-5 cord on the porch. I will basically keep replaceing what I use off the porch with ATV trailer loads until I can no longer access my woodpile with the ATV, so basically I start burning it from the porch in January depending on the snow..
Come mid september, I use my ATV and dump trailer and haul it down to my house (about 500'). I have an attached screen porch/patio (concrete floor) where I stack it full of wood. The patio is directly off my kitchen and from the kitchen its a quick firewood carry with my canvas carrier to my wood ring located next to my stove. IT is really nice to be able to load the ring in my slippers never having to go outside in the elements! I can stack about 4-5 cord on the porch. I will basically keep replaceing what I use off the porch with ATV trailer loads until I can no longer access my woodpile with the ATV, so basically I start burning it from the porch in January depending on the snow..
Hey Guys,
For me, I am leaving all my wood out in direct sunlight, then cover it late September/1st October with metal roofing. I then haul 1/3 cord at a time un on the front porch, stacked neatly in a rack, then repeat that as I burn it. We have very litte to no snow in N. Ga.(where I live) so this system works good for me. Even if rain/moisture blows in on the sides where the metal is not covering it, I haul it up to the front porch a couple of days before I need it, thus giving time for it dry back out if needed.
SG
Todd
Minister of Fire
My thinking is if you stay over 1 year ahead on your firewood supply, there is no need to cover until late fall or not at all if your like me and bring in about a weeks worth next to the stove. However I am very tempted to build a roof extention on the side of my garage over my wood just so I don't have to worry about brushing snow off the piles and to keep out of the weather.
Attachments
Eric Johnson
Mod Emeritus
Beautiful stacks, Todd. Wish mine looked that nice. I bet my neighbors do, too.
I totally agree about being a year ahead on the wood. It makes everything SO much easier.
I totally agree about being a year ahead on the wood. It makes everything SO much easier.
velvetfoot
Minister of Fire
jpl1nh
Minister of Fire
Now that's a nice set up. Wish I had a porch attached to my house that would hold even a cord, let alone 4-5. Oh well, keeps me in touch with nature..Adirondackwoodburner said:Hey, I am glad that I started this post, great questions etc. Well, I get all my wood cut/split/stacked by mid May. It is in a pretty sunny spot and I usually leave it uncovered until mid June and then cover it with 8' sheets of metal roofing. On top of the roofing I place decent sides rocks to keep it from blowing off. Two rows deep of wood I usually use two sheets overlapping and slightly sloped to one side therefore allowing the rain to simply run off. Sometimes I take scrap 2x4's and run it on top of the wood before putting the metal on allowing some distance between the wood and actual metal.
Come mid september, I use my ATV and dump trailer and haul it down to my house (about 500'). I have an attached screen porch/patio (concrete floor) where I stack it full of wood. The patio is directly off my kitchen and from the kitchen its a quick firewood carry with my canvas carrier to my wood ring located next to my stove. IT is really nice to be able to load the ring in my slippers never having to go outside in the elements! I can stack about 4-5 cord on the porch. I will basically keep replaceing what I use off the porch with ATV trailer loads until I can no longer access my woodpile with the ATV, so basically I start burning it from the porch in January depending on the snow..
colsmith
Feeling the Heat
Todd's wood piles are incredibly tidy and unobtrustive. I imagine my neighbors would also like us to do that, although when trees are leafed out you can't see much of our yard from the road. We have long rows of wood piled all over an area of our yard north of our driveway. We didn't have a master plan, I quickly put two long pieces of an old ladder down in a likely spot before some neighbors brought some firewood over almost two years ago. Then we put another row about 5 feet behind that one. Then another one nearby, then another piling area by the driveway, then another pile here, then another there, they aren't all parallel. We like them spread out in the sun and wind for better drying, so they aren't too close together. We worry about the carpenter ants that sometimes come along for the ride, so we wouldn't keep that much wood right next to our house. We don't cover most of it, but we cover in the fall with tarps the things we will be burning in the winter. The tarps look crappy, we are thinking of not covering so much, but we had a LOT of snow this winter, so we were glad we did. We keep about a week of wood on the front porch and under our hearth. Hubby wants us to build a wood shed, I pointed out that I have been waiting a lot of years for a garden shed and that has to come first.
Robbie
Minister of Fire
I think all wood should be covered on top all the time after splitting until used. If it's covered on top, it won't allow any rain or moisture to penetrate down into the wood pile where it could possibly excellerate rot.
Of course I have no proof of any of the above, but it just makes sense to cover on top. Then the sides can get the air and sun that is needed to dry well over several months.
I recently had one pile uncovered for a week and it rained all day one day. I found the wood still very wet several feet down and was soaking wet after a week.
Now...........think about continuous rain, all summer and into fall, never unstacking to let it dry, only waiting until fall to finally cover it and allow a couple months for it to dry............not me.
It's hard enough getting wood to season well enough in time as it is. And seasoning is one of the most important things we must do I think, besides stove maintenance and safety.
Robbie
Gooserider
Mod Emeritus
I recently described my "recycled road sign" woodshed elsewhere, and would be the first to admit that from some angles it's more than a bit of an eyesore - something about retroreflective orange... :cheese:
However my larger and newer shed is a bit better looking, and I think is a bit of an enhancement on the earlier design. It holds about 6 cords by my calculation, it would be hard to make larger, and that would make it a bit of a pain to get the wood in and out of it, and possibly make it somewhat less effective at drying, though not terribly so. However one could easily "modularize" it and build something much larger if desired. This size is largely determined by what is available in stock lumber sizes at HD.
The cost was reasonably low, even using mostly new materials from Home Despot, approx $500 last summer.
The first requirement is an area of reasonably flat, level ground approx 8'x16' - it needs to be flat enough to put the base rails on and have them mostly supported, and level enough that the piles won't tip - I'd say a couple inches up and down won't matter, but don't have much more than that...
I used PT lumber for anything which touched the ground, which included the base frame and the four corner uprights, the rest was regular stuff. The first part to build is the base frame, this needs to be no more than 8' wide, and consists of as many pairs of 16' PT 2x4's as you will have rows, which is determined by your stoves optimum log-length... My smoke dragon likes 24" logs, so I planned for 4 rows, shorter log length users might want 5 or possibly 6 rows. I put each pair 18" apart, with a 6" gap between pairs - ( if X = board, then X 18" X 6" X 18" X 6" X 18" X 6" X 18" X ) note that 3" of the stack hangs out on each side! These boards define the stack rows and keep the wood off the ground. All the boards are on edge, and are screwed into another 2x4 that runs across each end.
In each corner of the base frame, I put an upright 2X4 to support the end wall and roof. To pitch the roof I made the uprights in two pairs, a short pair that went on one long side, and a taller pair that went on the other.On my shed I made them 6' and 7' long, in retrospect I wish I had made them each 6" or a foot longer. Those in areas with heavy snow loads might want more of a difference so as to get more pitch. I screwed these into the base frame from both directions both to reinforce the base structure and to help make it a bit more rigid. I tied the tops of the uprights together with more 2x4's, 16' on the long sides and cut to match my pitch on the ends.
I found this seemed a bit wobbly, so I added a third 2x4 rafter lengthwise down the center of the roof, and put a 2x4 center post under each rafter Since the middle rafter didn't line up with any of the bottom frame members, I bridged across two of them with one of my 2x4 scraps to make a footing for the middle rafter support. I cut the center support rafters a little bit over length and jammed them in, in order to counteract any tendency of the roof to sag, and to make the rafters into stressed members.
Across the ends of the woodshed I put a 6'x8' section of prefab stockade fencing from HD - this gives reasonable weather proofing while still allowing some air to flow through, and keeps the piles from coming out the ends of the shed. It is less expensive than any suitable ply, looks fairly good, and was a perfect fit for the design. Because of the height of my uprights I had to trim some of the pickets on the low side. NOTE, put it so that the cross members are on the OUTSIDE of the shed - If you put it with the picket side out, the weight of the wood might push the pickets off...
For the roof, I put a bunch of recycled porch floor boards across the rafters on a diagonal (set by the length of the recycled boards), then put down a roof of clear corrugated plastic (PLEX?) which only the larger HD's carry. This stuff comes in white, green or clear - I chose clear for the benefit of whatever solar gain it might give me, plus I thought it looked best. I also got the shaped foam blocks you are supposed to use when mounting the stuff and the recomended rubber washer equipped screws. The specs on the stuff say you are supposed to support it at least every 24", I pushed it because I had added the extra floorboards, If I hadn't added them, I probably would have put in two more 16' rafters and support posts. The other thing I ran into is that the panels came in 8' or 12' lengths, because of my roof pitch, I really needed 9' - I opted to cut some extra panels into 2' lengths and extend my 8' panels a bit extra (the installation specs require a minimum 6" overlap) It was a bit of a pain, but it works and looks OK. I think you can get the panels in 10' length at a disproportionately higher cost, but this might be a better choice for those using a higher pitch roof.
The result was a shed that is open on the long sides, holds a great deal of wood, and does not look that terrible (I would define it as "rustic but not hillbilly") I didn't totally dodge the road signs, I placed a couple against the center uprights as I was filling the shed to divide it into 4 "bays" that I filled in sequence as I got my wood cut and split - I started filling it in June, and finished in Sept - I then used it in FIFO order, and all the wood was reasonably dry when I burned it.
For winter, I used tarps from Harbor Freight, I reccomend the more expensive SILVER heavy duty version, there is a DEFINITE difference in the quality, and the silver isn't as obvious or tacky looking as the blue ones. I found the 4'x7' worked best - I stapled them to the top rafters, and let them hang down (sometimes needed to tie the bottom to prevent flapping) - I would roll them up and secure them with recycled lettuce velcro to get wood or for summer drying when I just leave them up.
Hope this helps,
Gooserider
I keep 4 cords in my wood shed and a cord and a half in racks near the basement door (see links to photos below). I like these racks because they keep the rain and snow off the wood yet expose it to sun and wind. The rack is made from:
2 pcs 4” X 4” for the bottom
2 pcs 2” x 4” x 10’ )cut in half) for the uprights
1 pcs 2” x 4” x 10’ for the roof ridge
2 pcs of 10’ electrical conduit
1 pcs 2 x 4 x 8’ cut up for the small pieces
The roof is one piece of 10’ X 8’ plastic tarp cut in half (10’ x 4’). One side of the roof is folded over and sewn along the 10 foot length (thanks to the Mrs.) to make a loop for the electrical conduit. The other side (with the grommets) is just draped over the other electrical conduit and weighted using small splits with hooks screwed into them. The weighting keeps it from getting blown around and sagging from snow.
The rack is 13” wide at the bottom (make it whatever you want) and 30 inches wide at the top and holds a 10’ x 5’ rick. You either have to keep a small amount of wood in them at all times or tie them down somehow. I prefer keeping wood in them.
This is neither the cheapest nor the most elegant but it works for me.
http://i169.photobucket.com/albums/u230/kelsmi/IMG_0894.jpg
http://i169.photobucket.com/albums/u230/kelsmi/IMG_0893.jpg
That is one great looking structure....simple yet,effective. I'm going to build a couple of those but, use rubber roofing and carry the cover to the base....again....great design. Only downside......some kid lost a sandbox or a Lion lost their toilet LOL
Thanks,
Mike
Thanks,
Mike
- Status
- Not open for further replies.
Similar threads
- Replies
- 28
- Views
- 1K
- Replies
- 20
- Views
- 2K
- Replies
- 16
- Views
- 2K