
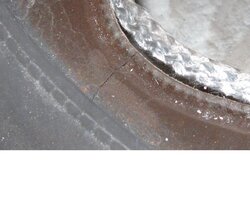
I purchased my Firelight(non cat) about a year and a half ago. So last year was my first full season burning with it. Loved the stove last season, no problems at all, never been overfired etc. So I went to clean it out this morning, to do so I took off the top plate and I found a decent sized crack on the flange underneath the plate. Is this a big deal? Should I call my dealer and see what they say?
Crack on jotul firelight, help
- Thread starter SPED
- Start date
-
Active since 1995, Hearth.com is THE place on the internet for free information and advice about wood stoves, pellet stoves and other energy saving equipment.
We strive to provide opinions, articles, discussions and history related to Hearth Products and in a more general sense, energy issues.
We promote the EFFICIENT, RESPONSIBLE, CLEAN and SAFE use of all fuels, whether renewable or fossil.
You are using an out of date browser. It may not display this or other websites correctly.
You should upgrade or use an alternative browser.
You should upgrade or use an alternative browser.
- Status
- Not open for further replies.
logger
Minister of Fire
Contact your local Jotul dealer rep.
Looks like the crack may have been caused by an inclusion in the casting...
It's located on a gradual radius...
Most stress cracks will occurs at sharper corners...
Looks like the crack may have been caused by an inclusion in the casting...
It's located on a gradual radius...
Most stress cracks will occurs at sharper corners...
Thanks for the replies guys, just called the dealer I bought my stove at, and she said she would order the part for me, I took out my manual and we made sure over the phone we had the right piece. I asked about warranty and she said if there was no warping I'd be fine, but I didn't get a real warm fuzzy on it, I'm hoping I don't have to buy this piece when it comes in.
Also, it sounded like I'll be responsible for installing this myself unless I want to try and drag the stove somewhere, which I sure don't. From the manual it looks pretty simple to take a few bolts off for the top piece and replace. I'm a pretty avid diy guy and good with tools, does this sound like something pretty straightforward to do?
Also, it sounded like I'll be responsible for installing this myself unless I want to try and drag the stove somewhere, which I sure don't. From the manual it looks pretty simple to take a few bolts off for the top piece and replace. I'm a pretty avid diy guy and good with tools, does this sound like something pretty straightforward to do?
You mizewell remove the OEM piece & take a look at the underside of it.
I believe you find that it's gasketed & not cemented to the side back & front panels...
Your replacement piece will probably have the gaskets pre-installed & you can simply bolt it back together...
I believe you find that it's gasketed & not cemented to the side back & front panels...
Your replacement piece will probably have the gaskets pre-installed & you can simply bolt it back together...
DAKSY said:You mizewell remove the OEM piece & take a look at the underside of it.
I believe you find that it's gasketed & not cemented to the side back & front panels...
Your replacement piece will probably have the gaskets pre-installed & you can simply bolt it back together...
Thanks Daksy, that's what it looked like from the diagram, was hoping it was just that simple. Now for the hard part... waiting for the new piece. I'll make sure and go easy on the stove til it gets here, I've only been doing small warm up fires at this point anyway.
If Jotul doesn't want the cracked part back - or even if they do - call the dealer & ask if it's
OK to drill thru the end of the crack to keep it from propagating further, until the replacement is in.
If they say you can do it, use a drill that's slightly larger in diameter than the width of the crack.
Locate the extreme end of the crack & drill all the way thru & then goob (technical term!)
some furnace cement in the hole & the crack & you should be able to burn it normally...
Thanks for all the advice daksy, I just got a call from the dealer, who berated me saying I gave her the wrong part number as she ended up getting the oval plate. I calmly explained to her that I did not give her a part number, that we looked at the books together and I told her part 23-top was what I needed and she then looked up the part number. With a huff she said "Well I'll have to order it!!" and promptly hung up on me. I'm afraid to even ask her about drilling a hole in the stove as I'm sure she'd prob just yell at me some more and hang up. I honestly don't think she tries to be rude but man this woman is hard to deal with, I feel like I'm on defense every time I talk to her. I try to be as polite as I can but wow. I wonder if I can get warranty service going through another shop or a Jotul rep? I'm hoping I can get this part in the next week or so, it's freezin here!!
SPED said:Thanks for all the advice daksy, I just got a call from the dealer, who berated me saying I gave her the wrong part number as she ended up getting the oval plate. I calmly explained to her that I did not give her a part number, that we looked at the books together and I told her part 23-top was what I needed and she then looked up the part number. With a huff she said "Well I'll have to order it!!" and promptly hung up on me. I'm afraid to even ask her about drilling a hole in the stove as I'm sure she'd prob just yell at me some more and hang up. I honestly don't think she tries to be rude but man this woman is hard to deal with, I feel like I'm on defense every time I talk to her. I try to be as polite as I can but wow. I wonder if I can get warranty service going through another shop or a Jotul rep? I'm hoping I can get this part in the next week or so, it's freezin here!!
My next stop would be to talk with that woman in person. If she's the owner, she should know better. If she's an employee, the employer should know.
NO customer should ever have to deal with that from a company that wishes to stay in business. ESPECIALLY in this economy.
pen
Well I finally got my new top and installed it, the person at the store was much more pleasant in person, although still no offer to install the top.
So now I have installed the new top and I cannot get an overnight burn, I must have a leak somewhere. The top was relatively simple, only 4 bolts holding it on. I cranked it down 3 separate times, I was afraid to crack something. I had a fire waited for it to cool each time and cranked the bolts a little more. They are pretty tight now.
I didn't mess with any existing furnace cement that I could see, just the gasket, has anyone else had an issue like this? Should I just get some furnace cement and take it back off and see if I can spot any leaks? The difference is VERY noticeable, before I could never turn my primary air all the way down, now even with it closed the stove burns too fast, which seems a little dangerous to me. I used to get 12 hour burns, now I'm at about 6.
meathead
Feeling the Heat
That's trouble. Looking at the diagram, it seems it would be pretty tough to screw up installing the piece. Are you positive nothing is warped? I wouldn't want to gob furnace cement on where there was none before...maybe take the top off and replace the gasket with a thicker one, then crank it back on?
meathead said:That's trouble. Looking at the diagram, it seems it would be pretty tough to screw up installing the piece. Are you positive nothing is warped? I wouldn't want to gob furnace cement on where there was none before...maybe take the top off and replace the gasket with a thicker one, then crank it back on?
Yeah that's what I was thinking, it's exactly as simple as it looks in the diagram. Replacing the top took maybe 10 minutes, and that's b/c I really took my time and triple checked everything.
I'm wondering if cranking it down may have knocked some other furnace cement loose? Once it cools down the rest of the way I'll pull the top and see if the gasket looks evenly indented. I did make sure and center the top before bolting down too...not sure what the deal is.
With the stove burning good go around the joint where the top meets the stove body with the tip of a candle flame. If there is a leak the flame will be pulled toward or into the leak.
Ok, I went around with a lighter and checked for leaks last night before pulling the top back off. I cannot find a leak anywhere on the top at all. Now where I can find leaks is the frontmost seam on the sides, where the front meets the sides basically. The problem is I can't get in there, as there are two front pieces, an inner and outer. Anyone know how to get in there and fix this seam? It's leaking on both sides basically from the top of the doors until an inch below the top.
I took off the top after checking for leaks just to make sure. I didn't see any black parts on the gasket. I cemented every seam I could see, the one joining the inner and outer top piece was a lil cracked up so I figured why not. I did all the corners that I could see without taking anything else apart.
I put it back together, did a couple small fires to cure the cement, then fired it up about 11 pm with a full load of 2 yr old oak. Same problem as before. Now before the new top, I could always control the fire with the primary air control. I could NEVER turn it all the way down without really almost putting the fire out, it used to sit open only a 1/4" or so for overnights. Now I shut it all the way off and it just keeps climbing until it hits 550 on top. I know this is a reasonable temp, but I don't really get any secondaries like I used to. This morning, at 7am still some coals, I could prob still start a fire, but not like it used to be.
So is it possible that I boogered up the front to side joints just by doing the top? I didn't wrench anything doing it. I'm not sure what to do here, I'm honestly pretty annoyed at the stove dealer, they never offered to come help at all and offered no advice. At this point I wish I could pick that thing up so I could go toss it thru their shop window. No really I wouldn't do that, but this thing is really aggravating me, I'm losin sleep here....
meathead
Feeling the Heat
Seems to be a pattern in the industry for some reason - or I guess maybe the bad dealers are all we hear about. Do youy still have the cracked top? Write them and jotul and tell them it is cracked from an inclusion in the casting and you cannot get the stove to function properly with the new top.
Generally when you spend 2k plus on something, you get some kind of help when something goes wrong with it so soon off the bat. May as well try
Generally when you spend 2k plus on something, you get some kind of help when something goes wrong with it so soon off the bat. May as well try
meathead said:Seems to be a pattern in the industry for some reason - or I guess maybe the bad dealers are all we hear about. Do youy still have the cracked top? Write them and jotul and tell them it is cracked from an inclusion in the casting and you cannot get the stove to function properly with the new top.
Generally when you spend 2k plus on something, you get some kind of help when something goes wrong with it so soon off the bat. May as well try
Sounds like a good plan, now that I've ranted and calmed a lil bit I will try the stove shop one last time and see if I can get the number of a Jotul rep. I do still have the old top, they asked me to bring it back when I had a chance, but I'm waiting until my stove is working right(and safely) before I do that.
ansehnlich1
Retired Hearth.com Member
I've had the top off my OSLO to replace the baffle plate. I didn't tighten it down hardly at all when I put it back on, the thing was so heavy I figured it could just sit on there and be ok, so I twisted the bolts a little bit and then called it quits.
I've re-cemented areas of the inner corners/seams of my Oslo each summer during the off season. My bet is that's all you need to do. Your stove is likely o.k. other than those vertical seams have lost there seal.
Take a breather, talk to the dealer, IN PERSON if you can, and see what they'll do for you. If nothing, ask that they give you the name/number of the regional Jotul Rep. and contact him/her.
If they won't give you that number, call around to other dealers until you find one that will.
Your final move would be to dismantle the stove and do a rebuild.
meathead
Feeling the Heat
Personally...I wouldn't be in any hurry to give the cracked top away. I can almost hear the dealer as soon as someone walks into the back room out of sight with that top
"It was an overfire, sir - you over fired your stove. The top was clearly warped. No, we don't have it any more, we threw it away why would we keep a warped top plate?"
"It was an overfire, sir - you over fired your stove. The top was clearly warped. No, we don't have it any more, we threw it away why would we keep a warped top plate?"
ansehnlich1 said:I've had the top off my OSLO to replace the baffle plate. I didn't tighten it down hardly at all when I put it back on, the thing was so heavy I figured it could just sit on there and be ok, so I twisted the bolts a little bit and then called it quits.
I've re-cemented areas of the inner corners/seams of my Oslo each summer during the off season. My bet is that's all you need to do. Your stove is likely o.k. other than those vertical seams have lost there seal.
Take a breather, talk to the dealer, IN PERSON if you can, and see what they'll do for you. If nothing, ask that they give you the name/number of the regional Jotul Rep. and contact him/her.
If they won't give you that number, call around to other dealers until you find one that will.
Your final move would be to dismantle the stove and do a rebuild.
Hmm interesting that you got a seal without cranking it down, I was curious how tight I'd have to go. I think you're right on the vertical seams, from the lighter test I did that seems like what it is. The problem on mine is I can't figure out how to get to the vertical seam without taking the whole front apart. There are two pieces to the front an inner and an outer, and I can't see how I can get to the seam in between them. I'm afraid if I take the whole front off then I have to do the bottom seal too. I think I will take the advice of seeing where I can get with the dealer/rep then as a final resort rebuilding myself.
meathead said:Personally...I wouldn't be in any hurry to give the cracked top away. I can almost hear the dealer as soon as someone walks into the back room out of sight with that top
"It was an overfire, sir - you over fired your stove. The top was clearly warped. No, we don't have it any more, we threw it away why would we keep a warped top plate?"
Hehe, this is exactly what I was thinking, this way I can always show the Jotul rep too. I will gladly hand over the top when my stove has been fixed.
BeGreen said:The top hold-down bolts are not required. In England, they leave them out after installation.
Are you talking about the two that hold down the oval plate or the four that hold down the whole top? I knew the two weren't required, but they give me a warm fuzzy lol.
So I called Friday, they said they would call the Jotul rep and call me back, so far...nothin. I cannot for the life of me figure out how to access the upper part of the seam between the inner and outer front without a big disassembly or else I'd try cementing that.
As was stated the bolts are to hold the top in place during transport. The weight of the top is all that is required to hold it in place once installed. I would guess if you cranked it down tightly you might compress the gasket in those spots creating a path for air to enter their if backed off after tightening or in another area on the top due to the uneven pressure created by torquing down the shipping bolts..
polaris said:As was stated the bolts are to hold the top in place during transport. The weight of the top is all that is required to hold it in place once installed. I would guess if you cranked it down tightly you might compress the gasket in those spots creating a path for air to enter their if backed off after tightening or in another area on the top due to the uneven pressure created by torquing down the shipping bolts..
When I first put it on I just barely snugged the bolts, it leaked. So I tightened em down some, still leaked. The weird thing is, if I run a lighter around it I don't think the top is leaking, I think it's the side joint.
- Status
- Not open for further replies.
Similar threads
- Replies
- 3
- Views
- 597
- Replies
- 10
- Views
- 787
- Replies
- 5
- Views
- 654