Cribbing experts, or anyone, I need help...lol

  • Active since 1995, Hearth.com is THE place on the internet for free information and advice about wood stoves, pellet stoves and other energy saving equipment.

    We strive to provide opinions, articles, discussions and history related to Hearth Products and in a more general sense, energy issues.

    We promote the EFFICIENT, RESPONSIBLE, CLEAN and SAFE use of all fuels, whether renewable or fossil.
Status
Not open for further replies.

Ram 1500 with an axe...

Minister of Fire
Mar 26, 2013
2,327
New Jersey
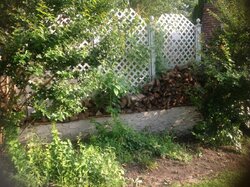
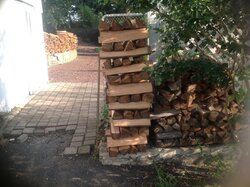
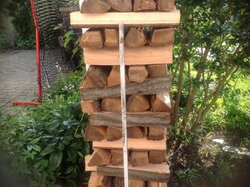
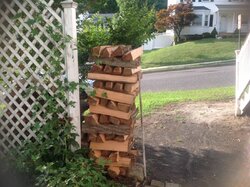
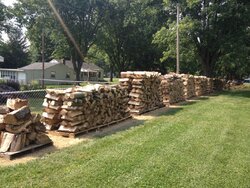
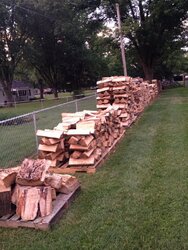
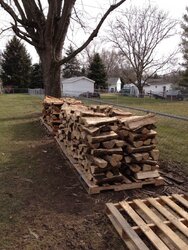
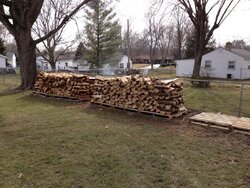
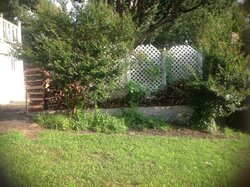
With all this red oak that I have, I am trying to fill an outer wall that will be facing neighbors houses as well as them driving by and seeing it, so I am trying to make this look as nice as possible, I have never built one before on top of it, it will be about a 22 ft wide single row that I will try to get up to 6-8 ft high, definitely putting book ends but possibly putting one in the center, if I can't make the first one on the left look good then I will forgo the others. Also the one on the left needs to be stable as I have kids walking by it all the time. I will be showing you the space that I am going to fill up with 100% red oak, it will not look like it does now in these pics, this wood will be moved out and the plants and weeds will be out and gone, all you will see is red oak in front of a planting bed so please imagine that as you comment, this space should hold 1 3/4 cord when all is done. All this being said, please critic my first cribbing attempt, I can tare it down in minutes and start over, I really want to do this right, if you have pics please post, I thank you all very much.....

image.jpg image.jpg image.jpg image.jpg image.jpg
 
Well, in the last pic, it's leaning to the right. In previous pics, it's leaning to the left.
Put some wood against that, and it''ll likely topple.
The first 6 layers are looking pretty good, then the lean begins....it's fairly obvious.
I applaud the first attempt. I hate doing it. Some others will be along to help.
 
  • Like
Reactions: HDRock
Great thank you, so rip it apart after the first 6 layers?
 
I am hand splitting and trying to pick out splits that are more similar but I guess some are wider then others?
 
I typically build my box ends as I build my stack. I never stack a box end all the way up bc it will not support the stack. Try going up layer by layer and add a box end layer with each layer of the stack. Build them as if they are one piece and not separately and I think you will be fine.

image.jpg image.jpg image.jpg image.jpg
 
If U split by hand U will have a hard time cribbing, but it's just a matter of size n shape
 
I would not recommend going any higher than 5', 6' tops.
Trust me on this, the taller you go with no walls to support, the more chance it will fall.
Even if it is stacked perfect, when the splits start to dry, the wall of wood will shift.
I had my drive through stacks at about 7' to 7-1/2', and they were straight, until the the drier they got, the more the stacks shifted, and fell.
I am sticking with 5'to6' and that seems to be holding well. slight shifts but not leaning tower of wood.
 
Thanks guys, yes all split by hand, should I try to trim the big ones down? I'm trying to pick out solid medium sizes
 
Some splits will work, others just will not
 
They can be a lot easier to get stable if you make some square/rectangular spits. I still wouldn't want my kids walking anywhere near my stacks that are taller than I am. If one falls over on somebody it is going to hurt really bad.

imgp9554-jpg.102069
 
Be willing to change the splits you use on the end as you build the row. You may come across a better piece. I always give my end pieces a slight shove, to make sure they are stable. Any question, tying a rope around the splits that run the same direction as the pile, with the end trailing over the layer below toward the middle of the stack and stacking the current row on top of the rope, ties the end in nicely. Another option is to deliberately gradually angle the stack toward the middle: start at ten foot width at the bottom, end up with 7 or 8 foot width at the top. Makes for a very stable pile when there are no end supports. Just make sure you go to the end of the pile and sight along the long sides occasionally to make sure the entire pile isn't leaning to the front or back. I can't drive stakes into the ground because I'm on bedrock, so I often make my stacks slightly pyramidal. All these techniques come in handy when you are hand splitting and cannot easily get nice square splits for the ends.
 
  • Like
Reactions: Trilifter7
Save those big splits for overnight burns. You'll be glad you did.
 
  • Like
Reactions: Hills Hoard
When building the cribbing, start with the outside pieces. Fill in the middles after its structurally sound.
 
  • Like
Reactions: Backwoods Savage
If your going 22 feet wide, definately put a cribbed row in the middle.
Your looking for trouble if you go too high
maybe you could tie into that lattice fencing somehow
 
  • Like
Reactions: Trilifter7
When building the cribbing, start with the outside pieces. Fill in the middles after its structurally sound.

I somewhat do the same. I Pick and choose the best pieces for the box ends and start each row on the ends then build the middle after each box end is filled
 
  • Like
Reactions: Backwoods Savage
They can be a lot easier to get stable if you make some square/rectangular spits. I still wouldn't want my kids walking anywhere near my stacks that are taller than I am. If one falls over on somebody it is going to hurt really bad.

imgp9554-jpg.102069
That picture looks great. Thank you all for the advice that you guys are giving, I have a better idea of what I'm going to do now, thanks
 
Take a step back every couple layers and look at it.
If it starts leaning, fix it right then. It's easier that way.;)
I agree with Hog too, don't go more than about 5' high. My stacks (with end posts) like to get a lean going after just a couple months in the sun and wind after they start shrinking and settling.
I give 'em a chest bump every few days.....I really need to find another way, 'cause that sometimes hurts.:p
 
  • Like
Reactions: NortheastAl
They can be a lot easier to get stable if you make some square/rectangular spits. I still wouldn't want my kids walking anywhere near my stacks that are taller than I am. If one falls over on somebody it is going to hurt really bad.


I've got kids running around the backyard. So I'm not stacking more than 4 feet tall, and with the cinder blocks and landscaping timbers, it puts it 5 feet off the ground max.

Lot more stable that way. Last thing we need is a collapse. Plus it's easier to measure how many cords I have that way.
 
The cribs are easier to build with just two splits per level, then you don't have to try to match up as many pieces. You never get all those pieces the exact right height, and the next level will be rocking. I would put t-posts on the ends for sure, and maybe along the front between the cribbed stacks. That will keep it from falling on the kids but what if it goes the other way? It'll take out your fence! You will have to keep an eye on it and try to pound it back with a hammer if it starts leaning out. If you absolutely have to go higher than 5' or so, you might want to build a rack, I think you can go 8' then maybe....
First order of business; In your second pic, you need to remove that log, buck and split it before you get any more wood stacked on it. ;)

You could just half-arse the ends like I do if you're going to have t-posts anyway. This one was pushing the limits. Just add the cross-pieces more often for more stability. Angle the cross-pieces up.
002-6.jpg
 
Like others when I'm stacking I keep my best squares/rectangles for the ends. When I first started I would use a level to check each layer as I went up, now I don't bother but I've cribbed who knows how many ends at this point.

Also the ends really don't hold back much weight, I stack in 24' rows with no cribs in the middle. Stack from the center out and the ends only need to hold back a few pieces of wood.
 
as said previously, i wouldn't build the ends first then stack between...built the box end pattern (never knew what it was called until now) into the end as you stack the main stack and it should be a lot more stable....

NOTE: i'm no expert, ive only done a few of these. It just works for me!
 
Thanks guys, yes all split by hand, should I try to trim the big ones down? I'm trying to pick out solid medium sizes

What big ones?

Cribbing is not all that difficult. One thing to keep in mind is when you build a barn or house or anything like that, the first thing you do is build a foundation. Same thing with cribbing ends. That foundation can make or break it. Another difference is that you are building the foundation all the way to the top! It does not matter if you split by hand or use hydraulics, you can crib easily doing it either way.

I do tend to split lots of rectangular pieces which do help on the ends. If I don't have enough of them I'll usually go at least half way up with them then using the triangular pieces above that. I also agree that many times I'll lay only two splits per layer and then fill in later. I like to fill in with some kindling because then if I need some it is easy to get at but you can fill in with anything; just be sure whatever you put in there has to be shorter than the outside pieces.

I do not build the entire end. Most times when starting a row I'll build the ends up 3-4 layers then fill in the rest of the row. Then make 3 or 4 more layers etc. I've never found it necessary to "tie in" with longer wood as in over 50 years I've had exactly one stack fall over, so I simply do not worry about it.
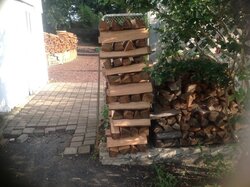
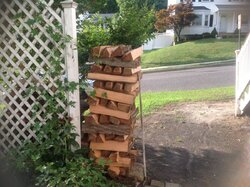
image.jpg image1.jpg

In the above stacks, both should be rebuilt. Notice that they do not go up straight. This is a prescription for disaster for sure. While it is true that sometimes I'll play around and make a layer out of level, just out of curiousity, most times after I lay that 3-4 layers, I'll then make sure everything is straight. Lean over the stack and look down on the outside. Can you see each level or is one out of sight? Perhaps one is sticking way out from the rest. Perhaps you can detect the fact that you are beginning to lean. For example, looking at the second picture above, had you looked down the outside of that end you would see that the stack is already tending to be out further than the bottom of the stack. That's okay. Now you only have that 3-4 layers to adjust before you continue stacking. In the first picture, again by standing up and leaning over the stack you will detect the lean in the stack and can straighten it. Remember, it is easier to straighten it now than after the complete stacking is finished. For those who have wondered, I do not use a square or level. I just eyeball it.

Something else that stands out in those ends are how they are built, especially the outside pieces (the inside pieces don't matter so long as they are not higher than the outside pieces). Looking at picture 1 and look at the very bottom row. Notice pieces 1, 3 and 4 (left to right). It is difficult to tell but it appears the next layer is not touching that number 1 piece. Number 3 might be a bit higher which will make it a bit tipsy. Piece #4 is put in backwards. The high part of the split needs to be on the outside and not the inside.

Now lets' look at the third row. Remember, this is the bottom of the foundation and we need to be very particular with these. Looking at row 3 vs row 1 we can see that they are sort of offset. They should have moved a couple inches to the left. Again, that first piece on the left looks like a dummy. That is, it appears the next row does not sit on this piece at all. A weak spot. Look at the middle 2 pieces. Are they too big? Look at the piece on the right. You can see it is not sitting directly on the piece under it. While here, look at the very next row on top of it. Can you see those also are shifted a bit to the right? This should give you a good idea of our thinking.

One more thing. It appears you want to make another row at a right angle from the cribbed one. This is fine but that row has to be cribbed also. If it is just leaning on the other cribbed end, you have two forces against that crib and therefore it could become a weakness. So more cribbing is in order.

Finally, in picture #2 you can really tell what you have by setting a straight edge up there. Build a good foundation and the house has a better chance of lasting a long, long time.

One more thing. You don't need much but it is a good idea when you are filling in between the two ends that you make the middle of the row a bit higher than the ends. This way when you cover it and it rains, the rain should flow off the cover rather than sitting there. In other words, you sort of make a pitch to the roof.

I hope this helps but if I have not worded it correctly, please ask about it.
 
Status
Not open for further replies.