Cutting into wood floor for hearth help

  • Active since 1995, Hearth.com is THE place on the internet for free information and advice about wood stoves, pellet stoves and other energy saving equipment.

    We strive to provide opinions, articles, discussions and history related to Hearth Products and in a more general sense, energy issues.

    We promote the EFFICIENT, RESPONSIBLE, CLEAN and SAFE use of all fuels, whether renewable or fossil.
Status
Not open for further replies.

CarbonNeutral

Minister of Fire
Jan 20, 2009
1,132
Nashoba Valley(ish), MA
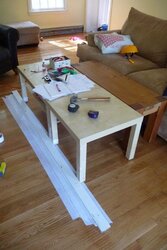
So that our hearth pad is flush with the existing wood floor, I am cutting a section out of it.

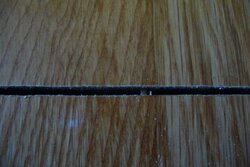
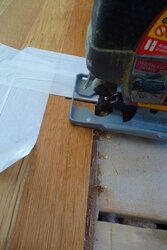
I have made a few test passes with my circular saw set to the correct depth, but it is chipping out some of the wood. In the section that stays this will be a problem.

Any hints how to cut through and stop it chipping out? When I do the real edge I will also be running it up against a guide if that makes the slightest bit of difference...
 
You can minimize the chipping by using a fine toothed plywood blade ( most are not carbide tipped, just plain steel). Also take a square and with the blade at max extension(unplugged of course) set your platen square to the blade, those degree marks are only a reference. The trick here is not to rest any part of the square against the the saw teeth. A small inexpensive plastic triange with the 90deg. corner knocked of a bit for clearance will work fine. Get some double sided tape and a straight edge long enough for your cut, stick the edge unit down to the floor for a guide leaving enough room for the platen to ride agains it and the blade to be where you cutting line is. a common problem of chipping out is caused by the operator not holding the saw true to the line of cut, hence the back edge of blade frays the cut. hope this helps some.
 
Some woods are more prone to chipping and also sometimes the finish on the wood can make it worse. If I was doing this same thing I would use a fine tooth finish type blade as suggested above. I would also use masking tape to protect the adjacent floor. But in addition I would very carefully with the help of a straight edge score my line with a razor knife before I cut. This technique works well when cutting off finished door bottoms etc..,
 
Nice, I will go find myself a plywood blade, check the sq, protect the floor (I did notice some scratching by the bottom of the saw), and score on the outside edge of the cut.

Thanks.
 
Lay down some 3" masking tape then cast your cut line on the tape.
 
You can also make a zero clearance plate for the bottom. It's basically a quarter inch plate that attaches to the bottom of your circular saw that you then lower the blade through. Does wonders for eliminating tear out, even with a cheap blade.
 
cmonSTART said:
You can also make a zero clearance plate for the bottom. It's basically a quarter inch plate that attaches to the bottom of your circular saw that you then lower the blade through. Does wonders for eliminating tear out, even with a cheap blade.

Out of perspex - or even wood I suppose?
 
You are only cutting into the finish floor, right? Not the subfloor?

Peace,
- Sequoia
 
I was planning on cutting the subfloor, but not the decking - is that a problem?
 
CarbonNeutral said:
I was planning on cutting the subfloor, but not the decking - is that a problem?

Do you have 3 layers then ? Decking (2x4 or 2x6 nailed on to floor joists), then subfloor (plywood or 1-by-?), then finish floor? Or by decking are your referring to the framing (floor joists)? Typical modern construction has floor joists, plywood subfloor, finish floor. Older construction has floor joists, 1x6 (usually) tounge & groove subfloor, sometimes diagonally, then finish floor. Then there are "other" arrangements. My house, for instance, has 2x6 joists @ 3 ft. on center (instead of the more common 18"), then 2x6 decking as subfloor (NOT t&g;), then the finish floor. Therefore, the 2x6 "decking" (subfloor) is part of the framing and cutting into it (for more than minor penetrations) would compromise the structure to some degree).

The subfloor, like shearwall panels or the diagonal bracing that was used before shearwall, is part of the structure of the house and cutting into it COULD compromise structural elements, depending on where you're cutting, how big, etc. Examine your floor structure (from underneath) and see if you will be compromising strength for asthetics. If you're not sure, check with a building pro before proceeding.

Peace,
- Sequoia
 
From basement upwards - 2 by 10s, 16 on center, 1 by 6 pine boards running perpendicular then STOP...

Sequoia, you have just saved me a lot of hassle - for some reason I was convinced I had joists, decking, subfloor, then wood floor, so the removal of the first subfloor did not give me concern. In fact, I'm sure somewhere in my house I do have this, BUT, most importantly, I don't have this in the lounge.

So I have to rethink this section as the floor will now be a little proud (I have clearance issues for the flue exit as well....)

Thanks again.
 
Ivy said:
Are you cutting because you don't like the idea of a raised stove?

Why not just build right on the wood floor?

Yes, we have younger kids, plus plenty of friends with younger kids, so we didn't want a big lip, AND we have clearance issues with the rear flue unless I use short legs.

But now it would seem that I have to have a lip of some sort because I got the subfloor details wrong
 
Lay down wide masking tape, lay out the cut line on that, use a nice straight-edge and score the flooring wood as deeply as you can with a utility knife. Multiple passes and new blades and patience will serve you well. Then you can cut it with the circular saw right along that scored line with little or no tear-out. Rick
 
Masking tape, score before and a fine tooth blade . . . few chips.
 
For once, I have to agree with Pook - or what ever he is calling himself this week. If I had to do it with a circular saw: Masking tape up the base so you don't make scratches in the floor, put 3-4 extra layers of masking tape on the front edge of the saw base where it will contact your guide. This will give you a fraction of a degree of cant to the saw blade so it won't rub on the cut edge you've already made and splinter the wood. Plunge the saw in, then very slowly, gently pull backwards so the teeth cut down into the floor. There should be almost no splintering on the cut because the blade is going down and no splintering on the front because your tape is holding the blade just a fraction of an inch off the wood.

Just be extra careful - if the saw starts to bite, it can really take off on you. If you have a router, I'd probably choose that over the saw. Make one shallow cut to define the edge of the cut out, then just make successively deeper cuts till you get what you want and finish up the corners with a sharp chisel.
 
Carbon ... if you're worried about folks stubbin' their toesies on the hearth pad, just use some beveled or 1/4 round moulding at the edge (past the req'd clearances, of course). Personally, I'd go w/ beveled - nice clean look, easier to miter the corners vs. the 1/4-round. Either one will minimize, if not eliminate stubbed toesies. And the raised hearth pad will form a natural "buffer" to the hot stove.

Peace,
- Sequoia
 
Eh - I cut a couple dozen sheets of oak plywood for cabinets pulling the saw backward just like you said. I could do it with 'little splintering' just pulling the saw backward, but to really get 'essentially none' I had to make sure the other side of the blade didn't contact the 'good side' of the already cut edge on the 'upswing'. Maybe a person could get lucky and their saw has a fraction of a degree of twist built in - or maybe mine is just crap and the blade twists the other way by a fraction, but a bit of tape cured it.
 
TreePapa said:
Carbon ... if you're worried about folks stubbin' their toesies on the hearth pad, just use some beveled or 1/4 round moulding at the edge (past the req'd clearances, of course). Personally, I'd go w/ beveled - nice clean look, easier to miter the corners vs. the 1/4-round. Either one will minimize, if not eliminate stubbed toesies. And the raised hearth pad will form a natural "buffer" to the hot stove.

I put our insert in late last fall. I almost ran into trouble with clearances since I forgot to account for the thickness of the two layers of thinset :roll: . I still haven't added the wood trim and have over an inch of a step up to cover. Sort of worried that the wood floor under the cement board might expand with humidity in the summer but no visible problems yet. Fortunately I used a metal edge on the tiles so it doesn't look horrendous.

The hearth is a no traffic zone so tripping isn't an issue. The kids seem to understand that a hot insert is not to be played with, however open door while reloading is not an obvious hazard to them.

Kevin.
 
Thanks to all - job done. Friend had a plywood blade that I used, I laid tape to stop scratching, and a guide on the side of the cut that mattered...

A few test cuts showed that the blade did not chip out, so I didn't bother scoring. Pics below.

I messed around for ages trying to decide how to cut the two planks that I could not get the circular saw all the way across. Ended up scoring the cut line, drilling a 3/8 hole, and using a jig saw - figured cutting an inch of the subfloor as well was not an issue.

Not a single chip - all looks great, now to the ceramic board....
 

Attachments

  • P1050327.JPG
    P1050327.JPG
    42.7 KB · Views: 171
  • P1050328.JPG
    P1050328.JPG
    38.9 KB · Views: 160
  • P1050329.JPG
    P1050329.JPG
    38.9 KB · Views: 199
Status
Not open for further replies.